My Layout ...


Patrick I would run blue painter's tape along side of the roadbed. The glued ballast may get on it but when you pull the tape up you will have a pretty straight line. I also put white glue on the 2 edges of the roadbed (cork) then sprinkle ballast on it. IMO you get better edge coverage.

For a long time I used a ballast spreaders but I have for the last several months put ballast in a dixie cup and spread it by hand. Just the way I do it.

I'm not criticizing but passing on some things I do.
 
I hate to say it so late (looked at this thread for the first time this morning....sorry...), but the cork roadbed is too broad for the tie lengths. You could rip it up, or you could cut off about 1/4" in a long strip. I would consider a razor saw or a cut-off wheel and a Dremel. Also, if you don't mind my honest opinion, the ballast grains are oversized. Typically, ballast measures something like 1.5" X 1" in the prototype. These look about twice that size.
 
Too much to tear up the cork at this point. Cork is the standard split stuff that's been around forever. The ballast is W\S course.

I made a different attempt the next 2 feet of track. We'll see if that's any better. I'll post after it dries. I do see now why you guys wet the ballast before adding the glue. I do know I shouldn't have to pick the stuff off the rail sides as I dealt with that no rather than later.
 
Regarding the ballast, don't put quite so much in the center, leave a slight depression. I use an old 3/4" paintbrush to spread it and get most off the tie tops. Once I get the glue/water/ few drops of Dawn detergent mixture applied after wetting everything with rubbing alcohol/water, if that's what you use, fold up a paper towel and blot the ties, brushing off the towel between blots. That will get rid of most of the stuff on top of the ties. After 35 years, I still get some stuck to the inside of the rails which I remove using a small screwdriver as a chisel. Dental picks are just as effective.
Regarding Curt's comments. His idea about using the painter's tape works, but I feel that it is an extra step. I use the same 3/4" brush to brush the ballast into my preferred profile before wetting it down. I don't have a problem with excess ballast and I just bring my ground cover up to where I want it when I do that later. I find it easiest to use recycled take-out condiment cups, which are essentially smaller Dixie cups.
Regarding 
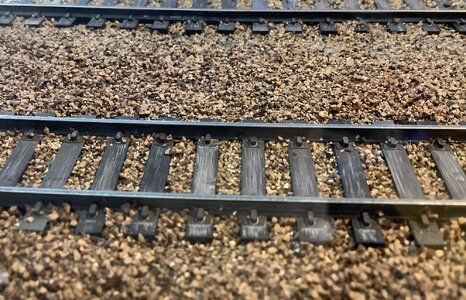
Crandell's comments. To me, HO scale roadbed is too high and too wide for sidings, so I use unsplit N scale on them. It takes a little extra ballast to obtain the right profile, but again I use that 3/4" brush to position everything. In reality, on the BNSF roadbeds near me, the main line ballast looks wider than my layout ballast. Coarse ballast is too large for HO. Medium is better although honestly it is actually too large scalewise as well. But it looks OK. Here is an example using Woodland Scenics medium light gray on the main with the HO cork roadbed, alongside a passing siding using unsplit N scale cork roadbed and medium WS mixed gray.
IMG_6245 (2).JPG

That's a homemade mix of different WS browns with a little gray mixed in, in between and alongside the main. I probably used some fine browns in the mix as well as medium.
I am not being critical of anyone else's methods, just posting what works best for me.
Another shot of a different spot on the layout which shows the elevation difference better.
IMG_6886.JPG

Hope that this helps.
 
Thanks for the insights. The too course kind of makes sense. Of course I was buying cheap...typical me. Explains why it didn't flow through the ballast spreader. So you'd recommend a medium or fine then?

I may be able to salvage part of what I've done. I will say the next 2 feet appear to look better. Hopefully it sticks.
 
If you're using sectional track, it shouldn't matter whether you paint before or after. If you paint flex beforehand, then whenever you bend it even the smallest amount, there will be a bare spot at each tie plate on the moveable rail. My thinking also is that mounting it first holds it in place as well. With all due respect to Sherrel, I use nails as it is easier to remove and reuse track, just remove nails, soak ballast and yank. It is also easier to correct alignment mistakes or "change of mind" situations when (not if) they happen. Gluing the cork to foam works well; there is still enough cork for the nails to bite into, HO scale that is.

i painted my flex track ties prior to installation with an airbrush. After installation, I airbrushed the rails…
There invariably is some touch-up..
 

Attachments

  • 80231CB7-4242-41F3-BE4D-152BD81C20AF.jpeg
    80231CB7-4242-41F3-BE4D-152BD81C20AF.jpeg
    792.1 KB · Views: 91
My trackage was painted prior to thinking about ballasting. May not look it in my pictures.

Once I get a chance again in the basement, I'll get some pictures of part two. I put glue on the sides of the cork and then laid on the ballast. Then spread the ballast dry between the rains and wet it with a little water, then dropped in some of the thinned glue mixture. I my have put a bit too much water, but we'll see. I do think I need a finer ballast though before I continue.
 
OK, I wasn't happy with my results with the course ballast, but you know that...

Found a new model railroad shop in the area and bought 2 shakers of a grey blend I think I'll like better. So now that I have the medium ballast, I began with removal of the course ballast:

Before:

20220717_090053.jpg
20220717_090058.jpg
20220717_090102.jpg


Turns out it was 4' of track to clear. First 2 feet trying a different technique took 2 hours, last 2' took nearly 4 hours. Glue a bit more glue than thinned glue. All I can say is that asking the dentist for any old dental picks was a good ask.

After:

20220717_095426.jpg
20220717_095429.jpg
20220717_164928.jpg
20220717_164931.jpg


First 2 of the after were taken at the halfway point, the last 2 on completion. I think any course ballast left won't really affect the correct final effct I'm looking for. A test on a sheet of paper (so I could recover the ballast shows the medium actually flows through my ballast spreader. You can see where the glue pulled the paint from foam under the trackage. I did clean and test both lines to make sure I didn't damage them after cleaning. I think there may be some cork damage between the ties, but think that will be covered when the new ballast is laid.

Someone suggested my cork is to wide for the track (Atlas Code 100). If I were to trim that down, how close to the ties would I cut it?
 
Just caught up with this thread - promises to be a great layout!

Regarding ballasting: I basically just ballast by hand using a teaspoon. See this post on my layout thread. I have tried all kinds of gadgets but none of them give me the level of control that I want in laying down the ballast. I find that it is a surprisingly intense task for me so I am never able to do more than about 2 feet in one day (perhaps I have excessively high standards :) ).
 
Regarding the cork - width of the roadbed. I found a track plan from the Northern Pacific Railway Historical Society, the actual handbook used for Right of Way back in my era. Roadbed is actually wider than seen on most layouts.

If you are super concerned with prototype, check out your historical society or road photographs of the era. Otherwise, I think it is fine as is.

Dave
 
Thanks Dave.

I wasn't sure I really needed to trim the cork, but then again, I'm not doing full prototype either. Hopefully I can get the ballast working without as much trouble as the course stuff was to get clear. Guys at the train shop said they used medium on the layout at the shop and it looked fine.
 
Nice work. The HO scale cork roadbed is actually a bit narrow as Dave pointed out. It shouldn't be a problem covering up any stray ballast or imperfections in the cork from here.
When I ballast, I use a condiment container exactly like the one pictured in the upper left of your last picture. I do about 3' at a time and if I want to do more in a day, I skip a small area and fill in the next day. I always found that I can't really add dry ballast to the end of a wet section. Just doesn't work for me. I probably already posted that I use medium.
 
Late to the party. Patrick, HO scale cork roadbed is generally narrower then what the real guys engineering departments mandate.

My issue with ballast is even the finer sizes of the name brands in MOO are still too large and the fines from separating your own natural ballast are too fine. Unless they look like boulders to you, no one else will comment

have fun
 
Turns out the bride was made be a French model company called Jouef. When I did a web search it turns out to be no longer made, but the company still sells European models.
It looks a lot like the bridge kit I got from Faller about a year ago. With an available bridge deck kit, you can build a double track version, which is what I did. This picture shows 2 of them end-to-end before I inserted into my layout.
PXL_20210630_221419140.jpg


Here is a pic of it inserted, before I started scenery. I love the viaduct look.
PXL_20211231_022304262.jpg
 
I have a thing for bridges and tunnels, lol. I may end up replacing the viaduct bridge and also the 2 smaller girder bridges leading to it with a few of the Kato double track truss bridges I just acquired. The only thing keeping me from making the change is that its easier to clean the tracks with nothing above the tracks, lol.


Back
Top