My Layout ...


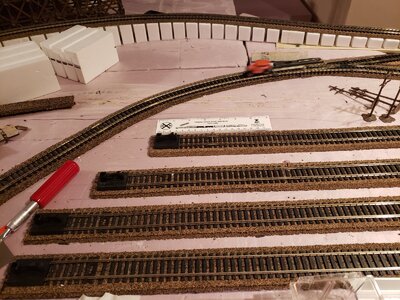
Ok, got started ballasting and then thought I'd better start to plan roads and crossings.

First the ballast:
20220728_152407.jpg

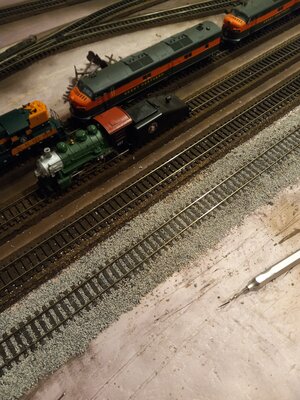
Initially looks a ton better. Thinking a 2 pass method, tracks first then the sides.

Now for the crossings, started by looking in my pile of new material. 1/16th x 1/4, then cut it to 1/8th.
20220728_151418.jpg


Get to the bench and look to the side...a whole pile of material salvaged from the bridge.

20220728_151535.jpg


So, I have a pile of 1/16th x 1/8th already stained to the correct color. Just need to cut to length and save the new material for something else.
20220728_151518.jpg


Just need to cut to length and set into place. I need to figure road widths. I figure I need 4 across, or maybe 3+ some. Once I can get that figured out, I can start the town area.
 
Ok, after spending an hour running trains and cleaning track, decided I attempt ballasting once again.

20221023_145159.jpg

20221023_145202.jpg


Did just the top of the rails and should be set this morning. Thought I'd do the sides on a second pass. You can see where the excess material is on the part I started a while back in the second photo. Still need to figure what I want to go where. I also cleaned my modeling workspace. I will say those dental picks are really darn handy for just asking the dentist if he had any. Even broken!

I know there's some cleanup to do, but this method so far hasn't produced the infamous clumps I experienced earlier. I know it looks like there's a bog clump near the re-railer, but it isn't glued to the layout if it really exists.
 
Ok, Update from the weekend. It's going too slow, but then again, it is summer and it has its own responsibilities.

View attachment 115838View attachment 115839View attachment 115840View attachment 115841View attachment 115842View attachment 115843

You can see where I over sprayed the wall....(dang it more work). SWMBO is aware although she hasn't seen it. As explained in the Coffee Shop (Aug. 2020), I'm using the white side of an emery board to clean the rail tops of paint. It does a good job and doesn't scratch the rails as bad as other things I could use. As seen in the first picture, I'm using Thomas as my test to see where I still need to clear rail tops of paint. The yard area has been cleaned at this point and I still have to finish the outer and main inner loops. I used a camo brown paint from rustoleum. It's really close in color to the paint that Willie uses on his. I think the rails look a bit "rustier" from the side than not. In the last picture, you see a second Thomas. I bought 2 complete Thomas sets years ago for about $30 each, brand new and then found the engine only for what I paid for the 2 sets. I bought a brown ballast that is a lot lighter than the rails are now. Hopefully it will look ok. Otherwise I'll need to mix it some.
I spy Thomas
 
Looks like it's been a while...

First attempt at ballast, what a mess!
View attachment 147131

Can't get a train down this siding, can you see why?

Thank goodness I am friends with my dentist.
View attachment 147133
Took 30 minutes to clear the ballast that got stuck on the inside of the rails and clear the "ties" of the ballast mess.
View attachment 147135
I can run trains on this now but still clumpy in spots.
A picture of my ballast spreader:
View attachment 147136

This is the outside line of my yard area. I have about 2 feet completed. I did vacuum up the lose stuff. Any ideas?
A number of modellers swear you get better sults using a smaller guage
ie
h0 use n gauge
00 use n gauge
i have tried this and it is easier but can prove more costly.
 
Ok, after spending an hour running trains and cleaning track, decided I attempt ballasting once again.

View attachment 154347
View attachment 154348

Did just the top of the rails and should be set this morning. Thought I'd do the sides on a second pass. You can see where the excess material is on the part I started a while back in the second photo. Still need to figure what I want to go where. I also cleaned my modeling workspace. I will say those dental picks are really darn handy for just asking the dentist if he had any. Even broken!

I know there's some cleanup to do, but this method so far hasn't produced the infamous clumps I experienced earlier. I know it looks like there's a bog clump near the re-railer, but it isn't glued to the layout if it really exists.
I would have coloured the track first.trying to paint track with ballast in place is annoying
 
Jaz,

Track is painted, the rail tops aren't. That's why the pink foam base is brown as well. There is a lot of shine there though.

And I deny the existence of Thomas...He's a figment of your imagination! 😉

He's actually one of 2 I have. Back many years ago, I bought on extreme discount 2 different Thomas sets each for less than just buying Thomas only at another retailer. He's mostly there for the grandkids to run on my layout. I use him a lot to test the rails, find the still dirty spots, etc. The grandson (almost 13) has his own N gauge layout he runs once in a while.
Next you'll be saying Ivor the engines not either.
 
Morning,

The promised pictures:
20221113_153215[1].jpg


20221113_153220[1].jpg


You can see the glue solution hadn't settled in yet. I am amazed at how little of the ballast is actually uses. It will be easier to do the sides once I have the tracks done. You can also see my messy attempt. I found a new 2" paintbrush in the garage that really helps level the ballast. I figure if I'm even with the or below the ties, I can make my track crossings accordingly.

Smudge: I've actually heard of Ivor, but I think it was on cable when the kids were small.
 
Morning,

The promised pictures:
View attachment 155827

View attachment 155828

You can see the glue solution hadn't settled in yet. I am amazed at how little of the ballast is actually uses. It will be easier to do the sides once I have the tracks done. You can also see my messy attempt. I found a new 2" paintbrush in the garage that really helps level the ballast. I figure if I'm even with the or below the ties, I can make my track crossings accordingly.

Smudge: I've actually heard of Ivor, but I think it was on cable when the kids were small.
Yeah, was quite popular, I loved the Welsh accent.
 
Hello again....

Had a minute to take a couple of pictures last night while I was downstairs.

20221116_181140[1].jpg


20221116_181144[1].jpg


I hit it with a small brush and see a little cleanup, and then the sides. I think it looks better. I just need to figure out the turnouts. Although I think as long as I keep the working parts clean, I should be ok.
 
Has it really been over a year since I last posted here?

Some progress has been made:

20240204_131050.jpg

20240204_145828.jpg


Ballasting looks better, but still "wet" when I took these. Also note my latest acquisition running with the 3 rebuilt blue box boxcars.
20240204_093920.jpg

Surprised by the metal trucks with real springs:
20240204_093930.jpg

20240204_094443.jpg


I painted the weight the same color as the base, more to stop the rusting:
20240204_122910.jpg
 
I think I need to go through my other blue box loco's and sell off what I'm not going to use. Downside of buying boxloads of stuff at auction for 1 item is that you can't use everything you get.


Back
Top