
You are using an out of date browser. It may not display this or other websites correctly.
You should upgrade or use an alternative browser.
You should upgrade or use an alternative browser.
My Layout ...
- Thread starter Patrick
- Start date
Patrick
Alien Attitude.
I've not had the time lately to get to working on the track. No significant changes yet, but you can see in the pictures how it evoled as I found things that didn't work and changed them. I need to get it setup and take some updated pictures. Especially since the basement has opened up more, still no more train table space yet, but SWMBO doesn't come downstairs...
Patrick
Alien Attitude.
Long time since I last posted.
Got started again on the wooden bridge I started and posted to the Coffee shop. (January Coffee shop, post #1202)
Here's What I took pictures of. I thought I had a couple more. it's the base of the stream, creek, river, etc.
![20220206_135329[1].jpg](https://modelrailroadforums.com/forum/index.php?attachments/20220206_135329-1-jpg.140447/ "20220206_135329[1].jpg")
![20220206_135333[1].jpg](https://modelrailroadforums.com/forum/index.php?attachments/20220206_135333-1-jpg.140448/ "20220206_135333[1].jpg")
I had cut the area out and then had a change in plan. I'm going to put the structure on as a module and then tie it back together. I'll get some additional pictures as I am further along. Structure had it's glue drying when I shut down yesterday.
Got started again on the wooden bridge I started and posted to the Coffee shop. (January Coffee shop, post #1202)
Here's What I took pictures of. I thought I had a couple more. it's the base of the stream, creek, river, etc.
I had cut the area out and then had a change in plan. I'm going to put the structure on as a module and then tie it back together. I'll get some additional pictures as I am further along. Structure had it's glue drying when I shut down yesterday.
Last edited:
BigGRacing
Aka. Gary Russell
I am going to keep my eyes open here as well as I eventually have to add the Sackville River as well
Topherisme
Chris wants more hobby time!!!
Good to see you posting again, will follow along  Enjoy the progress
Enjoy the progress NYC_George
Well-Known Member
I like that bridge. When did you build that?
George
George
Patrick
Alien Attitude.
The big bridge was part of a layout I purchased at an estate sale 10 years ago. It was just too tall to make work on anything I can fore see building. So I finally tore it apart carefully and used parts for the bridge I'm actually going to use. I retained most of the "a" frames intact, but the deck was partially dismantled. It was a very nicely built bridge. I'll try to get downstairs this evening and get some more pictures of my closer to final project.
Patrick
Alien Attitude.
Ok as promised:
Final stream bed. You can see where I hogged out the resting spots for the bridge poles.

The bridge: I added a couple of pieces to the railing ends after this picture was taken.

Bridge in place: Next 2 show the bridge in place. Nothing is permanently placed yet.


The ends are the same height as the cork roadbed.
Finally 2 are pictures with track in place. Nothing is yet fastened into place.


Stream was hogged out of the foam with a sure form rasp. I think I need to make the streambed a little deeper and narrower between the bridge poles otherwise it looks too much like a road. I still have some cleanup and refinishing on the bridge, then glue it up and start working on the streambed. All this before I even have the town figured out...
Final stream bed. You can see where I hogged out the resting spots for the bridge poles.
The bridge: I added a couple of pieces to the railing ends after this picture was taken.
Bridge in place: Next 2 show the bridge in place. Nothing is permanently placed yet.
The ends are the same height as the cork roadbed.
Finally 2 are pictures with track in place. Nothing is yet fastened into place.
Stream was hogged out of the foam with a sure form rasp. I think I need to make the streambed a little deeper and narrower between the bridge poles otherwise it looks too much like a road. I still have some cleanup and refinishing on the bridge, then glue it up and start working on the streambed. All this before I even have the town figured out...
Patrick
Alien Attitude.
Had a bit of time on Sunday, so here ar ethe results so far on my bridge project.


Bridge isn't glued in yet, but the cork bed is, hence the T-pins. Foam base glued back down and the cork was cut out to accept the rail supports which are the same thickness as the cork. I'm overthinking the medium to cover the riverbed in, while I have some lightweight sheet rock compound I wonder if there's something better.
Between this and cleaning the work space and finishing the GP (see Feb. Coffee Shop post #1610), I had a few hours to decompress.
Patrick
Alien Attitude.
Spent a couple hours before the family came to get stuff out of the basement.

Main creek channel deepened and the bridge restained. It took some time to get the extra old glue off where I stripped off parts I wasn't going to use. Looks like in the picture the stain is still a little damp. Dark Walnut was used. Has a dark tarry, creosote look in person. While I didn't get a picture, I also got the lift bridge piece glued and set. Where the lift bridge sits, I used some Atlas 3" straight pieces so I wasn't depending on the flex at the access points. I also made the gap between the layout rails and the lift bridge rails a bit tighter (reduced the gap).
I think before I set the track back in place, I need to get the channel walls constructed. The bridge in the above picture still is not glued in place. I think it would be easier to have it mostly plastered and colored before I set the bridge.
What should I use for the stream "walls"?
logandsawman
Well-Known Member
If you are referring to the stream channel, I would use sheet rock compound or hydrocal first, then paint. Then, I think vegetation along the top of the stream and sand/mud along the channel.Spent a couple hours before the family came to get stuff out of the basement.
View attachment 142220
Main creek channel deepened and the bridge restained. It took some time to get the extra old glue off where I stripped off parts I wasn't going to use. Looks like in the picture the stain is still a little damp. Dark Walnut was used. Has a dark tarry, creosote look in person. While I didn't get a picture, I also got the lift bridge piece glued and set. Where the lift bridge sits, I used some Atlas 3" straight pieces so I wasn't depending on the flex at the access points. I also made the gap between the layout rails and the lift bridge rails a bit tighter (reduced the gap).
I think before I set the track back in place, I need to get the channel walls constructed. The bridge in the above picture still is not glued in place. I think it would be easier to have it mostly plastered and colored before I set the bridge.
What should I use for the stream "walls"?
I don't use very much foam but maybe there is a standard way people do that?
Dave LASM
Patrick
Alien Attitude.
Thanks Dave,
I was not wanting sheet rock compound, but that may be less expensive than hydrocal. You kind of nailed what I'm attempting to recreate. Many streams in my area have a high bank on the outside of the curve and a low sandy\mud\fines bank on the inside of the curve.
I was not wanting sheet rock compound, but that may be less expensive than hydrocal. You kind of nailed what I'm attempting to recreate. Many streams in my area have a high bank on the outside of the curve and a low sandy\mud\fines bank on the inside of the curve.
logandsawman
Well-Known Member
From Amazon I got 15 pounds of hydrocal for $33, free shipping. I wasted about half of the first bag experimenting.Thanks Dave,
I was not wanting sheet rock compound, but that may be less expensive than hydrocal. You kind of nailed what I'm attempting to recreate. Many streams in my area have a high bank on the outside of the curve and a low sandy\mud\fines bank on the inside of the curve.
I love it cause it is hard and solid in 30 minutes or so.
I have a good system, Thinking about making a YouTube so others don't have to experiment so.
When I Google it, there is a train video, but you have to sign in and join and not what I want to do.
The Amazon product is pure, industrial stuff. The Woodland Scenics version may provide better instructions. Not sure.
Patrick
Alien Attitude.
Well,
Some additional shots of new work. This was the last shot posted of Saturday's work.

I also had time to finally fix some areas that tend to derail my 6 axle locomotives. All my 6 axle engines move smoothly across all lines. That is my E7's and an SD-40 I have.
Then I took some time today to do this:

 I have now a complete working bridge. I think I can still add details without compromising the bridge structure. I'm still not sure what water details or leave it as a dry wash.
I did clean the rails, as they needed it. 91% iso and pieces of old blue jeans. Now 2 lines in my have failed, but I think it's a wiring issue as the other 3 lines are fine. Next is to figure out how I want to start the town area and ballasting track. I think I'm at a point to further see where I want to go with the layout.
Some additional shots of new work. This was the last shot posted of Saturday's work.
I also had time to finally fix some areas that tend to derail my 6 axle locomotives. All my 6 axle engines move smoothly across all lines. That is my E7's and an SD-40 I have.
Then I took some time today to do this:
I did clean the rails, as they needed it. 91% iso and pieces of old blue jeans. Now 2 lines in my have failed, but I think it's a wiring issue as the other 3 lines are fine. Next is to figure out how I want to start the town area and ballasting track. I think I'm at a point to further see where I want to go with the layout.
Smudge617
Well-Known Member
Jouef is now owned by Hornby, in their heyday they were the premier model train company in France, but they still manufacture models in France, I've put a link for their catalogue if anyone would like to have a browse.Turns out the bride was made be a French model company called Jouef. When I did a web search it turns out to be no longer made, but the company still sells European models.
Jouef - Train Models, Buildings and Railways
Welcome to the Jouef Homepage! Here you can browse our products and services from the extensive range of model trains to the latest releases.
 uk.jouef.com
logandsawman
Well-Known Member
Lookin good, PatrickWell,
Some additional shots of new work. This was the last shot posted of Saturday's work. View attachment 144874
I also had time to finally fix some areas that tend to derail my 6 axle locomotives. All my 6 axle engines move smoothly across all lines. That is my E7's and an SD-40 I have.
Then I took some time today to do this:
View attachment 144875
View attachment 144876I have now a complete working bridge. I think I can still add details without compromising the bridge structure. I'm still not sure what water details or leave it as a dry wash.
I did clean the rails, as they needed it. 91% iso and pieces of old blue jeans. Now 2 lines in my have failed, but I think it's a wiring issue as the other 3 lines are fine. Next is to figure out how I want to start the town area and ballasting track. I think I'm at a point to further see where I want to go with the layout.
I like the dry wash idea you posited in the Coffee Shop, the paint job does it justice!
Dave LASM
Patrick
Alien Attitude.
All mixed with acrylic paint I had on hand. I'm not sure I could mix it again, but I am thinking dry was with a little greenery. I'm not a fan of brown landscapes. The Kansas Flinthills really aren't much in the late fall, winter and early spring.
This:

It is much prettier in green....
This:
It is much prettier in green....
Last edited:
Patrick
Alien Attitude.
Looks like it's been a while...
First attempt at ballast, what a mess!

Can't get a train down this siding, can you see why?
Thank goodness I am friends with my dentist.

Took 30 minutes to clear the ballast that got stuck on the inside of the rails and clear the "ties" of the ballast mess.

I can run trains on this now but still clumpy in spots.
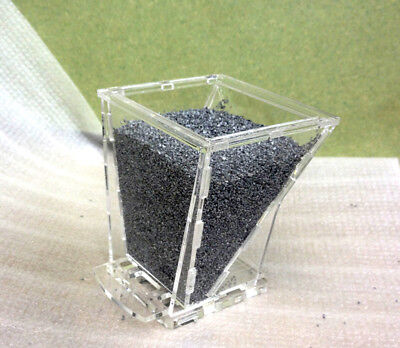
A picture of my ballast spreader:

This is the outside line of my yard area. I have about 2 feet completed. I did vacuum up the lose stuff. Any ideas?
First attempt at ballast, what a mess!
Can't get a train down this siding, can you see why?
Thank goodness I am friends with my dentist.
Took 30 minutes to clear the ballast that got stuck on the inside of the rails and clear the "ties" of the ballast mess.
I can run trains on this now but still clumpy in spots.
A picture of my ballast spreader:
This is the outside line of my yard area. I have about 2 feet completed. I did vacuum up the lose stuff. Any ideas?
Smudge617
Well-Known Member
You could try something like this, it sits on the rails so wont release too much onto the track, there a few different types around, and a bit sturdier too.Looks like it's been a while...
First attempt at ballast, what a mess!
View attachment 147131
Can't get a train down this siding, can you see why?
Thank goodness I am friends with my dentist.
View attachment 147133
Took 30 minutes to clear the ballast that got stuck on the inside of the rails and clear the "ties" of the ballast mess.
View attachment 147135
I can run trains on this now but still clumpy in spots.
A picture of my ballast spreader:
View attachment 147136
This is the outside line of my yard area. I have about 2 feet completed. I did vacuum up the lose stuff. Any ideas?
OO Gauge High Capacity Ballast Spreader with shutoff | eBay
Tested by Model Rail Magazine against all the popular makes and was awarded the top marks above all of the others.
www.ebay.co.uk
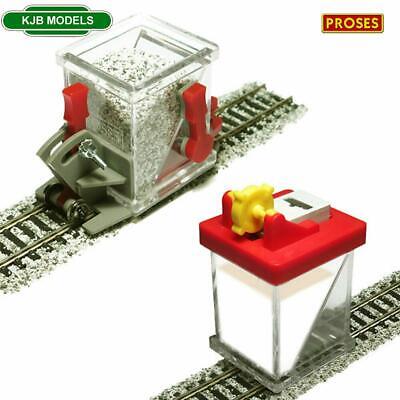
BNIB HO / OO Gauge PROSES BS-HO-03 Ballast Spreader Car And Glue Applicator | eBay
Advanced Ballast Spreader Car and Ballast Glue Applicator Set. Adjustable height setting allows you to alter the depth of ballast and cope with different Code Rail. BS-HO-03 Ballast Spreader Car And Glue Applicator.
www.ebay.co.uk
Last edited:
