Ok, trying my hand at my first weathered locomotive (N Scale), a BLI CSX ET44. As of this writing, it remains a work in progress.
This picture below is as close as is possible to a “before” picture as I can get. Note that no fading gas been done to the body. BLI’s CSX colors are distinctly lighter than what Scaletrains puts on theirs, and is much more flat in sheen as well. The BLI looks decidedly pre-faded next to a Scaletrains:
View attachment 185190
The goal of today’s work was twofold:
1. Rust/dirty up the plow a bit (and go over the M/U cabling & connectors afterward to get them to stand out a bit from the rust.
2. Fade the bogies and tank.
3. Highlight the various grilles/screens on the boby with a flat black wash.
The bogey fading is already done in the above photo, but the Scaletrains at left is still in it s ahiny black glory, so that conveys a pretty good idea of the “before” look of the BLI.
Here is the front plow, having been rusted with a mix of two parts Vallejo Burnt Umber to one part Mission models normal rust. Thinned about 1:1 with water, airbrushed on. Going much thinner made it want to run down to the leading edge of the plow. After spraying on ine coat and allowing to dry, I painted flat black onto the cabling, and a small amount of a Revell silver lacquer. Sprayed on a second coat of the rust/dirt mixture, and re-highlighted the cables with a flat black wash, and then used a mini Q-tip with 99% IPA to wipe down some of the rust off the connectors. This photo shows the rear end of the loco; it’s just a better photo:
View attachment 185191
And here is the front:
View attachment 185192
For the fading of the bogeys & fuel tank, I couldnt find the “grimy black” otgers advocate. The goal of it appeared to provide a “slate gray” kind of color. I chose Mission Models “Anthracite” black, and lightened it with one part Vallejo neutral gray to four parts if the anthracite, Thinned about 2:1 with water. (The Antractite is thick stuff, needed extra thinning for the airbrush. Afrer letting it garden for a few hours, i sealed it with Dullcote thinned 1:1 for airbrushing. After that, I highlighted holes and crevices with Vallejo black, thinned to a wash. The back end:
View attachment 185193
That photo also shows the result of highlighting some of the grille work on the body.
The middle, showing the fuel tank, a little dash of red to render the sight glass/ level indicator visible:
View attachment 185194
And the front:
View attachment 185195
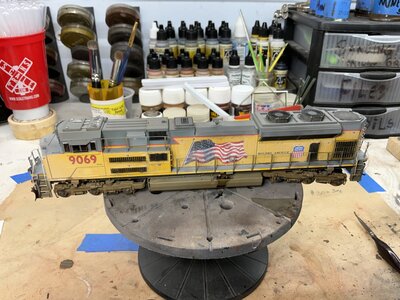
And here are a couple of overall shots, showing the grille highlighting, and an overview of the current state of the locomotive:
View attachment 185196
Not the best brightness, but does convey the topside grille highlighting:
View attachment 185197
Same shot, but with the camera flash, renders this one more representative of the overall color:
View attachment 185198
Since this BLI is decidedly lighter than my Scaletrains ET44s, I’m not sure this one will get a fade coat.
The plan forward:
1. Highlight/draw out some detail on the white cab roof.
2. Road splatter area over the lower extremeties. I have the Vallejo desert ran others have used, but in looking at it, that seems more of an arid/desert color, and I’m modeling West Virginia (specifically the New River area), so something more brown to a reddish brown (without turning it into a rust color) may be more in order.
3. To fade or not to fade? Either way, I have a Vallejo Blue Angels blue coming, to be a minor additive to a fade coat, be it for this, or down the road for those Scaletrains units.