Running Bear's Coffee Shop LVI


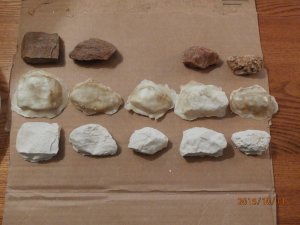
Here ya go Lynnb. My first castings. I'm not certain which rock was suppose to go to the middle one. There was 2 other rocks that I didn't mold and can't really tell the difference for sure.
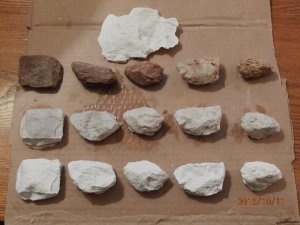
They all came out pretty dam good I think. The detail will really come out when I hit them with some color wash.

I'll have zero fear making molds of anything else now. Knowing me, I'll probably go out of my way now trying to find things to mold and duplicate. Maybe I should give the cats a heads up! :cool:

~
 

Attachments

  • PA110028_2.jpg
    PA110028_2.jpg
    164.7 KB · Views: 168
Louis, all I use is Zap A Gap CA+. I got a small bottle from my LHS before they went out of business--5 years ago. I keep the bottle in the fridge when not in use, and keep the top/tip clean, so it doesn't clog.

Does that work keeping it in the frig? I've never heard that about CA materials.
I have heard that about dry cell batteries - type As, B, C and D.

By the way Terry, the FP45 found a another bad spot for me. A low spot around turnout #10. The front plow blade caught something and was pull clean off. I'm finding it amazing that with a good variety of engines now, there are all kinds of nuances in my tracks. I suppose a steamer would have a hay-day with me.
Not likely an x-6-x anything would like my setup.
E.
 
Last edited by a moderator:
Terry how does krazy glue/super glue gels compare to that Zap adhesive gel?

Louis: works ok, but I really prefer Zap a Gap. I can't find it here and the closest LHS is 2 hours+. I keep forgeting to add a couple bottles to my orders!! LOL!!
 
Thanks BigE , they look great. Was it one coat slopped on the rock?
No. Having done 2 casts of each now, I would say to do a MINIMUM of 5 coats of latex. Let it cure all the way between coats.
The one mold that I only did 3 coats on won't last very long. It doesn't seem to be much stronger than those things us boys used before we got married - if you know what I mean. It's the same material in case you didn't know. Smells like it as well.

Just go find you a decent rock. Scrub and clean it up real good and give it a try!!!
Eric.
 
Good afternoon fellow track layers and spike drivers,
Hi Flo and Francine, It looks like Jeffreys' place here is a bit busy, I'd like something cool to drink, yes ice water will be fine.

WW says it's another fairly hot one> Clear at 87.6 °F - Feels Like 86 °F;

Winds are Variable at 5.3 mph from the West;

The Barometer is at 29.97 in/Hg;
Hum-i-dity is at 36%


On my layout scene I finally finished attaching the lower throw arm U bracket to the points as well as soldering a brass throw rod to it and checked the turnout as best I could to ensure an Arch bar truck with Kadee 33" code 88 [narrow tread] ribbed back wheels rolled through it freely and after a slight bit of adjustment for a tight area it seems to be just fine. The final test will be once I get it at least temporarly spiked in place along with the Caboose Industries High-Level Sprung Switch Stand base positioned so I can really check it out. Interestingly enough the way the points of this Right hand switch turned out when soldered in place they tend to spring to the outside stock rail which direct the a train to the Right line which is how I was thinking the main line would run anyway so that worked out well.

I've also need about a 3" section of track to add prior to it so it will tie in with the mail line it divides. There is about enough
Central Valley Tie Strip extending from the end of rail already placed so the extra section should be easy to place but I will need to solder a jumper to it unless I clean the ends of the existing rail as well as the short sections and solder them together which I may do for something a little different and easier. I just thought of that in writing here.


Say Lynn: I didn't get a chance to review all the shots you posted of your layout but it look like it's going to turn out very nicely.


Terry ... Your fences look terrific ....

My chain link fence is more simple. The vertical fence posts are just wire brads driven into the wood base. Then I cut common fiberglass window screen diagonally, I spray painted the screen silver and then weathered it. I glued it to the fence posts. I added enough scenery to make it look like the fence was deep in the weeds. ..... Being in the background, the fence did not need to be too detailed.

scrapyardD.jpg


Flip .... I'll send an email. Today will be a full day again here.

David ... WHat you called the B&O car was a 1930's boxcab diesel locomotive.


Say Garry: Had you not mentioned it I wouldn't have known that was a Box Cab Diesel as I was thinking about the way my early 1925 units look, not the same and shorter.

I also like the Steam Crane Crawler in the junk yard! Tichy makes a small one on a rail car base that is probably appropriate for my time period but I imagine it a bit of work to assemble it, especially to make it functional, I would believe?

Who makes the crawler you have, and was it a kit? I've seen some like that too.
 
Last edited by a moderator:
Thanks David , it will be a work in progress for a long long time.
Thanks BigE for the tips and No I didnt know it was same material and yes I do recall the thickness :p
 
Unless I feel spunky (some more) later, I'm probably done with this for the night. Don't want to work myself out of a job now do I?

Row #2 was from my first castings and have a single wash coat of "pearl grey" (Rit dye from the grocery store - 1/4 tsp + 1 cup water).
Row #3 is fresh out of the casts. The leftover up top was thrown into a standby "strata rock" mold from WS.
Notice the one in row 2 #2 appears depressed in the middle - it is. That is from the mold with only 3 coats. It's that one that reminded me of those days almost 40 years ago.

I think I'll do at least 7 layers on any future molds. Since I have the stuff, if anyone wants a rock molded, I'll do it for ya on barter.

So, for all you scenery scardy-cats out there, fear not! Come on in. The water is warm - sometimes it's hardened acrylic or epoxy but that's a different matter. :D
I am NO artist at all. If I can do this, anyone can. Not unless I've been selling myself short since I was a little kid.
E.

~
 

Attachments

  • PA110028_3.jpg
    PA110028_3.jpg
    178.4 KB · Views: 173
Thanks BigE for showing the results. I'm not sure if you stained the castings of what ever material you used right away out of the castings or not but I do know I generally use woodland scenic color system out of spray bottles ( because it works everytime) and I generally wait a day or more before staining. I will generally always use plaster of paris as well although I do use Tuf Stone as well its super hard and I use it for rough buildups and have found unless I let it set for at least a week the ws colour system doesn't take. I got my mold making stuff from www.sculpturesupply.com in Toronto Ont if anyone wants to know and are close by. Great prices as well. I generally stop in when I'm in Toronto ( 8 hours away ) and pickup at least 3 50lb bags of pop.
 
Good afternoon. Can't believe how many posts I missed in just a day and a half. More great photos from Garry as usual. Terry, for a first try at a fence no complaints from me. Looks good. My first attempt, pictured here was done about 20 some years ago. I soldered some brass rod for the froming and used a mesh used in flower arrangements.

IMAG0093.jpg

Was up early yesterday and at Home Pepot at shortly after 7 AM to pick up a bunch ($400 dollars worth) of millwork for trim, baseboard and crown molding and then returned home and completed that last flooring (for this year) in the master bedroom. Had supper, a couple of feers and fell asleep in the recliner, which is something that I never do.

Time for supper, adios.
 
Evening All,

Did a couple of chores this morning and then did switching on the layout for about 90 minutes. Tomorrow night daughter and grand kids are coming over for home made potato soup that MOH is making. Next Saturday is the annual skunk show (think dog show) in Kissimmee FL about 30 minutes from here. I believe it has been happening for 34 years now. It lets us catch up with people that we rarely see.

NG- That bench work looks really good.

Terry in Wisc- Nice how to shots.

Montanan- Very nice picture.

BigE- Great job on the castings. That is something I have never tried before.

I hope everyone has a good night
 
Thanks David , it will be a work in progress for a long long time.
Thanks BigE for the tips and No I didnt know it was same material and yes I do recall the thickness :p


Lynn: Liquid Latex can be purchased at most any paint place in quart and even gallon sizes I think. Find a rock and not necessarily a small one, you like due to it's surface or strata texture and paint the area you like so as to form a hollow of a bit of depth but it doesn't need to be over about a 1/2" deep depending on what your attempting to create a mold of.

Be sure to use the brush to push the latex into all the cracks and creaveses and let it dry a bit and then go back and give it another coat on the outside to give it a bit of body.

I like my rock molds to be flexible so I can apply the semi dry Hydrocal to any surface on the layout so it will conform to it as it looks a lot more natural. Make several molds of different surfaces of the rock and apply randomly while also inverting the molds as well as even over laying molds on a portion of what you've already placed for a different effect even with the same mold. If you have several molds preferably about 6 you can get quite a number of variations. With having even a quart of latex you can make a dozen molds easily if not more depending on how bid you attempt to make them?

Let the mold dry good probably overnight in a warm area and then carefully start pealing the mold from the rock surface. No matter how intricut the surface by using the brisels to push the latex into cracks and hollows the latex will fill those areas and you will have an exact mold like you want. Do be cautious though as it can fill voids that tend to want to hold/grip some small sections of the mold and not release it. You may need to cut these off with an Exacto knife.

Hope this helps a bit. I'll try and post some pictures of so of the molds I've made as well as what they produce.
 
Thanks BigE for showing the results. I'm not sure if you stained the castings of what ever material you used right away out of the castings or not but I do know I generally use woodland scenic color system out of spray bottles ( because it works everytime) and I generally wait a day or more before staining. I will generally always use plaster of paris as well although I do use Tuf Stone as well its super hard and I use it for rough buildups and have found unless I let it set for at least a week the ws colour system doesn't take. I got my mold making stuff from www.sculpturesupply.com in Toronto Ont if anyone wants to know and are close by. Great prices as well. I generally stop in when I'm in Toronto ( 8 hours away ) and pickup at least 3 50lb bags of pop.

No, they sat for a couple hours before staining. I wouldn't even call it a staining really. I have the WS earth colors kit to use but this was just playing around to see what it did. I'll likely use the WS stuff when I get serious about it. Right now I'm back to mental planning. Where to put trees? Where to expose rock face - and how? etc.
This stuff I'm using for casting now is a mix of hyrdrocal and pop 1:1 - only because I'm running out of both and have about equal amounts of both. That seems to be working out fine for now. I have about 5 or so lbs of sculpt-a-mold that I'll use to stick these pieces to where ever they end up.

It's all good. Keeps me out of the bars. Not that I wouldn't mind some actual human contact once in a while.
E.
 
Eric, next time you get to the tore, pick up a pack of Rit dye. I have used it in the past, mixed with the plaster, when casting rocks. The earth-toned ones are the best, if you can find them.
 
Eric, next time you get to the tore, pick up a pack of Rit dye. I have used it in the past, mixed with the plaster, when casting rocks. The earth-toned ones are the best, if you can find them.

I was already ahead of you on that one Brother. They only had about 20 colors. A really light tan or a dark brown was about as close as they got.
At only $2.38 a pack I figured I'd try out the grey and the black. The grey for a base coat (which you all have seen now) and the black for later on to bring out the cracks and fissures and such.
E
 
Aw shucks. I'm flattered Sir. Keep in mind when you say that mountain went up quick how much time and planning in my head went on before I did anything - including ordering the tunnel portals and placing them on the table. One could arguable say I've been 'working' on it off and on for the better part of 10 months. Physical work only took a fat week if you ran it all together.
But now that the "super structure" is in place, I'm back to regular ground cover work, tree planting and detail work, etc.
I think I'll try the technique of shredding one of those green scouring pads from the grocery store for some hanging foliage instead of the clump foliage/lichen stuff. Given the price differential, it's certainly worth having a look at.

As for that copter-eating big red oak, I would never take a saw to that monster. 3 reasons: 1) it ain't my tree; 2) it's about 6' across meaning #3) it's got be nearly 2-300, or better, years old. It was probably just an acorn when my 7th or 8th (I'm not sure) great-grandpa was fighting "for the cause" against the red-coats as a Colonel in the American Revolution of the 1700s.
I'll buy another copter before I'd lay a finger with ill intent on that tree.
E.

LOL! I did not know it was one of THOSE trees! There is a White Oak not as tall but as big at the base on the south side of town, has been one of my favorite 'huggin' trees out of sheer respect to longevity since the first time I saw it back about 1978 or so, it was here long before the town was!

TWO more sheets and we will have this sucker topped!
 
Evening All,

Did a couple of chores this morning and then did switching on the layout for about 90 minutes. Tomorrow night daughter and grand kids are coming over for home made potato soup that MOH is making. Next Saturday is the annual skunk show (think dog show) in Kissimmee FL about 30 minutes from here. I believe it has been happening for 34 years now. It lets us catch up with people that we rarely see.

NG- That bench work looks really good.

Terry in Wisc- Nice how to shots.

Montanan- Very nice picture.

BigE- Great job on the castings. That is something I have never tried before.

I hope everyone has a good night

THANKS! I will pass all compliments to the 'real' builder at the next session. Two more pieces to cut and then the top will be made and all we gotta do is attach it to the frame.

WIN_20151011_185657.JPGA bit of glue, weigh em down and screw em in and we be jammin!


Back
Top