Multiple Staging Areas & access to them (perhaps via a 'sub helix')

ModelRailroadForums.com is a free Model Railroad Discussion Forum and photo gallery. We cover all scales and sizes of model railroads. Whether you're a master model railroader or just getting started, you'll find something of interest here.


beiland

Well-Known Member
I'm designing a new double-deck layout to fit inside my 12x16 'train shed'. It will have an 'outdoor' helix structure,... outside the main shed, but in its own enclosure.
Helix%20Configuration%20%28external%29%2C%20ps.jpg


It will have shelf's on either side, and a peninsula. For the longest time I had been planning for a 6-8 track staging area to be located approx 8" under ONE of the side shelfs,...perhaps like this
Staging%20Tracks%2C%20Brackets.jpg


I decided to re-look at the possibility of utilizing the helix structure to gain access to the the staging tracks. What if I decided to try to add two loops to the bottom of my planned outdoor helix to take the trains down to the staging level?

Would it really be so difficult to access if I were to have to get inside the 'hollow helix structure', to fix a derailment of whatever?...and yes I know I will have to at times.

I had a 48" circular metal ring that I placed up on the top of three stacked milk cartons. Why milk cartons,...because it brought the staging track level up to just about the level I was think of, and it would allow for a stack of 3 of these plastic cartons to be utilized as slide-in-slide-out storage bins. So the staging access tracks in the helix structure would be at this level.
%231%20staging%20helix%20access%20idea%2C%20DSCF1986.jpg


%232%20staging%20helix%20idea%2C%20DSCF1983.jpg


%233%20staging%20helix%20idea%2C%20DSCF1985.jpg

Even with this 48" circle I had PLENTY of room to get up inside the helix. Now imagine if my circle is closer to a 60" one (30R helix) I plan on. I am now convinced that I will NOT have to play limbo to get at the interior of this lower helix level.

And now I could have staging tracks on both sides of the layout I could even have staging down the center of the peninsula. Lets see 6 tracks each on both sides, and 2-4 down the center,...wow, 14-16 tracks of staging (each with a different type train ready to run)
 
Last edited:

beiland

Well-Known Member
3 Areas of Staging

I now want to make use of that 'sub-helix' to bring my trains down to the staging areas (3 areas) below (8" inches below) my main deck level. I could see the staging access track (the sub-helix track) entering the center of the back wall of the shed, and splitting off 3 ways, to the right, to the left, and down the center penisula. The tracks going to the right and left sides of the room would likely be some sort of ladder arrangment to build to 6-8 staging tracks each.

Should they be an ordinary ladder or a modified one? Could they constructed using be Peco small radius (code 100) turnouts which I believe are #5's?

Rather than a 'simple ladder' configuration, should they best be a compound one like Armstrong and yourself have utilized??

I need to do a 'mock-up'.

Rather than the paper templates I chose to just quickly layout some actual turnouts to get a general idea of the access to staging I am considering. I chose my living room carpet to layout the turnouts as my shed has a bunch of junk in there at the moment.
DSCF2569%2C%20ps800.jpg


DSCF2568%2C%20ps800.jpg


Here the 3-way turnout is coming from the TV/stereo cabinette into the 'shed's interior' (represented by the carpet) That 3-way is located in the external helix structure, and sends the trains into the staging level in 3 directions, 1) down the center, and 2) to either side of the shed. The 6" wide laminate floor strip panel represents the thickness of the shed's back wall.
DSCF2570%2C%20ps800.jpg


There are 2 different size Peco (Code100) turnouts represented here,..... small size (bottom row), and medium size (top row) ones.
DSCF2571%2C%20ps800.jpg


I believe in this area the small radius Peco's are just fine??


The track radiuses at the entering end is a 24" radius. the exit track shown that is leading to the staging track down along the wall (edge of carpet) is 22". The others (not shown) would likely be 24" radius.
 

beiland

Well-Known Member
24" Radius Trackage

So I decided I did not want to spend $9 each for those Fast Track curves, nor wait for their delivery,...so I made some paper templates of 24" radius trackage,

Here is how things line up utilizing the 'small radius, code100' Peco turnouts. At first I had just 5 tracks for that side
DSCF2584%2C%20ps800.jpg


Then I got the tracks a little closer together going down that rug edge (inner wall of shed)...
DSCF2586%2C%20ps800%281%29.jpg


Then I got 6 tracks for that staging area. All of the curves are a full 24" radius, EXCEPT for the inner most one at 22" radius. Likely this one could be made 24" as well if the straight section preceding it was changed, but have one track at 22" shouldn't be a problem for short car trains and engines.
DSCF2599%2C%20ps800.jpg


DSCF2596%2C%20ps800%2C%20all%2024%20except%20inner%20one%2022.jpg
 

montanan

Whiskey Merchant
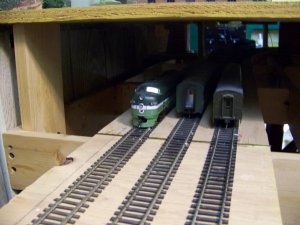
My hidden staging is hard to get a decent photo of. There are three tracks, one capable of holding a 65 car train, the second 60 cars and the third around 55.
Part of the staging tracks are on a drop down bridge

Bridge 002.jpg

My layout was built mainly as a point to point operation with an average train length of 10 to 14 cars. The hidden staging tracks also allow for continuous running if I leave one of the tracks clear for passage. IO keep all of my rolling stock and all but a few brass locomotives that are too long for my 90 foot turntables.
 

beiland

Well-Known Member
Peco Med Radius Turnouts instead of Small's

I just did a quick little redo with MEDIUM radius Peco turnouts. Looks pretty smooth,...

DSCF2603%2C%20med%20radius%20switches.jpg


DSCF2604%2C%20med%20radius%20switches.jpg


DSCF2602%2C%20med%20radius%20switchs.jpg


I think I like it even better with these larger radius turnouts. There is now about 2+3/8 inch centers between those curves, ....and a larger clearance down the side (wall) that will be nice for the new steel angle brackets I have in mind for supporting the upper deck just overhead.
 

beiland

Well-Known Member
Chicken & Egg Problem (the old,... which came first question)

So now I have a dilemma that probably a lot of folks have experienced,...build the staging tracks first then the deck above them, ...or vice versa??

Naturally you have to believe that building the staging tracks first is the most logical way to proceed, as they might be near impossible to build after a close fitting cover is added over them. But then how do you access the bottom of the main deck to do wiring, and whole host of things to the unfinished (and likely incompletely planned) main deck layout only 8 inches or so over the staging tracks?

And I am particularly concerned about this matter as I am contemplating 3 good size staging areas, and I have yet to decide on a final track plan for the layout.


These are a few of my thoughts at the moment. Both my staging level roadbed and my main deck roadbed will basically consist of shelfs of plywood cantilevered off the wall studding by metal brackets,...perhaps much like those angle-iron brackets suggested by TrainzLuvr

TrainzLuvr

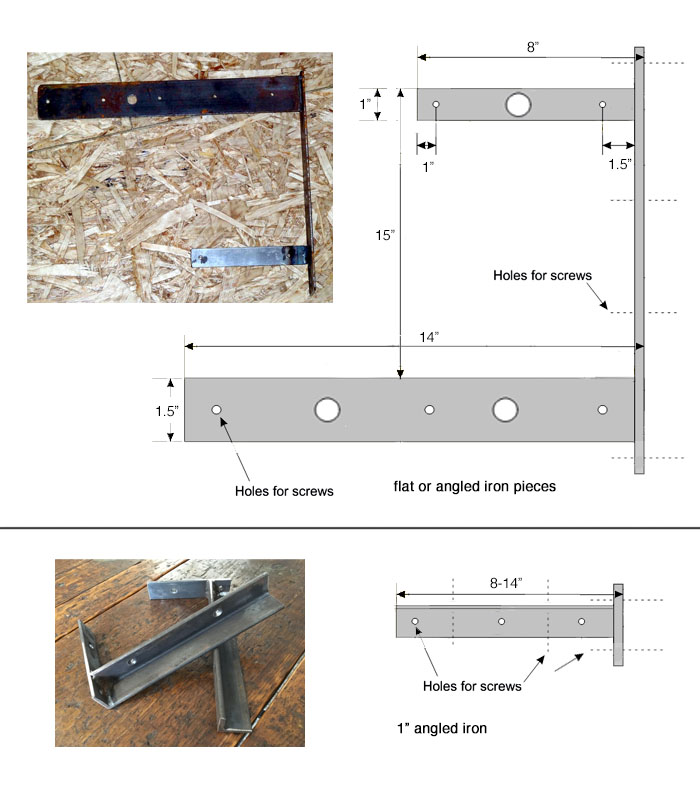
Let me show you what I mean...the black bracket below (top left) was the original design I started with which I actually saw here on MRH, from Bill Brillinger
benchwork%20brackets%20schematic%201.jpg


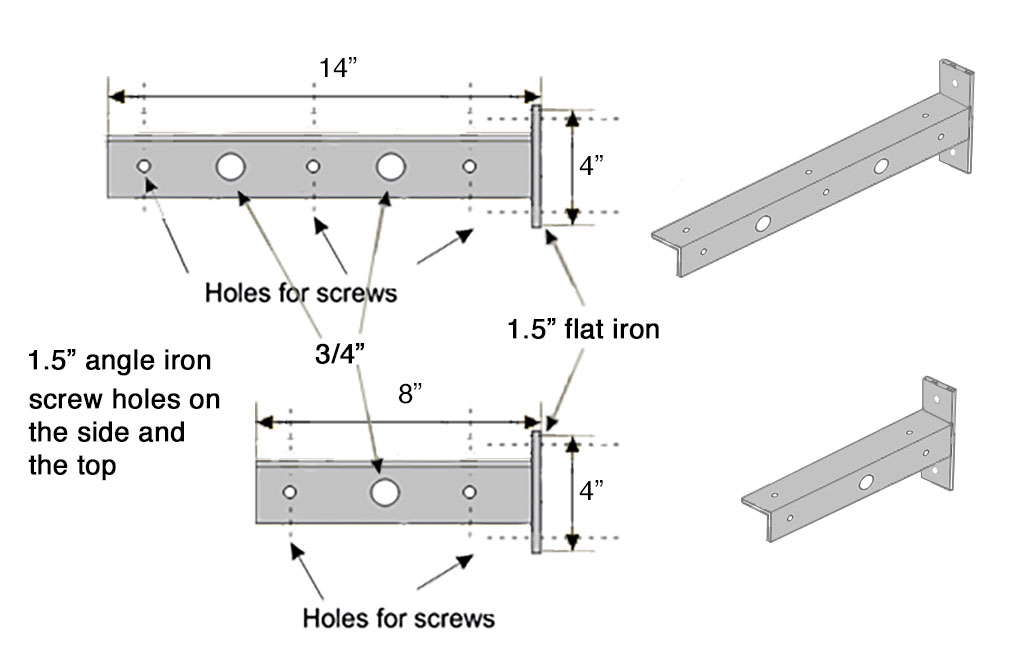
This second one I mocked up to be individual bracket for each deck:
benchwork%20brackets%20schematic%202.jpg

This type of mounting will allow for the most unobstructed access to the staging tracks, and the underside of the main deck. But it will still be near impossible to build the staging tracks and do the other future work to the underside of the main deck with only 8-9 inches of space between these 'shelfs' of plywood, particularly if the shelfs have depth.


I intend to build my staging level roadbed first, but in such a manner that it can be detached from its metal wall brackets to gain access to the underside of the main deck. This staging level 'deck' will need to be 'self-contained' in a matter of speaking, so it can be withdraw from its resting place in large sections, and without a lot of 'connections' (electrical or mechanical) to be fastened and unfastened in the process. In other word the staging level track board(s) need to be detachable from their metal support brackets and moved aside while work is done on the underside of the main train deck above.
 

montanan

Whiskey Merchant
Build the lower tracks first. I speak from experience. Build them and test them thoroughly before covering them up.
 

beiland

Well-Known Member
Peco small radius is 610mm or really close to 24".
I had read that 24" and that is one of the reasons I felt (still feel) they were fine.

But after I experimenting with the larger Medium radius ones, and found they didn't occupy that much more acreage, I became more enamored with them.
 

beiland

Well-Known Member
Build the lower tracks first. I speak from experience. Build them and test them thoroughly before covering them up.
As I already said I do intend to build those lower tracks first, BUT I do want to make those 'staging boards' removable while building the main deck level over it. What I have planned in my mind will not make that difficult, and certainly less obstructive while building the upper portions.
 

beiland

Well-Known Member
By varying the short straight track sections prior to those multiple curves we can get greater spacing between their centerlines, and greater spacing down the 'fairway' (the straight track sections....ha..ha)

DSCF2602%2C%20med%20radius%20switchs%281%29.jpg


DSCF2610%2C%20larger%20centerlines.jpg
 

beiland

Well-Known Member
S curve in Staging Access Tracks

I've had one party speak to the fact that I have one particular S-curve in my staging tracks. I chose to lay a couple of examples along side the Mediium size Peco turnouts I have definitely decided to use.

On one side is a long crossover by Shinnohari. On the other side is two Peco examples,...the longer Medium radius turnouts, and then at the outer side the Small radius pair.

DSCF2613%2C%20S%20curve%20in%20staging%20tracks.jpg


DSCF2614%2C%20S%20curve%20in%20staging%20track.jpg
 

beiland

Well-Known Member
'Removable' Staging Level Track 'boards'

I intend to build my staging level roadbed first, but in such a manner that it can be detached from its metal wall brackets to gain access to the underside of the main deck. This staging level 'deck' will need to be 'self-contained' in a matter of speaking, so it can be withdraw from its resting place in large sections, and without a lot of 'connections' (electrical or mechanical) to be fastened and unfastened in the process. In other word the staging level track board(s) need to be detachable from their metal support brackets and moved aside while work is done on the underside of the main train deck above.


So lets start by just considering one side of the staging. We build that one entire side, consisting of those curve tracks coming from the 3-way feeding turnout, and the 5 straight tracks down along the side, onto a very long flat piece of plywood roadbed. The track, its wiring, the turnout control machinery are all attached to the TOP side of this 'staging level board'. Nothing is attached to the bottom side of this board, as that might interfere with the plastic storage bins that can be stacked up below the staging level roadbed.

(see photos below)


This staging level board is supported by shelf type 90 degree metal brackets attached to the 2x4 studded wall of the shed,...very much like the upper decks will be mounted.

The only electrical connections that need to be made with this staging level are the buss wires for the DCC power, and the possible power for the turnouts. A 2-pin connector is all that's required for the DCC buss wires. An 8-pin connector is all that's required for the 4 turnout controls (2 wires per each turnout). This is what I was referring to as a staging level deck that is 'self contained',...just the track board with 2 simple sets of unplug-able electrical connectors to the main layout.

This very long staging level board might well be cut into 2 pieces,....the curved head portion, and the long straight track portion. That would make it easier to withdraw these 'staging boards' during major construction on the main deck shelf,...just unscrew them from their bracket wall support brackets and place them outdoors.
(the straight section staging board might not even need DCC buss wires as it will just be RR car storage,..no locos?)


......forget the diagonal type support brackets shown in these photos....
......plastic storage bins slide in under staging level roadbed....

The side that contains the actual 8 tracks of staging is already well below the lower deck/shelf of the layout, ...so it could still have the type of support that I originally had in mind.
Long plywood sub-shelf slit to fit the metal brackets attached to the wall studs,...like this..
Staging%20Track%20Plywood%20Base%20between%20brackets%2C%20over%20stacked%20plasic%20cartons.jpg


Staging%20Track%20Base%20split%20to%20fit%20wall%20bracket%20%28example%20on%20cardboard%29.jpg


And placed at such a height to just barely clear those plastic stowage containers stacked 3 high....
Staging%20track%20%27roadbed%27%20over%20%27stowage%20baskets%27.jpg
 

beiland

Well-Known Member
Interesting Observations by Maxman

railandsail
Why milk cartons,...because it brought the staging track level up to just about the level I was think of, and it would allow for a stack of 3 of these plastic cartons to be utilized as slide-in-slide-out storage bins. So the staging access tracks in the helix structure would be at this level.

Not really. You are forgetting that there needs to be a support structure under that ring. So you will either need to raise things up to allow the three-high stack of milk crates to slip under, or eliminate the third crate to allow the track level to remain as you show it.

railandsail
I am now convinced that I will NOT have to play limbo to get at the interior of this lower helix level.

I'm not convinced. You haven't said how high off the floor the top of the ring will be. Once you add the support structure, that distance will be less. I'm assuming that there will be legs to hold the helix up which you will have to crawl around.

If you crawl under on your hands/knees, you will have to scrunch yourself into a small ball to stand up in the middle of the opening. And if you slide in on your bottom, you will have to turn yourself into the ball position unless you can stand vertically from your backside. I don't know anyone who can do that.

And we are not getting any younger.
 

beiland

Well-Known Member
3 Plastic Milk Type Cartons
Here I must correct myself, I have found a difference in the height of a number of these type cartons. for instance ...
DSCF2618.jpg


DSCF2622%2C%20storage%20bins.jpg


and it turns out the 3 'milk cartons' are just a little too high. I am sure there are some that would work, but I'd rather be sure and utilize those 3 'file storage containers' pictured in the middle of that photo.

Even better would be the use of those red coke-cola type containers which I already have a lot of my RR stuff stored in. I can fit a 7 high stack of those under the staging deck with room to spare. They also fit between the wall studding of 24 inches much better.

Here is a mock up of a staging board over those stroage bins,.. (and that board is just resting on the top of the file storage bins at probably 1/2 inch lower than I propose for the staging level board.

DSCF2623%2C%20storage%20bins.jpg


In reference to your concern about the brackets that would hold up the staging track boards interfering with storage bins, I offer 2 solutions;
a) Both of these plastic bins I have chosen fit 'between' the stud/bracket spacing,
b) The style bracket needed for this staging track deck is a simple 90 degree bracket with extremely low 'projection' down under the deck's bottom surface,...ie...

DSCF2626%2C%20brackets.jpg
 

beiland

Well-Known Member
Accessing the Helix

I'm not convinced. You haven't said how high off the floor the top of the ring will be. Once you add the support structure, that distance will be less. I'm assuming that there will be legs to hold the helix up which you will have to crawl around.

If you crawl under on your hands/knees, you will have to scrunch yourself into a small ball to stand up in the middle of the opening. And if you slide in on your bottom, you will have to turn yourself into the ball position unless you can stand vertically from your backside. I don't know anyone who can do that.


And we are not getting any younger.

Maxman


What if I decided to try to add two loops to the bottom of my planned outdoor helix to take the trains down to the staging level?

Would it really be so difficult to access if I were to have to get inside the 'hollow helix structure', to fix a derailment of whatever?...and yes I know I will have to at times.

I had a 48" circular metal ring that I placed up on the top of three stacked milk cartons. Why milk cartons,...because it brought the staging track level up to approx the level I was thinking of, So the staging access tracks in the helix structure would be at this level.

Even with this 48" circle I had PLENTY of room to get up inside the helix. Now imagine if my circle is closer to a 60" one (30R helix) I plan on. I am now convinced that I will NOT have to play limbo to get at the interior of this lower helix level.

Hello from the helix

DSCF2632%2C%20ps800.jpg


DSCF2633%2Cps800.jpg


DSCF2634%2C%20ps800.jpg


DSCF2635%2C%20ps800.jpg


I just need to remember to make that helix tall enough so I can stand inside.
 

beiland

Well-Known Member
Photos being displayed?

Just wondering if the photos (photo links actually) are being displayed on this subject thread,.....to other readers than just myself ??

Not that many replies, so that got me to wondering. Plus I had that happen on one of the train forums, where I was seeing the photos I posted, but others were not.
 

santafewillie

Same Ol' Buzzard
I'm following and seeing all, just haven't commented yet. But here is one. Regarding the removable staging shelves. I thought that I saw in an earlier post or another thread, that some tracks were going to thread their way through the support brackets. Those back there probably don't need to be removable as they are close enough to the wall and narrow enough that they shouldn't interfere with working on the underside of the next deck. You will have to provide vertical clearance on the aisle side of those brackets as well, so you may have to reconfigure the switches to provide much more space between some tracks. It may also reduce the number of tracks that you can fit. Nothing quite like a support bracket clipping a detail off the top of an expensive steam engine. Maybe you have addressed this already and I missed it.

Willie
 

beiland

Well-Known Member
I'm following and seeing all, just haven't commented yet. But here is one. Regarding the removable staging shelves. I thought that I saw in an earlier post or another thread, that some tracks were going to thread their way through the support brackets.
You are correct, that was an idea I had originally. But as I further developed the idea of 'removable' staging level 'boards', particular as a single width piece of board, I decided I was going to have to build a different bracket that didn't have that diagonal piece. Those white brackets probably won't be used, certainly not here.

Going to have a friend weld up some of those using just plain angle iron as soon as I determine the depth widths of the final staging tracks, AND the main deck just above it,...as that new bracket will support the cantilevered decks of both of those levels.


Those back there probably don't need to be removable as they are close enough to the wall and narrow enough that they shouldn't interfere with working on the underside of the next deck. You will have to provide vertical clearance on the aisle side of those brackets as well, so you may have to reconfigure the switches to provide much more space between some tracks. It may also reduce the number of tracks that you can fit. Nothing quite like a support bracket clipping a detail off the top of an expensive steam engine. Maybe you have addressed this already and I missed it.
Willie
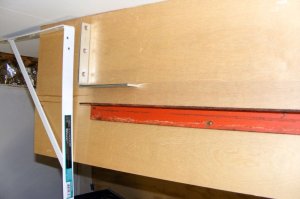
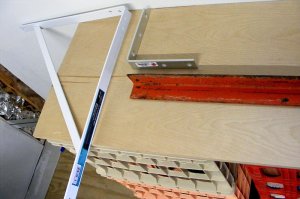
Ah ha I see I did not post a pic of that 'angle iron' we will construct the wall brackets out of.

Bracket Samples...
DSCF2630, shelf bracket samples.jpg
DSCF2629, shelf bracket samples.jpg
See that red angle iron piece, its 1.5" on a side. One of its flanges bolts/screws flat to the wall studs, and the other flange sticks outward and adds tremendous rigidity to the bracket. As a result of that 1.5 inch flange from the wall, the inner most staging track will need to clear this. Then the other staging tracks will be spaced on approx 2.5-3 inch centers outward from that. Staging level 'board' will be approx 17-18 wide/deep. Access from the aisle will be very wide open as it is a cantilevered staging shelf with almost no interfering obstructions from the front.
 
Last edited by a moderator:


Affiliate Disclosure: We may receive a commision from some of the links and ads shown on this website (Learn More Here)


ModelRailroadForums.com is a participant in the Amazon Services LLC Associates Program, an affiliate advertising program designed to provide a means for sites to earn advertising fees by advertising and linking to amazon.com

RailroadBookstore.com - An online railroad bookstore featuring a curated selection of new and used railroad books. Railroad pictorials, railroad history, steam locomotives, passenger trains, modern railroading. Hundreds of titles available, most at discount prices! We also have a video and children's book section.

ModelRailroadBookstore.com - An online model railroad bookstore featuring a curated selection of new and used books. Layout design, track plans, scenery and structure building, wiring, DCC, Tinplate, Toy Trains, Price Guides and more.

Top