Chain Link Fencing


While I was doing a bit of cleaning up this afternoon/evening I came across some 26 Gauge Wire. It looked like a good gauge for my Chain Mesh Fencing so gave cutting it and soldering it together to see how it would work, and if it could be done.

Keep in mind not a great deal of thought went into this as it was just a test/trial effort - none the less, here is the result which I think is pretty good as a beginning:

gShG4fA.jpg


The actual (usable) fence will have the solder joints cleaned up and everything will be straightened as much as possible, but I think considering how fine 26 gauge wire is, this didn't turn out too bad at all, and it kind of reminded how much I like soldering ... :)

I think I will give this another go but this time, with the top of the poles bent over for barbed wire ..... will then have to figure out how to make barbed wire ... :rolleyes:
 
Tony,

this is a great video on making fence. Looks to be a bit time consuming, but great results. I haven’t tried it, but I’ve collected the supplies to do it one day.


Mike,

A Luke Towan video - impressive isn't it. Anytime I need to find out how to do something, through watching someone else do it - I go to Luke's videos and not just because he is an Aussie BUT because he is damned good at what he does :) So thanks for posting this mate - it is what gave me the inspiration to give it a try :)
 
Last edited:
Have just placed an order for 2 yards (by 54") of White Nylon Tulle ... I think that will be enough 😬
Yeah, that might just be enough, and even if you plan to model Folsom Prison with a twenty foot high fence. :D

If you ever decide the white tulle is too white, know there are grey tulles available as well. Also worth pointing out (for any scale) that there are at least two weaves: Diamond tulle and hex weave tulle. The latter looks like simply like round holes to my eye, whereas the former is just about right, and looks like actual fencing.

Under typical layout lighting, grey tulle might look too dark anyway too--I'll guess you are going for the "galvanized steel" look--so it's probably a matter of opinion. I'm looking forward to seeing a few photos of what your finished fence looks like, as I have been a N-scale modeler for years now myself.

For either one, assuming you want to take the time, and in order to make it look more like fence, I would stretch it by pulling it on the one side to turn the diamonds into squares. Before fastening it to whatever frame you are making. Much more important in HO scale than in N, obviously--this is a case where we small scale modelers actually get a break. ;D

There's always the question too: "Why even bother?" I think the answer there is probably more important for module guys like me, who might take their work to the occasional model railroad shows, but also be able to focus on a smaller area, rather than a large layout. N-Trak, Free-moN, etc., and just because we aren't building all that much, so we can focus more on modeling a relatively small plot.

Most people would miss it, but there's often that one guy who looks carefully and really appreciates your work in detail. That guy is your fellow model railroader, or someone who might become one. That's the guy who sees it and gets it. Just sayin'.
 
Last edited:
More on chain link fencing, and this one is only about half your fault, wombat457...LOL! But only because I happened to be here reading just when you happen to be working on this project of yours. I blame the other half on having had too much coffee today, thus being......wait for it...wait.......wait.....

....too "wired." ;-P

-----

Honestly, I have actually been working this one out myself for a while, although more with regard to the chain link itself than to the pipe frame and wire sizes. I decided to take a look at this material which seems to be currently unavailable--maybe I just bought the last roll?

https://www.amazon.com/dp/B09Q1BY131?psc=1&ref=ppx_yo2ov_dt_b_product_details

If you look at the third photo on the left side, you'll get an idea how much it shows or doesn't show what's behind. The one with the fingers holding it.

A little research before I bought it showed that 60 mesh stuff lets about 40% of the light through each square--IIRC correctly the squares were pretty closer to N-scale size (60 mesh screen, which is a large part of why I bought it), and that's pretty much what it looks like to my eye too. It has a bit of a metal shine that tulle won't (tulle is more realistic here, because the whole idea is to represent galvanized steel, which isn't very shiny...), but not overpowering. But that said, I really would like to see more of what's behind it more clearly too, so I think I might try etching it to reduce the diameter of the woven wire a bit (and thereby open it up to more light).

On the other hand, there's also the fact that if you have a thick mesh, people who are only looking casually might notice it without even looking for it. "Hey...is that chain link fencing? Really? Cool!"

-------------

If that sounds like a small project, I suppose it is, but I also want to take a crack at making a N-scale version of a re-bar load similar to this one, by our forum member CambriaArea 51, and that might require some chemical etching too:


I recall seeing his work--really fine looking stuff--and having researched it a bit too, that he made the load using straight sections of #26 galvanized wire, which are available from amazon for twisting up labels and tags (his link):

https://www.amazon.com/Bundle-Galvanized-Inventory-Labels-Service/dp/B07DNKBQZM/ref=sr_1_9?crid=2Y8YQNHMZZTTZ&keywords=tag+wire&qid=1660479630&sprefix=tag+wire,aps,100&sr=8-9

In N-scale that's about 2" re-bar, which is used in building the big skyscrapers, but I thought 1" wire would look a lot more like his really good looking load. That's 34AWG, and so I just bought a roll of it (stainless steel) off Ebay about 20 minutes ago. Need to buy a wire straightening tool as well bout $20) but that's probably useful or necessary for any fine, but spooled wire other'n music wire you want to have straight and not curved in circles.
 
Last edited:
While I was doing a bit of cleaning up this afternoon/evening I came across some 26 Gauge Wire. It looked like a good gauge for my Chain Mesh Fencing so gave cutting it and soldering it together to see how it would work, and if it could be done.

Keep in mind not a great deal of thought went into this as it was just a test/trial effort - none the less, here is the result which I think is pretty good as a beginning:

gShG4fA.jpg


The actual (usable) fence will have the solder joints cleaned up and everything will be straightened as much as possible, but I think considering how fine 26 gauge wire is, this didn't turn out too bad at all, and it kind of reminded how much I like soldering ... :)

I think I will give this another go but this time, with the top of the poles bent over for barbed wire ..... will then have to figure out how to make barbed wire ... :rolleyes:
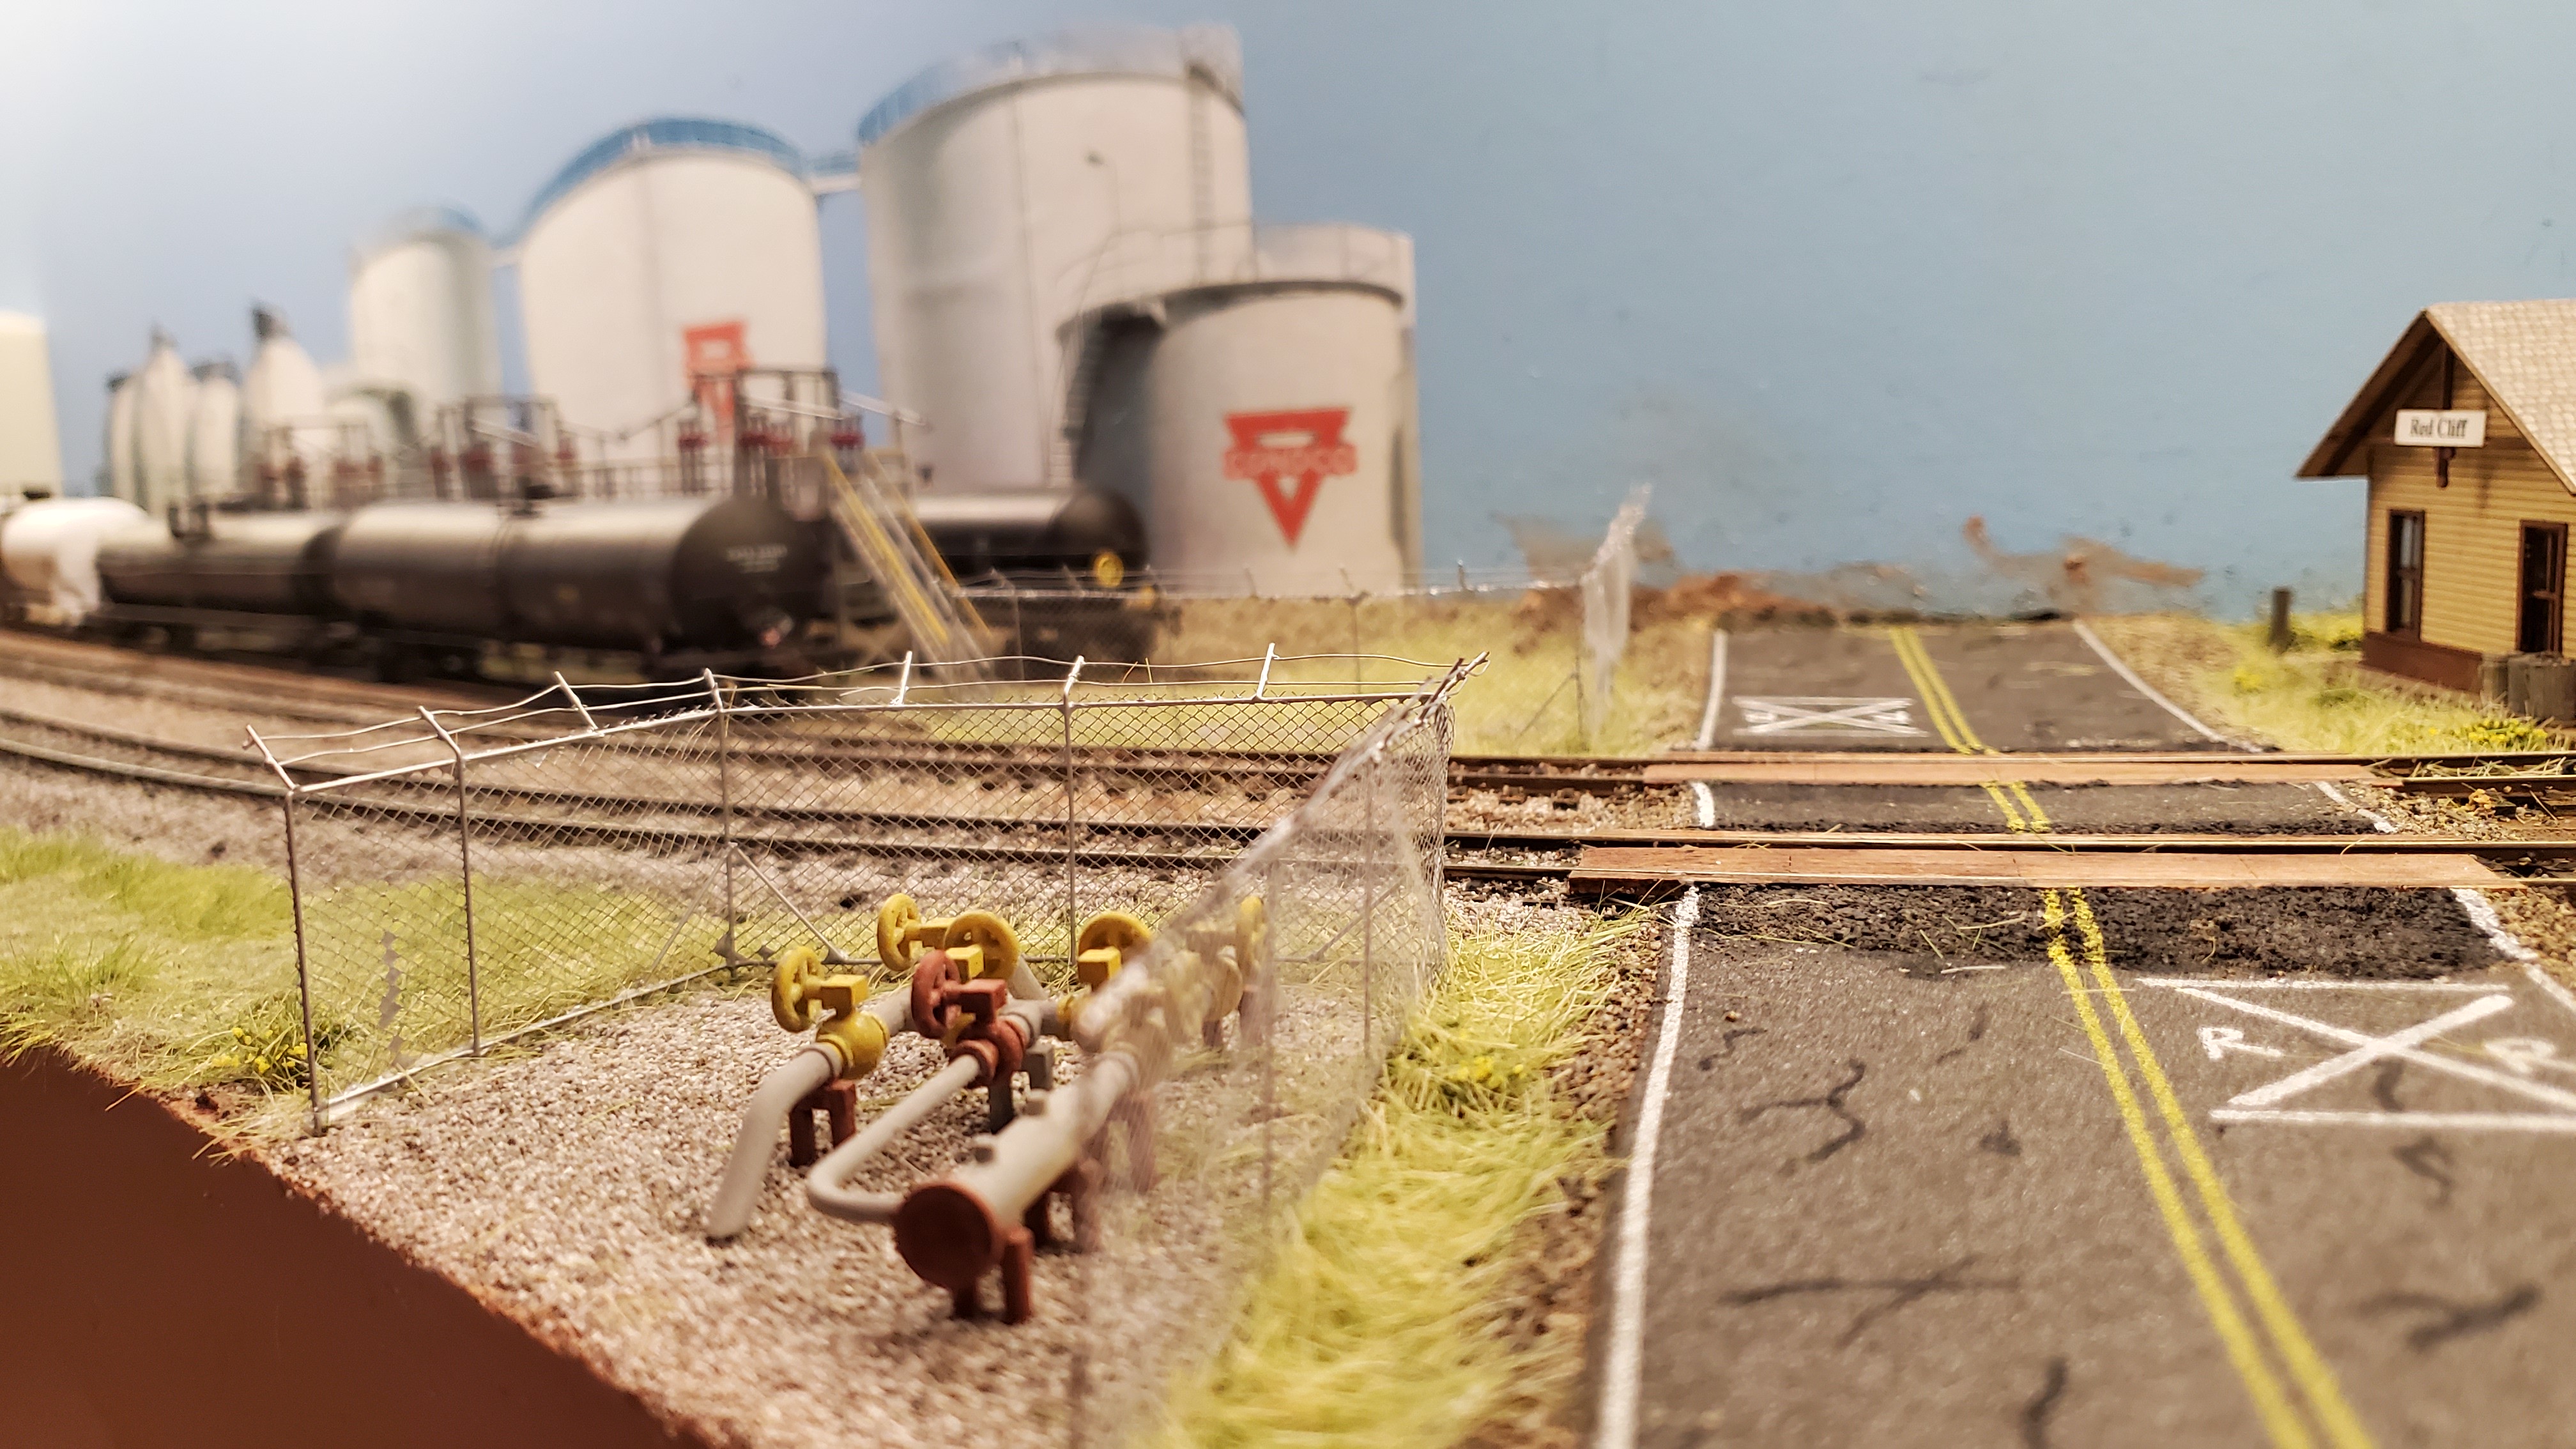
Are you truly serious about making the barbed wire? If you are, I can think of maybe four ways it could be done, although one of them is only for the true rivet counter--barb counter?--which would be actually winding the barbs around the main fence wire.

The key to that, like anything else, is to "think like a manufacturer." How would a manufacturer, who had to crank it out and get it out the door, do it?

That doesn't mean you have to run the numbers and decide if there was any profit in it or not, but just think about the how part.
 
Update on the fence - I am waiting on the Tulle to come in from Hobby Lobby. I had to order it from my "local store", or any store that had it in stock, BUT Hobby Lobby, in their infinite wisdom, decided to ship it from damn Texas. They couldn't have found a place in this country further away from me !!!

Anyway, bottom line I have no idea when the material will be here BUT have to go down to where the local store is next week so might just say to hell with it and buy it from them ... live and learn. Oh and, this'll be the last time I order anything from Hobby Lobby.
 
i actually prefer phosphor bronze wire over brass for things like fencing and guard rails. Its stiffer and its easier to solder. you can also cut it with a exacto knife by rolling it under the knife which give a nice flat end. I get it from Tichy. https://www.tichytraingroup.com/Shop.aspx?SearchValue=bronze+wire. They have lots of different diameters. They also sell it in 3 ft lengths as well.

Phosphor bronze, with same diameter as brass is much stiffer and doesn't bend as easily which is good for things like fences.

20200329_211942 by Chuck Lee, on Flickr

Here is an example of some chain link fence I did in HO scale with Tulle and phosphor bronze wire. The barbed wire is 32 gauge magnet wire.

A buddy of mine makes razor wire by rapping magnet wire around a brass tube to make the coils.
 
Might have to take a look at the phosphor bronze stuff then, see if they have it in N Scale size :)

Found it at Midwest and ordered a couple of packets of .015 gauge which I believe is about 2" in the real world 👍
 
Last edited:
Wrapping model railroad razor wire around a tube or dowel is just the way I would do it too, the advantage of the metal tube being that you can more easily slide it off. If I think about it, the only instances I've even seen of razor wire in the real world ARE rolled, although usually atop a fence in order to keep people outside from coming in, rather than as might used at Folsom Prison.

But this is about barbed wire, or at least this short talk about. Apologies for hijacking your thread if I've done so.

I mentioned four methods, and three of them probably depend on the fact that barbed wire is not just one, but two spiraled strands.

So, let's assume, in my case, and where my recently acquired, very thin nichrome wire is concerned, the first thing I would hope to do would be to take off some, if not all, of the shine. Make it look more galvanized. Spriral wrap it makes two twisted strands (this is probably important for three of my four methods.) Chemical etch for that first bit--painting it just makes it too thick, which defeats the whole idea behind using super-fine wire in the first place. In N-scale, paint thickness and grain sizes are more important, IMO, than in the larger scales. Part of the tradeoff--the larger scales can demand, at times, details we might not actually see in N-scale.

[Maybe things like barbed wire? Yeah...maybe things like barbed wire. :D]

#1: Paint the stranded wire. Thin paint, and just far enough off the base etched color that it catches the eye to cause a double-take. To see the thin, painted "stripe" as just slightly different in color. "Hey...is that actually barbed wire there?"

To do that requires some sort of cleanable mask. Something etched, which can be used over and over. Thin lines, the rest blocked. Something like this: https://www.amazon.com/Calligraphy-Measuring-Journaling-Invitations-2Pcs-Straight/dp/B09TNXJVNV/ref=sr_1_12?crid=G5XLOJBLXM5H&keywords=fine+dimension+dimensional+drawing+template&qid=1677065163&sprefix=fine+dimension+dimensional+drawing+template,aps,99&sr=8-12

This is another one, but designed only for precision dimensional layout: https://www.amazon.com/Precision-Woodworking-Stainless-Positioning-Carpenter/dp/B08W3KP7C7/ref=sr_1_11?crid=3KWFCARSD5E8L&keywords=fine+dimension+marking+tools&qid=1677067442&sprefix=fine+dimension+marking+tools,aps,103&sr=8-11

I'm almost certain I've seen tools like that which use slots, and not just points. Just can't find 'em now, but I think you get the idea.

These tools are designed for use with thin lead pencils, but there are metal plate versions which are designed to make allow for fine line differentials for architectural pencils. 1/64" or so. The idea would be to used one of them as a mask for painting small "stripes"...just enough different in color to cause that double take. Put a bunch of wires stretched alongside one another, cross them with a mask something like that, and spray. See what you get. And the mask could be cleaned and used again, if it was a one piece thin metal.

Of course you could also have such a fine mask photo etched. Almost certainly the better choice. Or etch one yourself.

#2: wind the double strands back and forth around pins on a build/paint jig, to whatever length you choose. 15"=200' sections in N-scale, etc.
Then cross them with single strands (also around pins). US barbed wire runs between 6" and 9" between barbs, as best I can tell. A bit of upward tension on the base (long) wires, and a bit of downward tension on the cross "barbs" should bring them into direct contact with one another. At which point you can (hopefully) fasten one set to the other.

Two ways I see to do that: Solder, the idea being that the melted solder "wicks" along the double stranded wires and thereby connect and (hopefully) hold the crossed "barbs' in place.

#3: Same as above, except use thinned out cyanoacrylate, which might/should "wick" out in same way as the solder.

The wicking effect I mention is capillary attraction, in the same way water can slip under a flat plate, etc. Or in the same the thinned down water/liquids we often use to wet our track ballasts to allow thin adhesives to hold them in place. I THINK the wicking effect would only work because of the two strands, which would draw the solder or fluid along the primary strand. It MIGHT work too with a single strand base, but I would guess probably not. And it's the wicking effect which keeps you from having to solder each joint individually....

[Which would be a particular niche in...He**l

#4: Use photographs of flat fencing, with clear openings, just where they would be on the original. Photographic modeling...using photo prints or slide bases can make simple prints look like very highly detailed models. The well known RPI New England Berkshire and Western club used some prints like these to give the illusion of finely crafted models, albeit not quite in the forground. You do reach a point up close where the fact that it's a photo print gives the game away, yes. Photo prints also have a shine, which can be a problem. But a bit further back, no one is likely to notice, let alone ask.

----

That said, I also saw some roads on a layout which had my jaw dropping as to their real-world appearance. Just amazing.

Then the modeler gave the technique away--the roads were PHOTOS of real roads he had shot using a drone pointed downward, and then printed and put in place. Just brilliant, I thought, and I immediately bought a twin pack of drones for just that purpose. Haven't tried it yet, but I'll post if it works out.

[DJ/Ken should try this first. He's a licensed drone pilot after all, and his downward videos make it clear how well it could work for him]

I have a couple other uses too for my own drones, but I cant get up to the mountains until spring to try 'em out. We'll see how it works out.
 
Last edited:
This is unbelievable - I am STILL waiting for the Hobby Lobby stuff to arrive!!!!!!!!!

DHL has now palmed it off onto USPS in OHIO for some damn reason so who the hell knows when it'll turn up in New York State, let alone my place. What makes it worse is the order was with DHL in Texas for 4 damn days before it went anywhere - unbelievable!!!

Hatton's uses DHL and they can manage to get an order from London to my place in New York State in 3 days virtually to the minute, but here - hell - they can't seem to manage to get something out of Texas in 3 days. It's disgraceful in my opinion.

Never again will I order anything from Hobby Lobby if this is the standard of service they dish up.
Sounds like the stuff I sent you by normal post might beat DHL/UPS. :(


Back
Top