Weathering Rolling Stock, a Continous thread


I used to use Testors DullCote. It always dissolved my pigments and pan pastels.

i have had good success using Tamiya xf86 flat clear straight no thinning. I don‘t see the dissolving of Vallejo’s pigments or the Pan Pastels I use. PSI on the airbrush is 18.

Best to you

Weather’s warming up to where I can soon get back to airbrushing with volatile solvents outdoors.

Testors does dissolve my pastels, too, but on weathered cars, I just compensate by applying a bit extra. But on this bridge, I also shot for dramatic textures on the surface, and got what I wanted. I don’t want to give that back.
 
@TLOC, Just spent some time getting caught up here. Great work! You have given me the wisdom to not try to weather anything until I at least get some better materials to give myself a fighting chance :D
Well thanks PMW for joining and sticking around. Don‘t let materials stop you from weathering.

After retirement (2014) I started weathering again and I started out just using craft paint from Michael’s Craft store. Thinned it down with water and applied as a wash with a brush. Then went to Pan Pastels that are super forgiving. You don’t need to spend to get moving.

I don’t think anybody on this thread will tell you that you have to spend a lot, because you don’t. Just start out with practice models and try things till you find something that works for YOU. I kept lots of notes and still do for formulas but it’s always good when you have to re-do something, you know how to mix it. Post pictures of your adventures. Have fun.
 
Weather’s warming up to where I can soon get back to airbrushing with volatile solvents outdoors.

Testors does dissolve my pastels, too, but on weathered cars, I just compensate by applying a bit extra. But on this bridge, I also shot for dramatic textures on the surface, and got what I wanted. I don’t want to give that back.
Sure don’t blame you for that. I never found the right mix of Pan Pastels to Dullcote that kept some of the pastels on the car. So I played with lots of different clear coats to seal the car.

Another one that worked well for me was Army Painters Matte Clear Air. The issue I had with that was it really gummed up my airbrush and after a few uses I’d have to break down the air brush for a full cleaning.
 
Here’s one of my cars! A Rapido box car with a freelance road name for a friend’s railroad. The Wisconsin and Upper Michigan.

Started as usual:

I inspected the car, washed it in mild soap and water and let it dry overnight

Hit the entire car with a clear coat, using Tamiya xf86 thinned 50/50 with Tamiya’s x20a. Let dry about 60 minutes

The trucks and wheel faces were hand brushed with a mix of #301 Vallejo Panzer Aces light rust and #302 dark rust . Mixed 20% #301 added to 80% #302

IMG_5204.jpeg
IMG_5205.jpeg
IMG_5206.jpeg
IMG_5207.jpeg
IMG_5208.jpeg
IMG_5209.jpeg
IMG_5210.jpeg
IMG_5211.jpeg
IMG_5212.jpeg
IMG_5213.jpeg


The side panels were hand trimmed using Vallejo Air’s #.041 Burnt Umber straight no thinning

I then created a wash using the #302 dark rust from Vallejo Panzer Aces line of paint. Thinned with distilled water maybe 20% paint to 80% distilled water. Brushed on a few times waiting maybe 15 minutes between applications

The roof was done using #301 light rust from the Vallejo Panzer Aces line. Again as a wash 20% to 80%

My idea was to weather this up as a car showing the start of rust but as usual with my own stuff I may have gone to far

A work in process

Your thoughts please
 
Well thanks PMW for joining and sticking around. Don‘t let materials stop you from weathering.

After retirement (2014) I started weathering again and I started out just using craft paint from Michael’s Craft store. Thinned it down with water and applied as a wash with a brush. Then went to Pan Pastels that are super forgiving. You don’t need to spend to get moving.

I don’t think anybody on this thread will tell you that you have to spend a lot, because you don’t. Just start out with practice models and try things till you find something that works for YOU. I kept lots of notes and still do for formulas but it’s always good when you have to re-do something, you know how to mix it. Post pictures of your adventures. Have fun.
My first efforts have been using watered down paint like you described. The first few came out pretty bad ☹️. This one I did a couple of weeks ago and might even stay on the layout though far from great 😀

IMG_2503.jpeg
 
Here’s one of my cars! A Rapido box car with a freelance road name for a friend’s railroad. The Wisconsin and Upper Michigan.

Started as usual:

I inspected the car, washed it in mild soap and water and let it dry overnight

Hit the entire car with a clear coat, using Tamiya xf86 thinned 50/50 with Tamiya’s x20a. Let dry about 60 minutes

The trucks and wheel faces were hand brushed with a mix of #301 Vallejo Panzer Aces light rust and #302 dark rust . Mixed 20% #301 added to 80% #302

View attachment 181926View attachment 181927View attachment 181928View attachment 181929View attachment 181930View attachment 181931View attachment 181932View attachment 181933View attachment 181934View attachment 181935

The side panels were hand trimmed using Vallejo Air’s #.041 Burnt Umber straight no thinning

I then created a wash using the #302 dark rust from Vallejo Panzer Aces line of paint. Thinned with distilled water maybe 20% paint to 80% distilled water. Brushed on a few times waiting maybe 15 minutes between applications

The roof was done using #301 light rust from the Vallejo Panzer Aces line. Again as a wash 20% to 80%

My idea was to weather this up as a car showing the start of rust but as usual with my own stuff I may have gone to far

A work in process

Your thoughts please
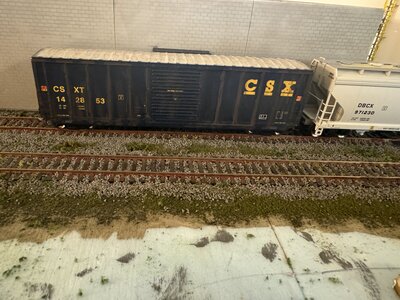
Vallejo are a definite worthy product, I once had a local supplier but bought one to trial, airbrush liked it, then they moved to another town,
 
.

Another one that worked well for me was Army Painters Matte Clear Air. The issue I had with that was it really gummed up my airbrush and after a few uses I’d have to break down the air brush for a full cleaning.

I’ve got some Vallejo matte clear varnish, as well. Just don’t break it out too often.
 
Here’s one of my cars! A Rapido box car with a freelance road name for a friend’s railroad. The Wisconsin and Upper Michigan.

Started as usual:

I inspected the car, washed it in mild soap and water and let it dry overnight

Hit the entire car with a clear coat, using Tamiya xf86 thinned 50/50 with Tamiya’s x20a. Let dry about 60 minutes

The trucks and wheel faces were hand brushed with a mix of #301 Vallejo Panzer Aces light rust and #302 dark rust . Mixed 20% #301 added to 80% #302

View attachment 181926My idea was to weather this up as a car showing the start of rust but as usual with my own stuff I may have gone to far

A work in process

Your thoughts please
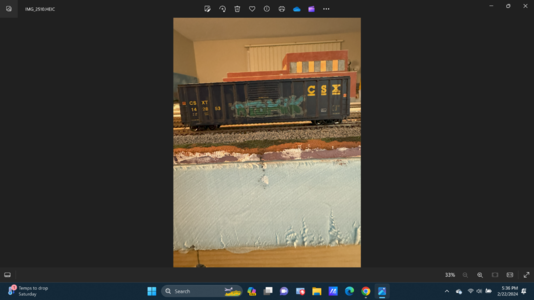
Your first four photos show your goal was well-met. The others seem darker. Lighting, exposure, other side of car?
 
My toughest critic is my son and I sent him some pictures. He likes but asked, what about the wheels? Iused to rust the springs to make them noticeable and sometimes added a gloss black to represent grease on the roller bearings! So I went back and added rust to the springs and grease to the bearings.

Took some pictures and since this car does go through a hump yard the wheel rim needs to be cleaned up. But I noticed some voids in the wheel face

IMG_4440.jpeg
IMG_4439.jpeg
IMG_4438.jpeg


IMG_4441.jpeg
He also suggested leaving the roof but I will add something darker over the rust letting the rust show in spots
IMG_4442.jpeg
 
Took new pictures on a turntable so the light is constant. Couplers and pockets are next up and another spray of a clear coat. The roof will get another shading in the morning

IMG_4447.jpeg
IMG_4446.jpeg
IMG_4445.jpeg
IMG_4444.jpeg

Vallejo are a definite worthy product, I once had a local supplier but bought one to trial, airbrush liked it, then they moved to another town,
Buy online, the Vallejo Air series of paints are very easy to use
 
My first efforts have been using watered down paint like you described. The first few came out pretty bad ☹️. This one I did a couple of weeks ago and might even stay on the layout though far from great 😀

View attachment 181936
So you have begun…

How did you do it? What was your paint mixing formula? Did you clean the car first? Did you try to fade the color of the car? What kind of brush, round, flat or pointy?

Did you seal the car? If you DID NOT, you should be able to strip it and start again. I use Isopropyl Alcohol 91% concentration to remove paint. If you did seal it, it just takes longer to strip.

You stated you think it’s pretty bad. Don‘t consider it bad, consider it practice. We all need to practice, practice and practice some more!

Frustration starting to weather is normal and Smudge (Chris) can chime in on that. Paul, it’s a learning process and it doesn’t happen overnight
 
My first efforts have been using watered down paint like you described. The first few came out pretty bad ☹️. This one I did a couple of weeks ago and might even stay on the layout though far from great 😀

View attachment 181936

Two-color cars like that are tough to start out with; what works for the white part may not work to well with the dark. Can make for some extra challenge.

That’s not a bad start.
 
My first efforts have been using watered down paint like you described. The first few came out pretty bad ☹️. This one I did a couple of weeks ago and might even stay on the layout though far from great 😀

View attachment 181936
That looks pretty good Paul, it takes a bit of time to find a technique that works for you, keep it up, I expect we will see more of your work in the not too distant future.
 
My first efforts have been using watered down paint like you described. The first few came out pretty bad ☹️. This one I did a couple of weeks ago and might even stay on the layout though far from great 😀

View attachment 181936
Looks good Paul. While watching videos of weathering is helpful in seeing different techniques, watching videos of real trains is helpful in actually seeing how they weather. While most video the side of the cars as the pass, look also for drone videos that show the tops of cars and what loads are in gondolas. You'll see in this video for example the tops of car in how they rust, walkway sections replaced, grain spillage, and how some are graffiti free or it's been painted over. Always remember no 2 cars weather the same and no 2 sides weather the same.
 
Last edited:


Back
Top