TLOC
Well-Known Member
Thanks Chris. I have the idea and the pictures. Now I need to pull it offDefinately looks like you know where you want to go regarding the loco weathering, I'm really looking forward to see how this progresses.

Thanks Chris. I have the idea and the pictures. Now I need to pull it offDefinately looks like you know where you want to go regarding the loco weathering, I'm really looking forward to see how this progresses.
I have no doubt you will, going to be an interesting "tutorial" I think.Thanks Chris. I have the idea and the pictures. Now I need to pull it off
Looks great Tom. I've never take one apart to weather. I feel the least amount of handling the better. I start at the bottom with the engine upside down. A dull coat to start, weathering and end with a dull coat. I've seen videos where guys take them apart, but they don't show putting them back together and what touch they do due to all the handling.Hit the bench and the locomotive this morning between my Wednesday vacuuming chores. Heck I even vacuumed my hobby space.
Cleaned up the panel lines last night and worked the sides and the nose this morning.
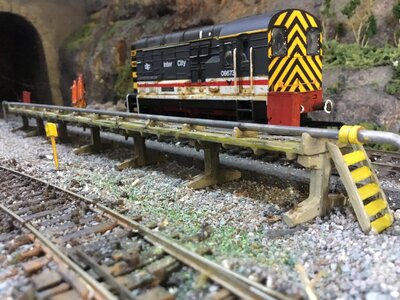
I am nor real happy with it but it is ok. Lots of little things to clean up. View attachment 163256View attachment 163257View attachment 163258View attachment 163259
The cab sides definitely need more fading. The walkways didn’t blend as I was hoping. I believe the next spray of clear coat will handle that. I then will hit the sides with a blending spray of charcoal black.
Other than the fading on the cab I can live with this.
Next up is fading the cab, nose, back end and the roof.
Thoughts please…
I needed to change the speakers and add the buddy board to the electronics so I had to take them apart any way. I sprayed my clear varnish and they are all drying. I put them in a cabinet to dry and avoid any dust. We’ll see how it looks after I put everything together.Looks great Tom. I've never take one apart to weather. I feel the least amount of handling the better. I start at the bottom with the engine upside down. A dull coat to start, weathering and end with a dull coat. I've seen videos where guys take them apart, but they don't show putting them back together and what touch they do due to all the handling.
The rusting texture on this one really bares close detail excellent workHit the bench and the locomotive this morning between my Wednesday vacuuming chores. Heck I even vacuumed my hobby space.
Cleaned up the panel lines last night and worked the sides and the nose this morning.
I am nor real happy with it but it is ok. Lots of little things to clean up. View attachment 163256View attachment 163257View attachment 163258View attachment 163259
The cab sides definitely need more fading. The walkways didn’t blend as I was hoping. I believe the next spray of clear coat will handle that. I then will hit the sides with a blending spray of charcoal black.
Other than the fading on the cab I can live with this.
Next up is fading the cab, nose, back end and the roof.
Thoughts please…
Thank youThe rusting texture on this one really bares close detail excellent work
Looks great especially in the scenes you have it inClass 08 cont.d
once I think it passes master I tend to trial it on the layout
View attachment 163494
View attachment 163495
View attachment 163496
and hide any really dodgy bits
View attachment 163497
View attachment 163498
relying on similar actions on other elements offer up enough dirt and grime to stop it looking p,asticky
I do purposely put weathered items together in order to get a scene, anything on the layout is worthy of a simple upgrade imoLooks great especially in the scenes you have it in
Yes, unfortunately not quite what you were after I think, whether to strip it off is up to you. But as your more knowledgeable about these things than me, is there an alternative to reversing this without stripping it ?I added a final clear coat the other day to CN9433 and didn’t really look at it until Sunday. I was trying for this
View attachment 163609
Had this
View attachment 163610View attachment 163611But got this
View attachment 163612I am not real happy and not really sure what I should attempt. These are my 2 Gp40-2L’s as a comparison
View attachment 163613View attachment 163614View attachment 163615Turns out when I went to use the clear coat I grabbed the clearly marked CLEAR with x-21 added. I know because the clear with X-21 is still sitting at the paint booth and the clear is in the rack at the paint bench
X-21 is the Tamiya base coat that gives a chalky look. I need to take a picture of the MP15Ac so you can really laugh.
Suggestions and yes I am open to stripping it off and starting the weathering over