Weathering buildings and accompanying details, a continuous thread


Jaz avalley

Station cat
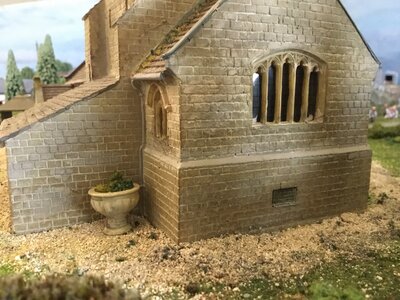
Buildings, wether you build from scratch or buy a kit improve a kit or buy ready to plonk, they often look that little more realistic with a touch of weathering, allowing them to sink into the background scenery.

I often think if they avoid the floating look by just hiding the fact they just sit there is a massive improvement. The thing that usually stands out for me is that ready to plonk often has much better detailing than the paint job takes advantage of
276EBB9B-60E6-49F8-B6D8-D243480C42D2.jpeg

even a small simple shed and coal bunker, can benefit from a little love
8866D0A2-8F07-4A80-AF01-56C906E13F2D.jpeg

here I purposely left the shed floating because in real life they often are off the ground to stop the wood rotting, but I do give it a white mixed with grey for that aged unloved look, and a touch of thinned green at the base for the inevitable growth when not maintained properly.
The coalbunker has a metal lid with a touch of rust, and I broke my usual rule of letting water drip down as nature occurs in order to add different levels of cement,gray,coal powder,again a touch of green and sone coal.
The shed had wood effect poorly shown off by the manufacturers paint job but improved with a thick paint, the ground has its own texture,and as the tree is so close I added some model grass to up its level,then angled the photograph for a decent long view
8C1928D7-48FD-4E3D-82C5-3D3F529B72DE.jpeg

here you see I added a dark shadow into the grooves before the highlighted grey
4F908EEF-B18A-4704-9788-B5138EA4BF9F.jpeg

I used more loose ‘grass’ to embed the bunker
3D818A0A-CAE8-4879-B661-62603491D98E.jpeg


and the focus helps that the wall is not as well grounded

TIP if you usa a iphone or iPad or similar check when using your camera mode by touching the screen and see if a box appears,if it does this is a focus option allowing you to concentrate the focus on a specific small detail you want to sharpen the focus on,it will also usually soften focus further away, very helpful for modellers
 
To my mind trialling small pieces is a good start, less expensive, easier to improve, which helps you build confidence,
A simple telephone box
F3EAC03A-2AFD-4390-87AE-7E7E4BD58C6C.jpeg

first set is just getting rid of the plastic finish, you can use dulcote or similar, I tend to jump to dirt
A6A5AE86-EEC9-4F1C-835F-40A2D5608B55.jpeg

to my mind this looks better than the adjacent postbox which screams plastic
1A3671DE-2908-475E-8859-49B537DC2198.jpeg

I like weathering,and often doing the same finish on nearby buildings improves the overall look
C65B06CD-A7A6-4714-BC93-CF6560F58ECB.jpeg

and then you have light, sone modellers like my self are lucky enough to have natural light,others not so much, and light tends to have a specific impact,and in some cases painting in that finish can help with the realism, here a dirty white infers reflections on the telephone box glass
C13F7426-6EF2-4AD5-BD56-E66C5C5A0BD5.jpeg

here you see the postbox has had a similar upgrade, dirt on the main box,dark shadow in the letterbox hole,and some smudged black inferring lettering on the instructions panel.
close up you’ll still see any lacking in the model
but pull back and let it blend
68A25428-FF99-4C0A-AD36-6229505703DF.jpeg


And it starts to fall into a whole,where your eye is processing the whole picture
 
The postbox as mentioned in previous
FE8541BE-CF3C-4CD9-A28B-487BF128AD65.jpeg

reference for those not exposed to the real thing
AB8C9D99-5A4B-4140-AEE4-C311EFAE2D90.jpeg

4AAF55EF-3311-4C0F-ADF6-265D2B1B1B58.jpeg
79236E80-6020-4FC7-A0AD-C92DF3426577.jpeg
BA72731A-6F53-44D1-B936-BA13844698F7.jpeg
DF9896AE-8A65-4868-9ED8-EFFB411E121E.jpeg

49CB74FF-B61D-4F0C-8544-90F4265FFC0F.jpeg

the English are quintessentially twee lol,and knitted seasonal toppings on postbox is quite popular in my area,some ladies have a lot of spare time,I plan on modelling this little gem in the future.
 
I’ll go back to small ‘buildings’ and simple engraves but meantime a church upgrade,a lovely building but I gave it some little tweaks,and as it represents a real building reference pictures are specific
D7D1D223-D858-4090-9FF7-629F6B12C225.jpeg

pristine from the box, excellent detailing
1E771D12-0BE3-4759-8A6D-061C25452A67.jpeg

here natural shadows enhance the finish
BEE339DB-3E72-47B8-B763-10D526EB65F6.jpeg

the real building you can see growth on the roof and the layout
21343954-7BFF-409A-BC6F-67EF778ED5B2.jpeg

88380BDA-CC87-49A4-8C96-60FF146AC04B.jpeg

some transparent greens and browns for dirt and some static grass for moss
So no need to paint it in
rather than a birds eye view, a low level taken late afternoon offers more atmosphere, and soft lighting taking full advantage of the building and its setting
0DBE7633-CA3A-4F80-8F17-E9117D5BEA38.jpeg
D2F70F8C-5527-4AAF-87C4-FE7B62312DC6.jpeg
32E9BD76-2A55-47FE-910B-6280CE2DFD94.jpeg
 

Attachments

  • 9362010E-1253-48B3-8B82-19EA836E4CF9.jpeg
    9362010E-1253-48B3-8B82-19EA836E4CF9.jpeg
    535.6 KB · Views: 64
Then figures or machinery to add life and movement even though static, and deep shadows
 

Attachments

  • 88588CEB-18BA-4045-B20C-28FFA99457B3.jpeg
    88588CEB-18BA-4045-B20C-28FFA99457B3.jpeg
    546.4 KB · Views: 66
  • 7EAB2366-73A5-4408-9725-228E9AC1CC80.jpeg
    7EAB2366-73A5-4408-9725-228E9AC1CC80.jpeg
    520.1 KB · Views: 58
  • 714F9553-3E9C-4851-9E6D-45F78FB0C7B8.jpeg
    714F9553-3E9C-4851-9E6D-45F78FB0C7B8.jpeg
    532.6 KB · Views: 59
  • 117FD428-57E6-4296-9945-0E9DC05BF3B3.jpeg
    117FD428-57E6-4296-9945-0E9DC05BF3B3.jpeg
    584.2 KB · Views: 67
  • 13D10DD0-60C3-4518-BEE9-992D6B6C1C85.jpeg
    13D10DD0-60C3-4518-BEE9-992D6B6C1C85.jpeg
    398.8 KB · Views: 63
A low relief, again does the job, but easy to enhance
8D950C05-48A1-4BD9-AE74-22794933B7DB.jpeg
07F8A171-948C-47A1-B28D-5BE3237D3DDC.jpeg
C029CC23-2178-4F6C-9CEC-375A11CAB748.jpeg

B9CAF014-F5AE-4261-BEFB-EFDB507302FA.jpeg

recolouring the bricks
EBC1799C-7FC3-4737-9BB4-FB9A315EB79F.jpeg

and highlighting the window frames
DD6B3D9E-8D6C-4586-8D52-9E3E6266FC35.jpeg

I considered green for the doors as it was popular in its day but I had a reference picture and copied that instead
F3BF1509-17C6-49A6-9C88-AB5E30B73675.jpeg

D2122696-A4C9-48E8-A0D4-7BADE235159A.jpeg
cottone gave me safety ropes
0F5CCC62-E022-4A46-9E33-E8EFD96926C6.jpeg

A1FCD0D5-D098-4BD2-ABF6-6747B400223C.jpeg

the quality of the paint is slap happy but the upgrade works despite this
 
A quick and simple upgrade
7D8576DA-FB4B-4AFE-A84E-AACD395D2BFB.jpeg

FCAD563A-20C6-4AB9-9C60-F1A8DFF30E26.jpeg

..and no I don’t not break the model I bought it cheap as broken,and thus it needed an appropriate paint job,
dark brown and orange brown for rust and thinned black for dirt
i could have repaired but thought it added character,
AAD9FC11-9BCD-43EB-AEF0-B488CC326E52.jpeg
CBAFC759-2499-4036-946A-6F3544619F64.jpeg
D7699DD7-AB33-4E12-890F-42592F6B19B4.jpeg

I often test with water and look how it lies then add the colour to the wet water
as you can see very little ever stays pristine on my layout, plus a number of the items tend to be previous era items that are still in situ and as such will have aged
 
Incredible scenes you are posting Jaz. Thanks for starting this thread…

Let‘s start here:

you show these 2 phone booths and say you ”tend to jump to dirt”. What do you mean and why don’t you always dull coat 1st? What type of “dirt”? The real stuff, chalks, paint mix, inquiring minds you know…
 

Attachments

  • 40CA4BE3-433B-48F6-BCCB-8F502D2B0B21.jpeg
    40CA4BE3-433B-48F6-BCCB-8F502D2B0B21.jpeg
    432.7 KB · Views: 57
Rust is rust, dark brown orange brown thinned black my go tos
dirt is dirt black brown thinned and powder
growth is green various shades often with brown
and pigeon poop my friends is black and white, lol

signal box bought as abandoned with light weathering, but with the amount of damage portrayed it would easily take an upgrade…mmm…downgrade

1DDA3B53-71CB-4DDB-B451-A62D3C9D90A0.jpeg

as bought, respectable almost
heavy black is used in any areas that ought to have deep shadows,check the roof line
the roof was far too clean that was addressed immediately
701CA7E3-4A42-4A26-AF01-40B7EFE268CD.jpeg

after the full works thrown at it
0FB65B12-FFA2-4491-A06E-BC340E00AE5B.jpeg
A50D6142-2FA6-4AA7-A701-8D7CCE9D1A05.jpeg
3F67B94F-AD4F-4EF7-B67F-E2B304F4B301.jpeg

I look at reference pictures to see where dirt accumulate and imitate
B34314EB-1EEB-4182-8C1A-3FF5267D9830.jpeg

a paintbrush once the paint is used dipped in water is used to mess up the glazing
306E2273-5D91-4030-9149-0062E2A0C0B5.jpeg

I often use a glue that can b e rubbed off if I do not like the result, I rarely handle them so rubbing off does not become an issue
modelled leaves
75ED1D6B-75BE-4203-9D1D-F0338FAF8793.jpeg

turned the signal box on its side dipped a little water between the bricks,literally touched a black paint brush to the water and let it. Spread
similar on the door
2CD9B37A-1E87-4956-85CA-D0DDA30A1E4C.jpeg
ACABA680-1758-4047-8BEA-089A82AD895A.jpeg

as a general rule of thumb less dirt etc high up, close to the ground or ledges or flat horizontal surfaces I go heavier, it wasn’t deep enough but I did consider a birds nest
 
Incredible scenes you are posting Jaz. Thanks for starting this thread…

Let‘s start here:

you show these 2 phone booths and say you ”tend to jump to dirt”. What do you mean and why don’t you always dull coat 1st? What type of “dirt”? The real stuff, chalks, paint mix, inquiring minds you know…
I have dulcote, but I have no patience and I would have to paint walk away let it dry then cone back, yes I know that is the sensible way, lol
i often leave paintbrushes dirty in enough water to stop them drying out,and sometimes take sone time to return not being an organised type of person,so the water has evaporated more darkening the colour, with weathering I mix colours a lot so rarely clean between changing colours so I often have a rather smelly pot which resembles a dirty rag colour, and I often use that as my first vote rather than the dulcote, this can take days or occasionaly cough weeks to nature as walking up and down stairs with the brushes to clean them out is not sonething I do often, but this can be imitated, when you have a small bottle with barely enough paint for a decent job I am not above dribbling in other colours, browns,orange browns dull greens blacks are all favourites.
if towards the end I think it too shiny I like powders which I wet brush or dry brush on as they make different textures, and I like citadel paints because of their special finishes, technical ones especially, although I regularly use layers and work them like camo. That is 3 colours a green a brown a transparent black, I paint like a demented woodpecker touching retreating touching covering the area for a percentage of the work but not a nice smooth 100 percent, once almost dry or comp,etely dry I repeat, and then again with the third colours,
so
a
abc all three
ab 2 of 3
ac 3of 3
B
bc
c
and then I may repeat so some areas have between 1-3 colours but between 1-2 or even 3 layers. Avoiding any type of obvious pattern.
on a loco I tend to go for harder wearing colours and a finishing vote for protection
on static building I am not so bothered, as I rarely man handle them

paint of one description or another is my preference as I like painting but I will mess with anything that takes my fancy
old eye makeup, soot or charcoal from the woodburner stove (not near track or engine parts unless embedded in a decent product so it does not dry fall off and become dust,real coal,real soil, I would use chalks although I don’t really own any except fit an expensive drawing set which I have owned for decades but just cant bring myself to crush…faints.
over the years cheap kids acrylics on sale after Xmas have featured heavily despite the fact I have a very expensive range of proper Railway colours lol
 
tower before left and after a bit more colour was added,pure black to the depths and washes elsewhere and sone grasses then a touch of static grass, the brickwork got a deeper colour, transparent browns and greens usually my favourite citadel colours, but Vallejo would have been a good substitute
2FBDAF22-75AA-444E-97C2-4E3825769348.jpeg
 
Ruins, a square tower, I started painting before i thought to photograph
E08E2655-9775-44A2-9883-1ABFAF04324C.jpeg

again the grout was given a darkening treatment colour runs through the grooves quite easily
a general darkening
then sone glue and grass
A2763EE0-91E4-4D43-8A66-E78FF229D3E2.jpeg
CE06C6B1-A446-4C19-9F1D-A8AD0D3E6A25.jpeg

happy with the initial result I continued in like manner
F85F0BA6-C6B5-4927-A3DC-7995E997E803.jpeg

again acting near where the building will need to sit into the layout
A4662FD4-B077-4A92-A24E-2A7A9B9621D9.jpeg
71C999D7-A7E7-4293-AB01-63D0C125116F.jpeg

I even added some colour to the greenery
FE88F6A4-83FE-4ACF-ABBC-D0CDC86B0061.jpeg
D1DE26EE-E4D9-4050-A904-79E4ECEF2523.jpeg

grass was added on the flat horizontal surfaces, grass seed blown in by the wind gets everywhere
A240C01B-DDAF-470B-ABF1-EDEB456A7A89.jpeg

then the process of building up the ground to hide it
CFF78261-2131-4A12-BD00-D0212C233467.jpeg

even with the grass I use the power of three (minimum) the action of camo colouring is always a happy choice for me,sone birch seed for levels, and sone small green bushes
 
A plain grey diesel tank
painted blue, then white added to fade the paint, before dark brown and orange brown begin the rusting process
08FE86DE-031E-4E19-8692-739FB8D889C9.jpeg
FE34A48D-E753-4C3D-ADEF-4074B9E6A5A3.jpeg
8B24F9DE-9C00-4AFB-8F74-8F2D96055D76.jpeg
B97901FB-CEC5-4838-99D0-FA8CC628ABAE.jpeg
6837B991-FCD3-4909-82EA-EFE2ADAF8645.jpeg
EF246C84-7D8D-4490-BBC5-9091BA9C4AD1.jpeg
A05E2B37-0283-4D99-940B-502109B4AE69.jpeg
A2FC545E-38AB-47E1-88DC-0EC3ECA62F55.jpeg
D473EE36-CD54-427E-80CB-177006E0F4C1.jpeg
271C814E-7838-4E6E-91DF-CDE5E48915FA.jpeg

paints in the picture are likely culprits
i now do. This as a matter of course
as it helps me remember at a later time what I used, pictures re-mace a thousand words….
 
calor gas bottles, often outside houses or businesses
these plastic ones came in a terracotta finish
i repainted a grungy orangey shade, then sone out of focus white naming, then sone thinned black for dirt, do not photograph too close they add detail, and are best not used as the prime focus
6C8F72E1-7EBA-4225-AA71-49461C8F8C4E.jpeg
F4F20A5A-EB1D-4C23-910E-3E85062E1AC6.jpeg
D8B7065E-DEE5-4D6C-977D-CE6938D53C74.jpeg

you can see it’s not a smooth finish paint,
0F6D2D8B-0F8E-48A7-8D7F-E5B5F941C456.jpeg

and the labelling is tough
CF237C80-8913-4E15-863E-E124E8DC8288.jpeg

the dirt emPharisees any detail
C26CAD30-9E5D-45DC-9AC6-5A2D7735DE65.jpeg
D9E83927-D5EC-4D65-BFE1-3837D6B6FAA8.jpeg

out of focus your mind knows what to expect and fills the detail
FDA34B26-0179-4D52-BC4B-069C60822AE1.jpeg

they become an incidental
BB3C5746-AC33-42B4-A5FA-439F7847E21F.jpeg

each substandard detail adds to the overall effect
79E27C97-4656-4F9C-920D-848F995B0E4A.jpeg
 
Now still stretching it a building or a structure
a Hoist, plastic kit,
painted yellow, then dirtied
the chain did not hang well so I added a weight to straighten the ‘ropes’, again add water see where it settles then touch with dirt colours that then bleeds in nicely
1FC13F69-44E7-47AB-BF89-7A85F45933D3.jpeg
1449DD19-B554-425E-928D-1C09E8AFB5A6.jpeg

9A5F2C4A-3E54-46C1-916C-3A069028302C.jpeg

E5FED5B8-DDE1-41B1-81BF-F22535594A4D.jpeg

DC5C161F-F676-45C9-A991-9DF5ACFA0393.jpeg

the weight
I even used some actual railway modelling paints

9080D34A-9C55-4F65-B4AD-4AE134094ABB.jpeg

BA5AAA3A-ADF0-42E4-AD6E-531B40C7C2BE.jpeg

embedded in ballast

257A21FB-48BC-4511-ACA8-BF8484235065.jpeg

1F3A059D-E01A-44CD-9098-2ECB88FBCF2F.jpeg

accompanied by detailing

C3B20E68-FC88-483F-B222-E0B6229CDE88.jpeg


Back
Top