You are using an out of date browser. It may not display this or other websites correctly.
You should upgrade or use an alternative browser.
You should upgrade or use an alternative browser.
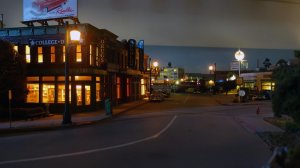
Street lights on main street
- Thread starter Charles Smiley
- Start date
souleman1948
Member
Charles, That is absolutely awesome. How did you do the sidewalks and curbs. I'm doing my downtown this winter and sure could use some insight.
Charles Smiley
cspmovies
Charles, That is absolutely awesome. How did you do the sidewalks and curbs. I'm doing my downtown this winter and sure could use some insight.
the sidewalks are Strathmore board available at art supply stores. The generic name is artist illustration board. it cuts with a razor - even on a 45 degree angle. so i make the roads with it too. I raise the road center with strips of balsa wood so the road has a 'crown' to the center.
i seal with spray can clear lacquer then add texture gray to the road folloed by darker chalk powders.
sidewalks are scored every 4 feet or so with section lines and colored with concrete color then add character with various chalk powders. sidewalks are layered over the road and the excess gives a slab floor for under the buildings.
i hope all that makes sense. go to www.cspmovies.com and find the tab on the left called "model Railroad" and go to the slideshow there. you can see some of the photos there of streets in better light.
It's a quiet night in Walnut Creek, all the residents are home watching "The Ed Sullivan Show" Elvis is on tonight.
Alan Curtis
Member
the sidewalks are Strathmore board available at art supply stores. The generic name is artist illustration board. it cuts with a razor - even on a 45 degree angle. so i make the roads with it too. I raise the road center with strips of balsa wood so the road has a 'crown' to the center.
i seal with spray can clear lacquer then add texture gray to the road folloed by darker chalk powders.
sidewalks are scored every 4 feet or so with section lines and colored with concrete color then add character with various chalk powders. sidewalks are layered over the road and the excess gives a slab floor for under the buildings.
i hope all that makes sense. go to www.cspmovies.com and find the tab on the left called "model Railroad" and go to the slideshow there. you can see some of the photos there of streets in better light.
That slide show is a great resource. Wonderful series of scenes, trouble is I know I could never produce models to that quality! Inspiration, though
Charles Smiley
cspmovies
Thanks Alan. Lots of those models were built decades ago and they have been reworked into what you saw there. So they didn't start out that good. It took several revisions for many of them. So after awhile they start looking good. Also, you don't see the "mistakes" and rejects tossed in the dust bin. 
goscrewyourselves
I'm the one
Charles, yep - looks very good.
Lynn, doing lighting for your buildings and streets is easy and very straight forward - even if you use LED's. If you can wire up a DCC track, turnouts, signals and so forth, you'll breeze through building and street lighting. Believe me, if I can do it - ANYONE can
Lynn, doing lighting for your buildings and streets is easy and very straight forward - even if you use LED's. If you can wire up a DCC track, turnouts, signals and so forth, you'll breeze through building and street lighting. Believe me, if I can do it - ANYONE can
Alan Curtis
Member
Charles, yes, it is amazing that something you thought was great when made, in later years as modeling skills have improved does not look so good anymore. natural progression, I guess.
Tony, I hope you are correct as my wife insists that I add interior and lighting to an American stainless steel diner kit recently completed!
Tony, I hope you are correct as my wife insists that I add interior and lighting to an American stainless steel diner kit recently completed!
goscrewyourselves
I'm the one
Alan,
Installing lights into buildings is very easy, regardless of whether you use the good old fashioned incandescent Model Power Self Adhesive lights or LED's.
If you are wanting to light a modern structure, the diner, I'd suggest using LED's (cool white perhaps) with nothing less than a 470 ohm resister. That should give you the effect that you might see (lighting wise) in such a building.
Feel free to PM or email me if you need any specific help or a step by step guide to anything.
Alan Curtis
Member
Thanks Tony, may be needing you. 


