
You are using an out of date browser. It may not display this or other websites correctly.
You should upgrade or use an alternative browser.
You should upgrade or use an alternative browser.
HO 12"x80" test/switching/display layout
- Thread starter leva
- Start date

montanan
Whiskey Merchant
It isn't John Allens Timesaver, but it sure looks interesting. I have plenty of space for a layout but being that I really enjoy switching, I sacrificed a long main line run for a switching layout. Good luck on the project. Keep us posted and welcome aboard.
Here's John Allens timesaver. I did operate on it a few times, a lot of fun.

Here's John Allens timesaver. I did operate on it a few times, a lot of fun.
Plans changed. Used plywood to construct a 96" x 13" layout section. Sloooooooooowly working on it. The black stuff is this rubber mat that they use underneath paper rolls when being transported by truck. The HUGE paper rolls just stand on end and the weight and rubber keep them from moving around.
Layout doesn't have any legs yet. I'm still playing with the height.


Layout doesn't have any legs yet. I'm still playing with the height.
Last edited by a moderator:
Got legs and am gluing down some rubber with silicon. It's not the best adhesive, but I like how flexible it is when it dries. On top of the plywood I have a .75" thick layer of polyiso glued down. The foam with the aluminum foil on one side. Sold as Rmax at Home Depot. I peeled the foil and paper off of most of it. I used Glidden Gripper Interior/Exterior Primer & Sealer to attach the foam to the plywood.
The foam is a bit rough because it was salvaged from another project.
Legs are 2x2's and layout surface is about 51" high.
Here's a picture, not much to see.

The foam is a bit rough because it was salvaged from another project.
Legs are 2x2's and layout surface is about 51" high.
Here's a picture, not much to see.
Last edited by a moderator:
Epimetheus
Member
Rough foam is a good thing - it gives the ground more texture. I like the way you are constructing it of stuff you had around. There is no right way to build it as long as the trains do not derail.
I prefer the second layout to the first although the second has no run-around. You can use 2 small engines or use the 5-finger road engine to complete the train.
I prefer the second layout to the first although the second has no run-around. You can use 2 small engines or use the 5-finger road engine to complete the train.
Updates as of yesterday.
I started soldering on feeders to the turnouts. I started by using a new iron that I purchased specifically for this from my local hobby shop, was trying to support my local hobby and stuff. Well the iron was a piece of crap, and dangerous too. I soldered one turnout with it and when I was going to place the iron on the ground some hot golden colored (solder?) metal came flying out and burnt right through the rubber foam mat I was working on. Don't care about the mat, but I do care about burning my skin. Also looking inside the tube it was red hot and the tip on the iron was horrible, I kept having to clean it repeatedly. Anyway, that's $20 I'll never get back, and the hobby shop ended up closing in December anyway. Probably because of the Hobby Lobby that's being built in town.
So I went back to my trusted Weller soldering gun with it's huge tip. I bought a pack of copper tips for it awhile back and love it. I've tinned the tip and it barely needs any cleaning. I mainly bought it for when I got into the RC hobby and needed to solder wire sizes up to 10 gauge to connectors.
The soldering gun does make a mess out of the ties, but only on the bottom. The Peco ties seem to hold up just fine. At 140 watts it takes seconds to make the joint. I used 20 gauge solid wire for feeders.
I did have an issue on one turnout where I caught the rail from underneath when nipping of some plastic tie webbing. The rail popped off and broke what looks like two small spot welds where the point rails hinge on. I repaired it by nipping off the small plastic representations of spike heads, then tinned the rail and put flux on the little tab of metal where the point rails attach.
Then placed the rail on the turnout and used the soldering gun on the flange to solder the rail down. I used some super glue to further hold down the rail the rest of it's length.
The first turnout I soldered feeders to I didn't bend the wire down into a slight U shape and then realized I might have to pile up some ballast to hide it. Also I had the feeders coming down at the edge of the turnout, which would require two holes to be drilled into the layout surface to run the feeders down below. On subsequent turnouts I put a bend in the wires and attached them so the feeders would come down the middle of the track and just require one hole drilled into the layout. Also this way I didn't have a wire sticking out to the side of the turnout.
The frogs come prewired, so no soldering there. I am having the frogs powered with a Frog Juicer.
I cut two lengths of flex track and soldered feeders to them as well. On the curved piece I first used a Sharpie to make a mark on the rails where feeders could attach and not foul up the ties. Then I cut the webbing, spread the ties out and soldered on the feeders. Then once curved the feeders are almost exactly across from each other and I didn't have to cut the ties to get around the solder joints. I'm going to practice with my other soldering iron that has a fine tip so that I can just solder on a feeder underneath the rail between the ties without melting them.
No track is attached yet, I am waiting on insulated rail joiners. I completely forgot about purchasing some. I need to isolate the frogs, except for the #6 Insulafrog turnout. All the rest are #5 Electrofrogs, and one wye.
The #6 turnout is for future expansion, of which I really have no idea yet. I need a longer switching lead, and would like a place to runaround cars, and more tracks with some basic scenery to admire my railroad cars. Which sadly are mostly in their boxes, which are in boxes") .
.
Then after that I can expand to the right of the layout for nine feet. I just need a removable section for access to the electrical panel.
I washed all track with soapy water after soldering, I got the idea from some guy on Youtube, to clean off flux and better adhesion of paint to ties. I used CorrosionX on the wire that holds the points in place and where the point rails are hinged. Also I put a drop of CorrosionX where the point rails contact the stock rails. I don't want any paint or adhesives to get into those areas. And I was worried the small springy wire that holds the points in place would rust.
Pictures!
First turnout, done with the crap iron.

The crap Trakpower iron, and black holes in mat and some melted stuff on tile.

The gun.

Big soldering tip damage.
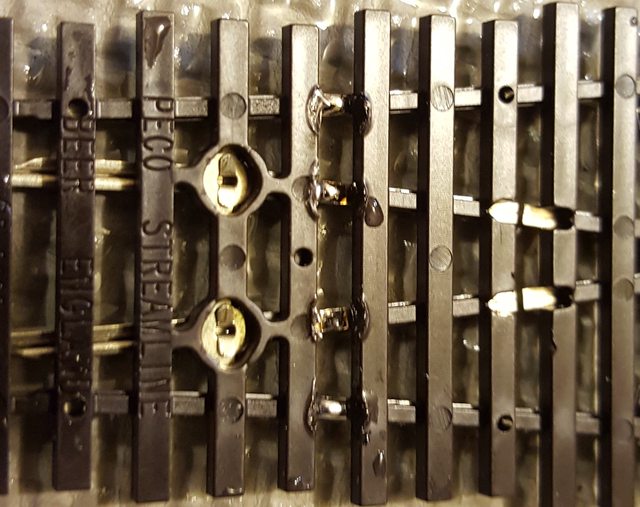
The moment when I realized I should have my feeders come down the middle, like the black wire.

Rail popped off when I caught the bottom with my nippers. Two small spot welds on the right side.

Fixed, the white stuff is the super glue.

Sharpie marks for feeders on curve.

Lightly filed to mark where to attach feeders.

Progress so far, not sure of final placement of siding.

I started soldering on feeders to the turnouts. I started by using a new iron that I purchased specifically for this from my local hobby shop, was trying to support my local hobby and stuff. Well the iron was a piece of crap, and dangerous too. I soldered one turnout with it and when I was going to place the iron on the ground some hot golden colored (solder?) metal came flying out and burnt right through the rubber foam mat I was working on. Don't care about the mat, but I do care about burning my skin. Also looking inside the tube it was red hot and the tip on the iron was horrible, I kept having to clean it repeatedly. Anyway, that's $20 I'll never get back, and the hobby shop ended up closing in December anyway. Probably because of the Hobby Lobby that's being built in town.
So I went back to my trusted Weller soldering gun with it's huge tip. I bought a pack of copper tips for it awhile back and love it. I've tinned the tip and it barely needs any cleaning. I mainly bought it for when I got into the RC hobby and needed to solder wire sizes up to 10 gauge to connectors.
The soldering gun does make a mess out of the ties, but only on the bottom. The Peco ties seem to hold up just fine. At 140 watts it takes seconds to make the joint. I used 20 gauge solid wire for feeders.
I did have an issue on one turnout where I caught the rail from underneath when nipping of some plastic tie webbing. The rail popped off and broke what looks like two small spot welds where the point rails hinge on. I repaired it by nipping off the small plastic representations of spike heads, then tinned the rail and put flux on the little tab of metal where the point rails attach.
Then placed the rail on the turnout and used the soldering gun on the flange to solder the rail down. I used some super glue to further hold down the rail the rest of it's length.
The first turnout I soldered feeders to I didn't bend the wire down into a slight U shape and then realized I might have to pile up some ballast to hide it. Also I had the feeders coming down at the edge of the turnout, which would require two holes to be drilled into the layout surface to run the feeders down below. On subsequent turnouts I put a bend in the wires and attached them so the feeders would come down the middle of the track and just require one hole drilled into the layout. Also this way I didn't have a wire sticking out to the side of the turnout.
The frogs come prewired, so no soldering there. I am having the frogs powered with a Frog Juicer.
I cut two lengths of flex track and soldered feeders to them as well. On the curved piece I first used a Sharpie to make a mark on the rails where feeders could attach and not foul up the ties. Then I cut the webbing, spread the ties out and soldered on the feeders. Then once curved the feeders are almost exactly across from each other and I didn't have to cut the ties to get around the solder joints. I'm going to practice with my other soldering iron that has a fine tip so that I can just solder on a feeder underneath the rail between the ties without melting them.
No track is attached yet, I am waiting on insulated rail joiners. I completely forgot about purchasing some. I need to isolate the frogs, except for the #6 Insulafrog turnout. All the rest are #5 Electrofrogs, and one wye.
The #6 turnout is for future expansion, of which I really have no idea yet. I need a longer switching lead, and would like a place to runaround cars, and more tracks with some basic scenery to admire my railroad cars. Which sadly are mostly in their boxes, which are in boxes
.Then after that I can expand to the right of the layout for nine feet. I just need a removable section for access to the electrical panel.
I washed all track with soapy water after soldering, I got the idea from some guy on Youtube, to clean off flux and better adhesion of paint to ties. I used CorrosionX on the wire that holds the points in place and where the point rails are hinged. Also I put a drop of CorrosionX where the point rails contact the stock rails. I don't want any paint or adhesives to get into those areas. And I was worried the small springy wire that holds the points in place would rust.
Pictures!
First turnout, done with the crap iron.
The crap Trakpower iron, and black holes in mat and some melted stuff on tile.
The gun.
Big soldering tip damage.
The moment when I realized I should have my feeders come down the middle, like the black wire.
Rail popped off when I caught the bottom with my nippers. Two small spot welds on the right side.
Fixed, the white stuff is the super glue.
Sharpie marks for feeders on curve.
Lightly filed to mark where to attach feeders.
Progress so far, not sure of final placement of siding.
Last edited by a moderator:

flyboy2610
Loveably weird
I have that same Weller gun. I use it all the time. I don't solder my feeders to the bottom of the rail, though. I solder them to the outside. Once the track is ballasted they will be hidden.


Greg@mnrr
Section Hand
leva:
I will be following your progress since I plan on building a John Allen Time Saver. I model in HO, but just may construct it in N scale.
I like switching and the Time Saver will give the guys in my informal group a way to spend time during our meetings and non-modelers a taste of operation and switching when running a switcher.
Greg
