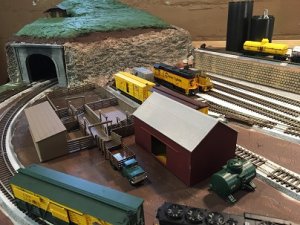
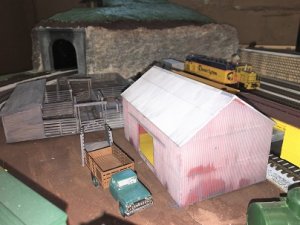
Walther's Stock Yard Kit....


PrairieKnight

Active Member
Has anyone built the stock yard kit from Walther's? I opened the box today and found the directions lacking and very confusing. Also, if anyone has any suggestions on how I can get the grey patina wood affect using acrylics on the fences and structures in the kit, I sure would appreciate the help.
 
PrairieKnight:

I constructed two of the kits and once you start the kits are relatively easy to built. I air brushed mine a light mix of gray and flat black, thinned with 70% alcohol. I applied the mixture in light coats. The lower areas along the bottom of the fencing I air brushed rail brown in light coats.

Once the paint dried, I did a wash of india ink and alcohol to bring out the details.

I took a photo which I'll post if I can find it.

Greg
 
Here's a photo of the stockyard while in the painting stages...no "brown" as been added as of yet.

Walthers Stockyard 001.jpg
 
Out of the box the fencing is gray and all I did was to give it a crappy paint job with a rattle can and the fencing came out looking weathered.

attachment.php
 
Last edited by a moderator:
Chet....I think my fencing was a brown color. Need to look at some left over parts to be sure.

Greg
 
Having to kitbash the stock pens into the available space I have, I had plenty of left over parts.
 
PK -
I opened the box today and found the directions lacking and very confusing.

Typical of most Walther's instructions, but as Greg posted, it's relatively easy once you get started. You do have to pay attention to some of the fence sections as I recall, as some are slightly different than others. I'll try to remember to get a picture when I head out to the train shed later.

Willie
 
Wilie - You are so right about Walthers directions. They're more of a suggestion. I find it easier scratch building than following some of Walthers directions.
 
Wow.. I appreciate the replies.

Greg: I appreciate the color combination and thinning percentage. One other question, with all of the surfaces that need to be painted in this kit, did you paint before assembly? Or did you assemble and then airbrush. I am still working with my Paasche double action as far as thinning and air pressure and so on.... still learning through trial and error....... hoping to avoid another error...if you know what I mean. Great picture.

Chet: Great picture. I just finished the Signal Tower kit that is in the picture that you posted.

Willie : I appreciate the advice... I will watch the fencing sections when assembling.
 
PraireKnight:

I'm not much of a chemist, but I mixed the paint as follows:

20 parts gray
5 parts black
75 parts Alcohol

This mixture is really a matter of what you want to be the finished product. Set the mixture for a very light coast and do several coats. The paint dries fast being an alcohol based mix.

I assembled the pen with solvent cement and then painted it. Try "dry" assembling the kits in stages to get the feel for the project. I started on the front first.

Have fun.

Greg
 
The Walthers stockyard kit used to come with a set of 18 cattle which required painting. The cattle were also sold as a separate detail item. Unfortunately Walthers discontinued the cattle from both the stockyard kit and separate scenic item several years ago. A reply to an inquiry to Walthers indicated they had no plans to make the cattle again. But wait there's hope apart from eBay. Walthers also sells a LifeLike cattle pen complete with 12 head of beef cattle. At a price of about $12 it was worth it just for the cattle so I bought two. I am not using the LifeLike very clunky cattle pens designed to be assembled without adhesive as more of a toy. I am building a cattle pen to match the pen at Walnut Creek on the SP San Ramon branch. I did find a set of the Walther's cattle on eBaay about a year ago and it cost more than the 3 LifeLik pens by the time you included shipping.

Ken
 
I managed to pick up enough of Walthers cattle that I have enough to make a pretty good size herd. There are other companies offering cattle but they are so expensive compared to the old Walthers cattle. We raise black angus up here in Montana so painting them wasn't a problem.
 
All,

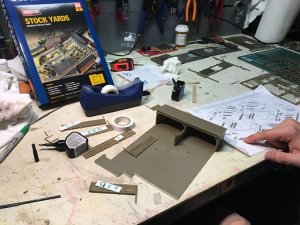
I appreciate the advice and suggestions. I wanted to post a couple pictures of the stock yard:

Stock yard on the bench.jpg

Good thing there are no audio files on this post. There were some words used during the cutting and splicing the fence sections together that are not suitable for this forum. This was a two man build. And just as was posted...the directions were not as much help as the picture on the box was for the assembly.


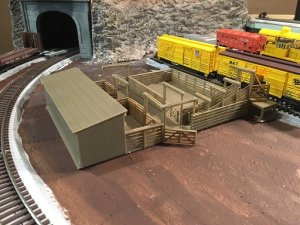
Stock yard placement.jpg

This is where we are planning to put it on the 4 X 8 layout. We had to modify the plans...er...I mean the picture ;) in order to make it work in the space.

Thanks again everyone. I have alot of painting, weathering, and scenery work to do before I start looking for cattle...and eventually a couple cow pies.
 
It looks good. I wish I would have had the room to put down the entire kit, but due to space limitations, I had to condense the pens.
 
I know a fellow model railroader who on a prior layout that had two Walther's Champion Packing plants that he used to construct one large plant. This along with the additional stock yards was impressive.

He also added a long yard along the plant to hold stock cars, reefers and box cars.

He had a "whole" herd of different cattle.

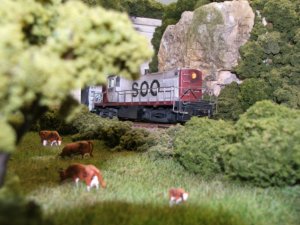
Here's photo of my "stock Yard"....have the pens, yet to be installed somewhere on the layout, maybe on the future expansion area.

Greg

SOO and cows.jpg
 
Greg,

That is some fantastic scenery work. The lighting on the photo with the shade areas is very good. The weathering on the SOO locomotive is something I am striving for with structures and rolling stock at the moment. Did you use powder, chalk, airbrush on the locomotive?
 
PraireKnight:

Thanks for your comments...the SOO locomotive was one of the first locomotives I weathered and was actually the result of a mistake. The cab roof was scratched and I painted it a Grimy Black with a air brush. Once I started, I used an airbrush to lightly weather the entire locomotive. I also used caulks on the sides and grills.

To simulate rust, I tapped on white glue with a small paint brush and added AIM power products over the white glue. This added a 3-D affect to the rusted areas.

Friends called this loco a rust bucket in action.

I also installed a Digitrax decoder.

I had a habit of putting locomotives on a water heater the layout and I forgot this loco and it was on the heater for some time and the heat from the vent disfigured one side of the cab. It is slight and most never notice it when the loco passes by.

Greg
 
I don't remember being confused by the dis-tructions! I probably didn't use them as a look at the box cover pretty much explains things. I think I sprayed my fences and the walls of the shelters with Floquil Roof Brown and then weathered every things with light gray and white washes. I make my washes with Acrylic paints diluted with water. Mine did come with some cattle; but, I bought more, I panted them up to be Black white Face, Angus, Herefords and Charolais. I separated them in the holding pens and thought that might likely be how the Slaughter House might do it. Holsten and other dairy cattle steers would also be slaughtered at a Packing Plant, so if you want, that would be another possibility. I don't understand why Walthers would make a Stock Yard Kit and not make cattle for it!

I was happy that the two unloading ramps for cattle aligned perfectly with 40 foot stock cars.
 
Last edited by a moderator:
I wanted to post a couple pictures before and after weathering the stock yard and a building I stole for the stockyard scene from the Walther's lumber yard kit. I plan on putting fine sawdust down in the stockyards.

Cattle10.jpgCattle weathered10.jpg


Back
Top