
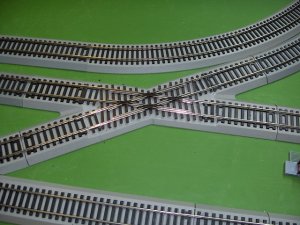
I previously mentioned the problems I had with the Bachmann 30° crossing causing my 040 and 060 locos to stall, stop, or jerk hard enough to cause cars to uncouple. The only way around it was to run the train much faster than scale or longevity would allow. I felt this was a design flaw of the crossing. The plastic frog and resulting loss of contact made the crossing unsuitable for small locos. I can run an F7 diesel through there all day long without a hitch, but my railroad is being built with a late 1800's to early 1900's motif, so my diesels sit on a display shelf.
I also have problems with the Bachmann powered turnouts, but those will be dealt with in another thread. I have a lot invested in EZ Track, and wanted to maintain the roadbed. Obviously, some alterations would be necessary. I did some research and the brand name Shinohara came up as highly rated, although a bit pricey. I took a chance and ordered a Shinohara 30° crossing, convinced that I could incorporate it in my layout one way or the other.
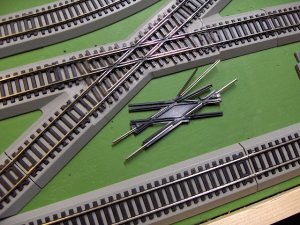
The new crossing arrived and I was impressed by the amount of rail metal near the center. It looked like it would work much better. The only issue is the crossing was 6 1/2" shorter overall than the Bachmann. My initial plan was to remove the Bachmann crossing from the roadbed and replace it with the Shinohara. That would have been simpler if both units were the same size, and had the same tie footprint, since the ties in EZ Track are set into the roadbed. So, I was going to just remove as much of the Bachmann crossing to allow insertion of the new Shinohara. However, before I started destroying the original crossing, I needed to prove the Shinohara would work.
I took a couple of 9" straight tracks and cut the ends off to a 3 1/4" length, so when attached to the legs of the Shinohara, would fit where the Bachmann crossing was. It looked somewhat crude but I removed the Bachmann crossing and inserted the new cobbled up hybrid. Subsequently, I started testing it with my little locos. Wow! It performed exactly as I had hoped. Regardless of speed, the little locos would steam through without a hitch, hesitation or stalling. It was workable, so now the permanent installation had to be engineered.
I measured in 3 1/4" on each leg of the Bachmann crossing, then used a Dremel tool with a small abrasive wheel to cut through the rails just to the plastic ties. The ties would also have to be severed but better to cut only one material at a time to avoid broken wheels. Once cut through, I pulled the shortened rails out. Then I used an Exacto knife to cut through the ties down to the roadbed. At this point, the center section of the crossing could be removed. This wasn't pretty and the crossing was beat up quite a bit, but it did come off, leaving a landing place for the Shinohara.
The next step was to remove the footprints molded into the roadbed, so the new crossing would lay flat and line up with the short rails, once they were replaced. It could have been done with rasps, sharp knives or a sanding block. All workable but time consuming.
I am fortunate to have a small machine shop in my basement, so I decided to mill out the center of the roadbed just to remove the footprints and leave a flat surface. It was fairly easy to do. I held the crossing down to the mill table with a clamp strap across each end. The hold down studs and nuts were just snugged up finger tight. Use of a wrench would have resulted in a broken roadbed. I used a 2 flute endmill for aluminum at about 1400 rpm, and hand fed the table, taking 3 passes to clean it up. It looked pretty good and an Exacto knife around the edges removed any burrs.
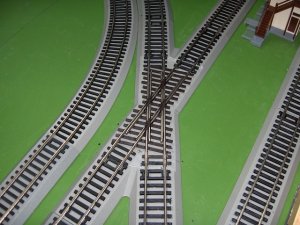
Back to the bench and some test fits were made. It was evident that the Shinohara crossing had to have all eight track connectors installed prior to being placed on the roadbed. Additional ties had to be removed for clearance. Once that was done, the short rails previously removed were re-inserted. A couple needed to have the ends polished a bit so they would engage the connectors on the crossing without issue. Once assembled, the new crossing was rigid and looked very good. Some of the space at the junctions was reduced with small sections of 2 ties slipped under the rails. The joints are almost invisible. I may add a few drops of CA here and there, but as it sits, it is perfectly usable. Now my little locos just glide through the crossing without any notice. It was a project certainly worthwhile and allowed me to keep my EZ Track layout by addressing an issue and solving a problem, rather that scrapping my layout and starting over.
The attached pix show the finished project and the old frog next to the new one shows the difference. I wish I had taken a couple of shots showing the steps outlined above, but I didn't think about it until it was all back together and operable.
My next project will be transplanting Atlas turnouts onto the EZ Track roadbed and I will have good pictures and reports.
I also have problems with the Bachmann powered turnouts, but those will be dealt with in another thread. I have a lot invested in EZ Track, and wanted to maintain the roadbed. Obviously, some alterations would be necessary. I did some research and the brand name Shinohara came up as highly rated, although a bit pricey. I took a chance and ordered a Shinohara 30° crossing, convinced that I could incorporate it in my layout one way or the other.
The new crossing arrived and I was impressed by the amount of rail metal near the center. It looked like it would work much better. The only issue is the crossing was 6 1/2" shorter overall than the Bachmann. My initial plan was to remove the Bachmann crossing from the roadbed and replace it with the Shinohara. That would have been simpler if both units were the same size, and had the same tie footprint, since the ties in EZ Track are set into the roadbed. So, I was going to just remove as much of the Bachmann crossing to allow insertion of the new Shinohara. However, before I started destroying the original crossing, I needed to prove the Shinohara would work.
I took a couple of 9" straight tracks and cut the ends off to a 3 1/4" length, so when attached to the legs of the Shinohara, would fit where the Bachmann crossing was. It looked somewhat crude but I removed the Bachmann crossing and inserted the new cobbled up hybrid. Subsequently, I started testing it with my little locos. Wow! It performed exactly as I had hoped. Regardless of speed, the little locos would steam through without a hitch, hesitation or stalling. It was workable, so now the permanent installation had to be engineered.
I measured in 3 1/4" on each leg of the Bachmann crossing, then used a Dremel tool with a small abrasive wheel to cut through the rails just to the plastic ties. The ties would also have to be severed but better to cut only one material at a time to avoid broken wheels. Once cut through, I pulled the shortened rails out. Then I used an Exacto knife to cut through the ties down to the roadbed. At this point, the center section of the crossing could be removed. This wasn't pretty and the crossing was beat up quite a bit, but it did come off, leaving a landing place for the Shinohara.
The next step was to remove the footprints molded into the roadbed, so the new crossing would lay flat and line up with the short rails, once they were replaced. It could have been done with rasps, sharp knives or a sanding block. All workable but time consuming.
I am fortunate to have a small machine shop in my basement, so I decided to mill out the center of the roadbed just to remove the footprints and leave a flat surface. It was fairly easy to do. I held the crossing down to the mill table with a clamp strap across each end. The hold down studs and nuts were just snugged up finger tight. Use of a wrench would have resulted in a broken roadbed. I used a 2 flute endmill for aluminum at about 1400 rpm, and hand fed the table, taking 3 passes to clean it up. It looked pretty good and an Exacto knife around the edges removed any burrs.
Back to the bench and some test fits were made. It was evident that the Shinohara crossing had to have all eight track connectors installed prior to being placed on the roadbed. Additional ties had to be removed for clearance. Once that was done, the short rails previously removed were re-inserted. A couple needed to have the ends polished a bit so they would engage the connectors on the crossing without issue. Once assembled, the new crossing was rigid and looked very good. Some of the space at the junctions was reduced with small sections of 2 ties slipped under the rails. The joints are almost invisible. I may add a few drops of CA here and there, but as it sits, it is perfectly usable. Now my little locos just glide through the crossing without any notice. It was a project certainly worthwhile and allowed me to keep my EZ Track layout by addressing an issue and solving a problem, rather that scrapping my layout and starting over.
The attached pix show the finished project and the old frog next to the new one shows the difference. I wish I had taken a couple of shots showing the steps outlined above, but I didn't think about it until it was all back together and operable.
My next project will be transplanting Atlas turnouts onto the EZ Track roadbed and I will have good pictures and reports.
Attachments
Last edited by a moderator:
