Main deck benchwork done


DALDEI

Member
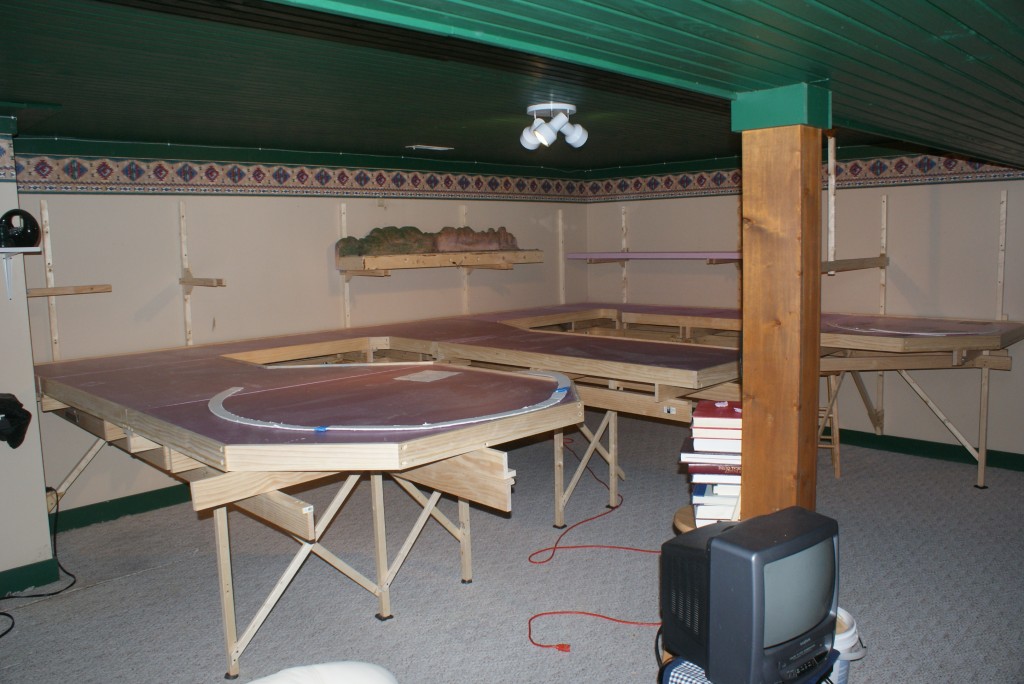
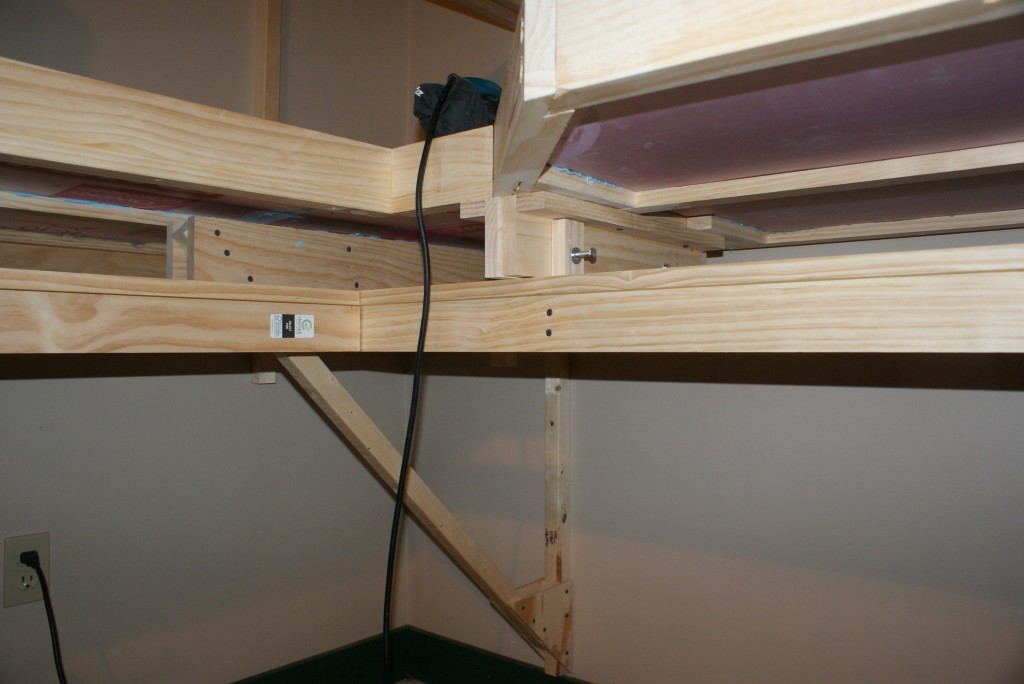
I've completed the main deck benchwork for my new layout.
This is a "permenent" under benchwork (L-girder + beams attached to wall) as well as 8 removable sections of 2" foam framed in 1x3's. Each section is removable to work on in my shop or for possible moving, but not intended as a truely "modular" setup.

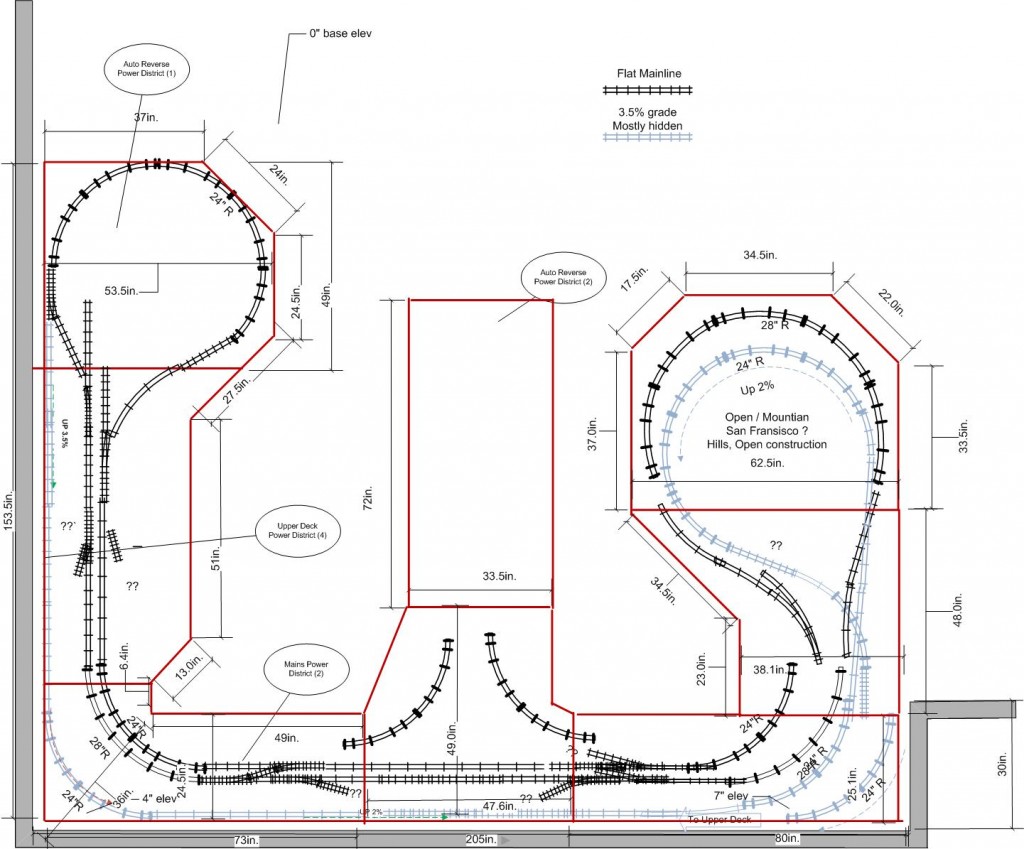
Track layout plan is not complete, just a rough draft, includes a nolix to an upper shelf deck at about 17" above the main deck.

Attached are the layout and a few views of the benchwork.

Now for better layout details (working on design in 1:1 scale using cardboard cutouts) and actual track laying ! (expect 100% hand laid including switches).

http://trains.calldei.com

DSC021761-1024x684.jpg

BasementLayout3-1024x849.jpg


-David
 
Excellent approach for benchwork

This is a "permenent" under benchwork (L-girder + beams attached to wall) as well as 8 removable sections of 2" foam framed in 1x3's. Each section is removable to work on in my shop or for possible moving, but not intended as a truely "modular" setup.

An excellent approach - seeing it is much better than the way I tried to get it across a couple of times.

I have saved your photo as a reminder!

thanks ,,, ken
 
Looks pretty good. How long did it take you to build it?

How long of a run is it to reach the upper level 17" rise? Sorry, can't visualize it... what it would look like from the photo of the benchwork.

Looking forward to seeing more progress updates.
 
Last edited by a moderator:
Thanks Ken, thats encouraging. This has been a very challenging project as I've *never* done anything like this before, either benchwork or even the basic woodworking skills.

A complicated problem is I could not find any design like this anywhere. I wanted easily detachable sections but that did *not* include the under-bencwork support. I want to use butterfly screw connectors to connect the top level to the framework entirely so that I can remove and re-install many times without having to drill new holes, and to easily identify the separation points. None of the layout books or articles I read had anything like this, but it seems like such a natural request !

Attached is a view "under the hood" of how some of this attaches.

Two sections attach with a 1x4+1x2 glued/screwed to the section but wing-nutted together.

DSC02160-1024x684.jpg


Wing-nuts attache the sectional component to the benchwork framework.
DSC02156-1024x684.jpg
 
Michael, this took about 6 weeks to build, maybe 1 hour/day weekdays and 5 hours/day weekends.
THis is the first kind of *anything* like this I've ever done and had no help so a lot of time was spent sitting on the floor tyring to visualize what I wanted to accomplish, along with many aborted attempts. Each section I got a bit better, but there were some tough sections. Who would have guessed the walls are not straight ! so I put straight sections in then they were not flush to the wall ... <grunt>
My sander was my best friend :)

Looking down at the layout, the Loop on the upper-left, matches the very far away benchwork in the photo in the upper-right. The foreground loop area in the photo lower-left matches the layout diagram upper right. The bottom of the layout diagram is the wall (far center of photo).

The wall-around nolix loop to the upper section (blue int he diagram) starts on the deck at the far right,
will go up along the wall (or maybe 1" off the wall") across the back to the left side, where it then will enter a loop at about 12" height go back to the wall and hopefully hit about 17" there in time to hit the first (left) part of the upper deck in the left corner. I've measured this out and I have including the loop about 560 inches to raise 17" so it looks like about a 3.5% average grade. A bit steep, but I think will work.

I may opt for a lesser grade and then the return-upward path against the back wall will make it about 1/2 way across the wall before reaching 17" ...
 
Whoaaaa dude, a 3.5% grade is very steep, with also a loop involved. You will only be able run short trains or have to use 3-4 engines with anything longer than 15 cars.

If I were you, I would rework that grade down to 2%. I have a 2% grade on my layout and I have to use at least 2 engines with anything longer that 15 cars. Exept when using my MTH Aces that pull crazy hard, so I don't have to consist them together.

Save yourself some headaches and find a way to get closer to 2%. Trust me.

Why do you need the 17" clearance anyways? Seems a bit too much for space between levels.
 
Last edited by a moderator:
Thanks for the comment Micheal. I keep going back and forth on the grade issue. Some people like you say 3.5% is too steep and others say they have no problems with 4%+
I doubt I will be running > 15 cars ever ... my staging yard is not that long.

17" inches may be too much ... but its really only about 14" between top of lower deck to bottom of upper deck and thats not including a fascia .. once I put a tort or 2 in and some lighting I expect the top to drop down another inch or 2 so that leaves a vertical clearance of about 12". That doesnt seem too big to me (but then this is the first time I've done anything like this so who knows).

I first planned for 2% which brings the return path hooking to the upper deck in the upper-right (of photo) or lower-left (of plan). That may not be so bad. I've marked up my pilistars with 2%, 3% and 4% marks around the room so I can see what I'm dealing with.

I actually dont mind if I can never pull more then say even 10 cars up the grade at a time, I can come down and get more. I only have THREE cars right now so its hard to do anything but just take peoples word for it ... and I seem to get as many oppinions as people !

But I know safe better then sorry ... once its locked it its probably hard to change.
Now's the time I can easily adjust the heights and grade, but once I start laying track it will be harder.
 
I don't know who has a 4% grade with a loop, unless they are pulling one car.

The loop makes the grade even harder to pull cars, more forces are in place, and trackwork must be perfect.

Even Crandell here on the forum, who has an awesome layout, he says he made a mistake with the grade, which I believe is 3%. And he was stuck with short trains. Steam era.

In any case, you should test for yourself, setup some track on a 4x8 sheet of plywood. And run some locos and a few cars at different grades by raising one end up.

What equipment are you running anyways? Steam? or modern diesels?
 
Right now I have one steam and one yard-car. I am planning on modelning the steam-transition era. I went back down to the basement and eyballed what a 2.5" would look like, Without lowering *all* the upper deck it would come in about 1/2 back across the back wall. Thats probably a good thing. I do appreciate all this feedback !
I dont expect to run more then 10-15 cars (but who knows, I'm sure my expectations will change in time !)
 
You should be OK with a 2.5% grade. And like you said, you may say that you don't need anything longer than 10-15 cars, but trust me, you're interests will change. Long trains are not only cool, but are more prototypical.

Good luck, keep posting updates!
 
The bench work looks good and solid. Other than the above mentioned grade questions, that track work on both of the loops is very close to the edge. Will you have skirting around your layout to prevent mishaps?
 
Thanks Jerome. In reality the track will be inside a bit more then the layout currently shows, I had just updated the plan with actual measured benchwork size but not yet repositioned the track. But it will be about 2" from the edge. The foam is inset so there is a bit of a lip, about 3/4". That ended up being an 'accident' of how I constructed the frames, I used L-Girder style construction for the foam frames. Using 1x3's with 1x2's glued to the bottom. Then inserting the 2" foam gives a bit of a lip. I am hoping this will help. But maybe not enough. Thinking of adding a thin fascia (valance?) around the whole thing on the front, that could be the chance of extending the lip further up (?). I'll see how it goes. Thanks for the suggestion.
 
The problem with inclines is not only the grade but also the radius of the turns. To sharp and the cars will pull off the track. It takes a lot more space than you would think to make it work. Take a look at my helix action video on youtube. It took up more than 6ft of space to raise the track 13” at a 3% grade and that’s with a 10ft pre grade of 2%.

http://www.youtube.com/watch?v=uyzgL8tRKic

George


Back
Top