Heavily Weathered Hopper


Approach_Medium

New Member
Hello Everyone,

As said in my "Introduce Yourself" thread, I am new to HO scale (moving up from N) and what follows is my first attempt at weathering an HO ACFX Hopper. Admittedly it may be a bit over done, but I'm going to go ahead and say it's not half bad for my first model in more then 5 years. Let me know what you think!

Photo Nov 19, 8 16 28 PM.jpg
Photo Nov 19, 8 16 44 PM.jpg
Photo Nov 19, 8 17 28 PM.jpg

-Joe
 
Wow nicely done. The rust looks very real. Mind telling us how you did that? And what did you use? Powders?
 
Thanks, dudes! I'll have to add graffiti to a future model since I have no idea how to do that now ;)

Motley, the rust is all Barmills powders. The effect was achieved by creating the streaks first using different shades of reds and oranges. After that I added a layer of dullcoat to secure it on the model. The really dark rust and texture is also powder, but I mixed it into a paste using lacquer and applied very sparingly as its not possible to undue once its applied. The final effect of actual raised rust, which is difficult to see in the photos, was done by placing drops of lacquer on the model, then sprinkling powder onto the puddle and blowing away any excess. Most of the grime is black chalk, but I also applied a wash of diluted Oily Black. Let me know if you have any other questions!

I have B&O covered hopper in the works now. I'm planning on remarking it for Conrail in the process. We'll see how that'll turn out. Hopefully I can have some pictures up in a week or so.

-Joe
 
What brand of lacquer did you use to get the dry raised rust? Was it Dullcoat applied with a regular brush, or something else?
 
Very nice work! I don't have the courage to try this on one of my Exact rail, Genesis, or Intermountain cars, but I would love to give it a try on one of my Blue Box kit cars. Is that what you used? Can't wait to see more!
 
Joe:

Nice weathering work and I like heavy weathering on rolling stock.

Blair Line has some nice graffiti decals and are on sale at Walther's. Easy to apply and just use a decal setting solution like Solvaset to settle the decal down into the car's detail. Use a gloss finish prior to installing the decals and a dull finish after they are dry.

I purchase cheap rolling stock at hobby shops and meets to practice on. Recently I purchased a Santa Fe caboose and a box car shell for $1.00 each. Nice practice material and no risk to prized equipment.

Rock Island Loco.JPG


Here's a Rock Island loco that will be patched for my Milwaukee Northern Railroad. It was the second loco I weathered several years ago.

Thanks.

Greg
 

Attachments

  • SOO hopper.jpg
    SOO hopper.jpg
    218.9 KB · Views: 219
I guess by now you've discovered HO is larger than N, and is easier to work with.
The covered hopper looks very bad, in a good way.
As for the upcoming hopper, wouldn't it make more sense to patch it into CSX? I see those hoppers almost daily, a really ratty looking B&O car, with "CSXT" patched in for reporting marks.
 
Nice job on the hopper Joe. If you are interested in a little experimenting, try substituting hairspray for the laquer when doing rust. It sticks to the model but can be removed very easily with water if you don't like the way it looks. This plow was done about 3 years ago with this method and still looks like it did when the powder was applied. The coupler is done by just mixing powder with the hairspray and painting it on. This makes a light textured looking rust.The metal plates were done the same way and while still wet, loose powder was sprinkled sprinkled on top. This will give it a flakey appearance. Although I use ground artists pastels, it should work the same with the powders. Ron
 

Attachments

  • plow 1.jpg
    plow 1.jpg
    135.4 KB · Views: 209
Sorry it takes me forever and a day to reply to anyone. My time is very spread out.

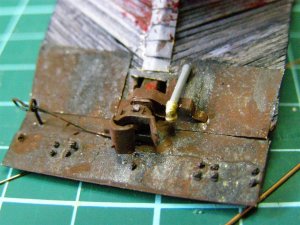
Cjcresent, The lacquer is Testors brand. It's quite thick, similar to the consistency of honey. It works really well applying thick drops then adding the powder and leaves no obvious residue. I did several layers on the really heavy spots. I also finished with a quick spray of dullcoat just to make sure it was all sealed on there.

Blue92rs, The model is an Atlas. I'm not even sure if it was a special edition or anything. I'll check out the specifics when I get back to my apartment. I'd like to give a shot to one of those ExactRail cars. They look pretty nice from what I've seen.

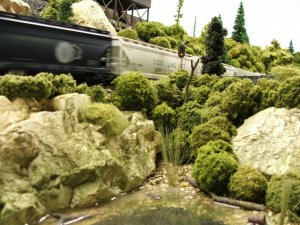
Bnsf971, I'm already in love with HO. It would have been very difficult to get this effect in N, believe me! I can't wait to keep going with more. I want to decal it in Conrail only because I don't want to bring this particular piece of rolling stock all the way to modern day. That and Conrail is one of my other favorites. I grew up next to a Conrail yard and my grandfather was also a conductor for Conrail, so I've got some fond memories of those days. And hey, if I sold it to someone who wanted it to be CSX we could add yet another layer of weathering and re-patching!

Rlundy90, I'll have to save that technique for future use. It looks great! One of my favorite things to do is experiment with different techniques to achieve reality. Eventually, I'm sure they can be combined into an altogether new technique!

More to come...

-Joe
 
Forum:

Here is a recent weathering job of a PFE 40' steel reefer with before and after photos. The weathered loco still needs to be "patched" for my Milwaukee Northern and a bit more accents to the roof ladders.


100_0736.jpg

and after...

40 Foot Steel Reefer.jpg

Thanks.

Greg


Back
Top