Decisions made and new questions


Perry

New Member
I have decided to go with Kato N 1060023GE ES44AC GEVO and Mixed Freight Starter Set, Union Pacific.
I like the track and the track expansions available. The engine can be upgraded to DCC and it's in my price range. Kato came highly recommended.
I am going to need to tack the track down to my plywood so when I'm not working on my layout i can lean it against the wall. What can I use to tack it down that will let me move the track around as I expand. I like the V9 expansion for the M1 oval that comes with this. I will add that and a rail yard later as funds are available. I see allot of people putting cork under their rail. Is that to cut down on noise? As always any info will be greatly appreciated.
Perry
 
The use of cork will cut down greatly on noise, yes. It also provides a nice surface to lay the track onto. When using cork, you can buy the full sheets and cut it or buy the model railroad cork. The cork made for the model railroad will have the beveled edges that, when covered in ballast, resemble a prototypical railroad. Most modelers (including myself) like this look and use this method. There are other methods, but this is (i think) the most common. Being that you plan to expand later, you may want to simply nail the cork and track to the plywood. The LHS (local hobby shop) will have track NAILS (there is also track spikes, and are used for hand laying the rails. you don't want these). You can nail the cork to the plywood and then the track to the cork. The track has small holes in the center of the ties every few inches, this is where the nails go.

Its actually very simple to lay the track using the method above. My layout (and many others) are more permanent. I use ALEX brand caulk (the cheapest bottle is around $1.50 here in Ohio) to "glue" the cork to the plywood and again "glue" the track to the cork. A very thin layer is all that is needed. I lay a very thin line of caulk, and using a plastic ($0.50) putty knife, spread it out, leave it for about 5 minutes to get tacky, then lay the cork/track. Put something on top of it to weigh it down for a little while (30 minutes on curves where the caulk/track will resist it's position the most) then repeat. This method can be found in many threads on this forum. The picture below shows the white caulk on the cork holding down the track. There is a similar layer under the cork holding it to the plywood.

20140427_213407.jpg

I'm in the process of laying track now. If you want more details about how I'm doing it, I can put up more pictures with deeper explanation.
 
I just looked and there is a roll of peel and stick 1/8 cork on the shelf here in my shop! Left over from another project. The caulk method will be just what I need when I have all the track for my final layout. So how hard are the track nails to get back out?
 
The track nails are fairly easy to get out with a pair of pliers. They're pretty small and don't hold much friction with the wood. The hard part is finding the nails in the cork! The ones on the track are easy to find, they're the only small round pieces of metal that sit on the ties. If you use the peel and stick cork, you may not need to worry about finding nails. The cork you have, is it a sheet or strips? I would suggest cutting it into strips just wider than the track so you can bend it to match the direction of the track. For sections where there may be more than one track along side each other, cut it wider to cover the entire area. Keep in mind that the ballast will all be level in that case, so try to keep the next few steps in mind as you work. Five minutes of planning now could save you 30 minutes of headache later - that goes for more than just model railroading!

Do you have a track plan? I know you were going to keep the space small, but do you know what it will look like? The best ideas are started on napkins!
 
Well the starter kit I'm ordering tomorrow comes with the Kato M1. It says it's 3x4. I'm going to set it up on my workbench and measure it myself. After that I'll be looking at my space available and the Kato expansion packs. No I don't have a firm plan yet. I'm sure it will come but I'm going to set it up to run anyway. Just gotta!
 
I just looked and there is a roll of peel and stick 1/8 cork on the shelf here in my shop! Left over from another project. The caulk method will be just what I need when I have all the track for my final layout. So how hard are the track nails to get back out?

I've seen an awful lot of busted ties where people have taken up nailed down track. I can't imagine it would be easy at all to remove nails driven into wood, but maybe someone here has some advice on that? I'll just offer a slightly different method from what was offered with the caulk. I too use caulk to attach the cork roadbed to the layout base, but I use Elmer's school glue to attach the track to the roadbed, not caulk. The reason for that? If I ever do need to replace or revise some track, all I need to do in order to remove a section of track is simply wet it down for a while. The water eventually causes the school glue to release and you just pick up the track. Comes off good as new. I guess you could nail down the cork rather than caulk it down, because otherwise you will have to scrape up and waste the cork, but it's also not as expensive as track is and caulk does work wonderfully and easily.

So to me the glue would be the way to go. With either nails or caulk I think you're going to have a tough time getting the track back up without damaging it. I don't know if glue works as well in HO; maybe the track resists being held down more; but I've got nothing but school glue holding down my entire layout and the one time I had a shrinkage problem it actually bent and warped the turnouts on either end of a curve while the glue kept holding the track down and didn't pop loose or move at all. I have also had to take up a couple pieces of track, and while it takes a little time and re-application of wet cloths it does turn loose after a while with everything intact.

BTW, you will still need some track nails if you decide to use glue/caulk, because they're invaluable to use as a temporary hold while laying track. You lightly tap them in just enough to keep the track in place (conveniently going right through the center line of the cork), and then can remove them easily with small needle-nose pliers once the glue dries. Since you don't hammer them all the way in, and in fact just barely hammer them into the wood at all, they then do come out easily once the glue dries. Nothing at all like having them hammered all the way in flush with the ties.

So...my very long-winded two cents worth. If it's even worth that :)
 
I've seen an awful lot of busted ties where people have taken up nailed down track. I can't imagine it would be easy at all to remove nails driven into wood, but maybe someone here has some advice on that?
...

The easiest way to remove track nails from the track is to take a small pair of wire cutters, the thinner ends will grab the nail easily, turn them 90` to the track. Place the ends of the wire cutters underneath the nail head, tighten the grip some, and using the rail as a fulcrum, and the cutters as a lever, simply pushing down will lift the nails out. This cause no damage to the ties, nails or rail at all.

Probably took me longer to type this than it actually does to do it.

I use that exact method to remove temporary nails that I've put through my cork and foam or partially into the wood as the glue dries, though I usually use my track nippers or sprue cutters since they have finer points than my wire cutters (easier to get in there on N-scale track). I wasn't sure the same thing would work without damaging rails and whatnot if the nail was fully imbedded in wood. Nice to know it does work just for future reference.
 
BTW, you will still need some track nails if you decide to use glue/caulk, because they're invaluable to use as a temporary hold while laying track.

:)

I just finished taking up about 60' of track, some was glued down with elmers and some just with nails, some I actually looped 24 gauge wire through the little holes and through holes drilled in the plywood.

The nails were the easiest. I pulled them straight out with a good quality small pliers. A good quality needle nose pliers worked, too. The looped wire also worked easy as I just tisted the wire to break.

The glued track required some scraping. Caulk may have been better, but I wonder how well it would hold a good curve. Mine was attached to plywood without cork and all of it is re-usable.

lasm
 
The glued track required some scraping.

I'm surprised that the glue required actual scraping. When I took mine up there was of course some residual glue, but it came off just as easily as the track. I did use a scraper to do it, but it didn't require any actual effort since the glue was in a gel-like state and just needed something to swipe it off. The only reason I used a scraper is that I had one handy and it seemed less messy than trying to wipe it up with a rag. It does seem that if a track is known to be temporary that nails are probably the best way to go if one knows how to both apply and remove them. The broken ties I've seen may be as much from putting nails in as taking them out. I never intended mine to be anything other than permanent so glue seemed the best option (if nothing else to eliminate the visible nail heads) while still not being so permanent as to kill the track if anything did go wrong (read: when inevitably something does go wrong).

I pulled them straight out with a good quality small pliers. A good quality needle nose pliers worked, too.

I'm assuming you're doing HO, so I'll just make one comment on that. The only problem I've had with using needle nose pliers as opposed to snips is that in N-scale the nail head is about the same width as a tie. It's very hard to grasp that rounded nail head without doing it "sideways" to the tie, and it's all too easy to also grip the tie itself. I've found that getting the snips actually under the nail head as Carey describes does work better in N-scale than trying to grip the side of the head. Again, my experience at fully seated nails comes from just pulling them out of foam and not plywood, but it seems that would hold true for that also.

Caulk may have been better, but I wonder how well it would hold a good curve.

I haven't used caulk on track, but I have used it on cork. If it adheres to the track as well as it does to cork, then not only will it hold a curve, but good luck ever getting it back up without trashing the track. It's entirely possible that caulk doesn't keep quite the hold on plastic ties as it does on cork (and I assume that's the case since it's been put forward as a temporary option), but there was just no way to get caulked cork up without destroying it completely. If it does release the track okay, you'd still have to throw away the cork, but just like my original method of caulking the cork and gluing the track, to me it's not a bid deal to throw away the cork and use new anyway. Not sure cork that's been down any length of time would be malleable enough to re-use in any case or at least not worth the effort for the cost involved.

I think bottom line here is to take the pros and cons of each method and decide which ones work best for your particular situation. Everyone is offering some good advice on pretty much all methods and really it wouldn't hurt to just try them all out. Take a few small pieces of track, affix them to some scrap lumber using the different methods and wait a day or two. Go take the pieces back up and find out for certain which way works best for you.
 
Congratulations Perry!

Sounds like you are well on your way to having a lot of fun with your railroad.

If it were me I would use screws to attach the track down. You may have to go to a specialty bolt company to get the proper size and length but it sure makes it easy to change the track plan. I know because I changed my track plan weekly and I am still considering another change. No wonder I don't get much done, but I sure am having a lot of fun with my trains! I hope you do too!
 
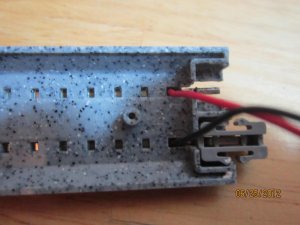
One thing to consider about Unitrack is that there are no predrilled holes of which to nail the track down. You would have to drill your own holes. I personally used Hot Glue to put my NScale track down (unitrack) but that is a more permanent method...
 
One thing to consider about Unitrack is that there are no predrilled holes of which to nail the track down. You would have to drill your own holes. I personally used Hot Glue to put my NScale track down (unitrack) but that is a more permanent method...

I think the rest of us all missed that he was going to use Unitrack. That does change things around for sure. And pretty much everything I've said in this thread is useless when you throw that in there. IDK, maybe it would still glue down okay, but actually I wonder if the plastic base of the Unitrack wouldn't be perfect for a very light bead of caulk to hold it down. No worries about "holding" a curve like there would be with flex, so it wouldn't really take much caulk to hold it in place and it should be fairly easy to take up just using a small scraper. I would think that also means not using cork under the Unitrack since it has built-in roadbed, but I guess it could still be done for noise reasons if that's an issue when mounted directly to plywood.
 
Hey again Perry,

I was not aware that Kato's track did not have holes. If that is the case you may want to consider silicone adhesive. It's flexible, sets up slow and is easily removed from plastic and other surfaces.

lets us know what you do and how it works.
 
Thanks for the good info all. I build acoustic guitars. There are places where I use something similar to Elmer's white glue, like gluing the neck to body. The reason for this is so you can remove it for repair if necessary in the future. Heat from a heat gun or hair drier will soften this glue so you can pry the pieces apart without breaking them. I'm thinking I may try this with my track. At least a test piece. I'll let you all know how it comes out. I may try silicone also just to see which works better. Thanks again!
 
At this time i am using sewing pins to hold my track down its for a short time. i plan to move in a year the pin heads hold the trank down and the rest is thin anough to not be tight in the ties so it is removable
 
quote_icon.png
Originally Posted by Mike_Arnold One thing to consider about Unitrack is that there are no predrilled holes of which to nail the track down. You would have to drill your own holes. I personally used Hot Glue to put my NScale track down (unitrack) but that is a more permanent method...


I think the rest of us all missed that he was going to use Unitrack.

Yep, I definitely missed the Unitrack part of that. Sorry to get everyone going on the caulk method!

Depending on how long you want to keep the tracks where they are, can't you just lay the tracks out and run them unattached to the board? If I remember correctly (it has been a while since I used unitrack), the sections lock together as to prevent the separation of sections without a decent amount of force.

Also, doesn't the Unitrack system allow for fastening to the surface with nails, or screws? Here is a picture of the bottom of some N scale Unitrack. Makes me think there is a way to secure with nails. In which case, this is what I would do.

IMG_0235.jpg


Back
Top