Marlin338MX
Well-Known Member
That's where I had it. You can see it in a photo in my first post. It will most likely go back there before all is said and done.

Sorry missed that post, but logically it's the only place that has enough run-up for the incline.That's where I had it. You can see it in a photo in my first post. It will most likely go back there before all is said and done.
I somehow missed this thread when you first started it on Veteran's Day, but I just caught up. Here are some thoughts.
I use cork roadbed directly on 1/2" plywood. My layout has no grades, thus making it easier to build. There are places where I added elevation alongside tracks (corners for example), by just adding layers of Homasote because that's what I had on hand. Foam could also be used.
If you weren't trying to clear another track, the Bascule bridge wouldn't need quite as much elevation. Maybe a river painted directly on the plywood. It could be made more realistic with riverbanks made of 1" foam. Or a section of the plywood could be cut out and lowered to make the riverbed.
Those old Tyco structures can be dressed up and made to look much better. Honoring your father with their inclusion is a great idea.
After you determine the track plan, use a pencil and trace roughly on the sides of the tracks. It won't be as wide as the cork roadbed but it would give you some guidelines as to where to place it. There is a small amount of forgiveness in sectional track, but be careful not to kink it. Flex track would give more flexibility. I use Elmer's White Glue to hold the cork in place, and then use track nails to fasten the track. I use flex on most of the layout and all of my curves are at least 28" radius. My holdover sectional track is used on sidings. If you're planning on using mostly sectional track, be prepared to add many more feeders for power.
I'll be following along, and you already seem to know that we like lots of pictures!
I agree. And I would love to add more plywood so I can add more track and buildings.Sorry missed that post, but logically it's the only place that has enough run-up for the incline.
Christian would love this, just missing some DragonsAnother funny layout. Hope you find some ideas...

There might be some room for a short caboose at the end of that 30 car trainAnother funny layout. Hope you find some ideas...
I just noticed your layout and you have a nice, big space, I wonder how you are accessing the middle of the plywood?
I have seen some guys cut a removable access hole.
As far as foam board for terrain goes, there are a couple school of thought. I do not use it and prefer to use hydrocal, which is a plaster like material which dries very hard and does not shrink. Pick your lowest elevation and that would be the plywood and work up from there if you want topography.
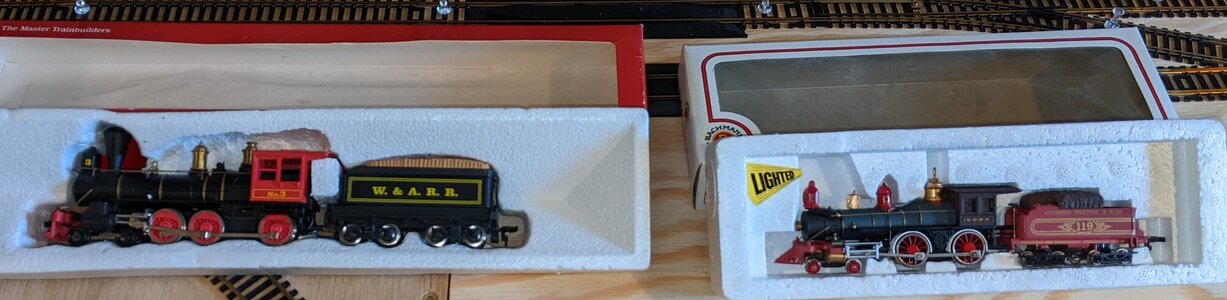
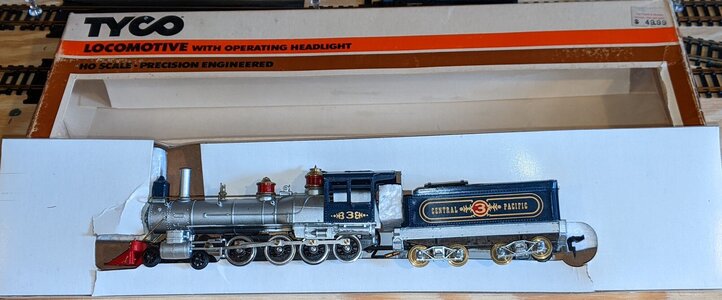
I am curious what your locomotives look like?
Dave LASM
Nice!Loco pics cont
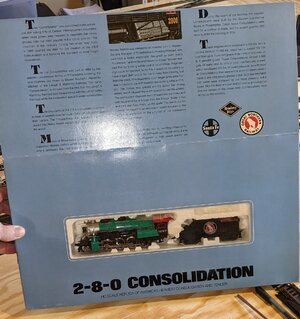
This one has never been out of the box
View attachment 177438
The engine on the left is a Mantua brand
View attachment 177439
View attachment 177440
These two War Bonnets are F9's
View attachment 177441
Most were new until I opened them. My dad was a huge John Wayne fan, and a fan of the Wild West in general. I think that explains why he had so many steam locos.
Keep in mind that this wasn't ALL of his train stuff. I only got about half or 2/3's of what he had.
Nice!
I notice the GN 2-8-0, looks like a Bachman, I worked on these models (as in repairs). They developed cracks in the driving gears quite predictably. I was somewhat successful at making them run but would be curious if a new in the box is going to present that issue.
At the very least, it is an attractive display model!
Dave LASM
For this specific model the repair part was unavailable. I purchased a total of three locomotives to make one operational.Thank you!
You are right, that GN 2-8-0 is part of the Bachmann Classic Collector's series. I'll be paying close attention to all the gears and moving parts when I finally get around to doing maintenance on all of my engines.
Are replacement parts easy to find for these old engines?
Dave,For this specific model the repair part was unavailable. I purchased a total of three locomotives to make one operational.
I made a helpful youtube video on disassembly and repair of this (Bachmann 2-8-0) the link is on my signature below.
Dave LASM