Best way to ballast


Hawkesburytrain

Well-Known Member
I've read a few posts, seen a few videos and still puzzle on what to use to ballast.

Some talk about diluting the white glue 1 to 1, 1 to 2 and even 1 to 4
Some use water with dish soap, others use water with alcohol (still don't know what type of alcohol)
Some pre glue while others do the laying of the ballast first

Since I don't want to make any mistakes, could you tell me how you did it and what did you use

Thank you
 
Basically, what you are going to do is spread some very fine gravel over your tracks, smooth it out using small brush or tooth brush, then get it wet so the glue will soak into it.
Nothing really exacting here. You can find ballast spreaders on the internet or in hobby shops that help ya spread your ballast over your track, but then ya have to go back over it to get the ballast laid right then come back on the forum and tell everyone what a waste of money the ballast spreader is.
Once the ballast is the way you want it, ya need to glue it down. Now if you just put Elmer's glue on the ballast, the glue would just bead up and dry in clumps. I'm sure ya don't want that, so ya need to thin the glue out a bit. I usually use a 1:1 mix or there abouts. Nothing really exacting. I use an old ketchup squeeze bottle for this. Fill it half way with wet water and the rest with Elmer's glue, put the cap on it and shake it up. Yep, I said "wet water". Once again, if you just put water on the ballast, it would bead up without soaking it. Ya need to break the water surface tension so it will soak into the ballast. You can do this using liquid dish soap. It has glycerin in it which breaks that surface tension and then the water will soak down into the ballast. Use a Windex type spray bottle. Put some dish soap in it first. For a 16oz bottle, a half thimble full of soap should be adequate. I think that might equate to about 1/4 teaspoon of dish soap. Once again, nothing real exacting here. Fill it with cold water, real slow so it doesn't foam up. Do the same with the water that ya mix with the glue.
Ok, ya have your ballast spread out along a three foot section of track, spray the wet water onto the ballast until it is soaked down to the road bed then use the ketchup bottle and spread the glue, first down between the rails. A couple of lines of glue will do, then along each outside of the rails, then down along the embankment of the roadbed. You can see where the glue is on the ballast. Once you have done this, don't touch the ballast. You can touch it up by just dropping ballast where you can see it's kinda thin or missing on the roadbed. Spray it again then some glue. Set up a fan to have moving air over it and allow it to dry for a few hours. Clean the rail surface off before running trains and you are done.
 
Last edited by a moderator:
I'm actually using techni seal polymeric sand on my layout. They have it in a few colors. I'm using the gray and I really like it so far. It has a water activated polymer in it so all you have to do is law the ballast out how you want it and drip/spray water on it..the water activated the polymer and it dries solid. I first read about it in MR. I've read some people didn't have much success with it, but I dunno if they used a different brand or what. But I'm using the same brand mentioned in the article and I absolutely love it..a 50# bag cost me about $22..I'll have ballast for my next 5 layouts

As far as technique..the ballast spreaders are pretty useless..I'll use it to get a base line down then go back over it..so far my favorite tool has been a McDonald's mcflurry spoon that I cut the end off of to square up. That and a small paintbrush.
 
Last edited by a moderator:
There are many ways to successfully ballast your track.

For my N-scale railroad, I did the following -- basically a one-step method.

1. I use actual rock ballast from Arizona Rock and Mineral. I find it stays in place better than, say, Woodland Scenics ballast.

2. For the adhesive, I use: 3 parts matte medium : 2 parts 91% isopropyl alcohol : 1 part distilled water.

3. I place the ballast with a small spoon, and use a very soft brush to groom the ballast to the desired shape. I apply ballast between the ties first, then do the shoulders. I tamp the shoulders with my finger to compress the ballast a bit.

4. I apply the adhesive with an eye dropper down the center of the track between the ties. This flows into the ballast and under the tracks to partly soak the ballast on the shoulders. Then I apply more adhesive to the ends of the ties outside the tracks. This fully saturates the ballast on the shoulders.

5. The next day after the adhesive has dried, I fill in any areas where insufficient ballast was applied and apply more adhesive.

6. I avoid applying adhesive directly to the ballast. There is too much of a chance that some of the ballast will float away. I apply adhesive to the ties only and let it flow into the ballast. I do not use a spray bottle when ballasting.

That's what works for me!

- Jeff
 
I'm of the school that the ballast is the last thing to go down. The scenery was there first, and as such the railroad should be on top of it.

To apply the ballast, I use a small paper cup to distribute the ballast with. To shape it, I use a 2" foam brush to move the ballast with. Nice thing about using a foam brush is the brush can be cut to give you the shape you want. I do use a small brush to remove ballast from things like flangeways, points, guardrails.

Since I use real rock, I don't have a problem like that associated with Woodland Scenics, where the ballast will float away when wet. I use the ketchup type bottle as well, to wet and glue the ballast with. I use a mixture of water and Dawn, to first wet the ballast. Then I set the ballast with the glue mixed about 1:2 with water, and another couple of drops of Dawn.

After the glue has dried, I will take a small flathead screwdriver, and "scrape" along the inside edge of both rails to make sure that there aren't any pieces of ballast that is in the "runway" of the trains wheels. Very last thing that is done is to double check anywhere ballast could get caught and cause a problem, flangeways, guardrails, etc. Then I pull out a vacuum, and gently vacuum the ballast. Any areas that need repair is done at that time.
 
Ken -

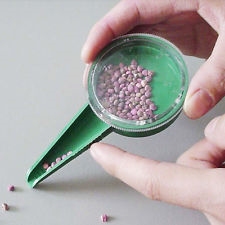
He's referring to this little gadget:

Ferrey-Morse_Seed-Sower.jpg


It's called a Seed-Sower from a company named Ferry-Morse.

- Jeff
 
Thank you Ken that was what I was referring too looks handy don't you think. If I ever get to the point I'm ready to ballast I will try it out.
 
I'm Jeff, not Ken, but yes it might be a helpful ballasting tool. They are available from various online vendors if your local garden store does not have them.

- Jeff
 
Sorry Jeff I'm typing between runs at work. So I got a bit rushed and did the brain freeze thing. It been happing more often as of late.
 
TURNOUTS!!!!!!!
Don't forget to tell him about Ballasting turnouts!!!

I have just started ballasting "Completed" portions of my layout. Turnouts will be the bane of you existence when it comes to laying ballast.
I am basically follow the steps outlines by Ken in the second post, but when it comes to turnout, USE EXTRA CARE AND CAUTION when laying those little nuggets down. You have to ensure that you do not impede the movement of any moving portion of the layout (above or below the rails/ties). Make sure, when you lay ballast in between the ties of a turnout, under the sliding rails, that you keep it nice and low and away from the sliders. When you apply the adhesive, only glue on the outside of the rails. If you have wet down the ballast before hand, the glue will naturally seep in between the ties under the whole turn out. If your ballast is to high or you are not careful with the adhesive application, you will glue your turnout into one direction.

I have about a dozen turnouts on my layout currently. I have completed four. I am starting to get it down now, but I have one that I KNOW will give me issues for years to come, darn it. Learning curve. Fortunately, the turnout is right on the edge of the layout and easily reachable for manual adjustment.
 
About turnouts. I apply a little oil on the throw rod and ground throw to keep it from sticking. I try to work the turnouts a few times while the glue is drying. The after the glue has dried I oil it again if it is stuck. Patience is needed while looking to see where hang ups are occurring and to gently fix them.
 
A couple of questions from a beginner here...do you guys use fine or medium ballast for HO layouts? Also, for those of you that posted about using rock, do you have links you can share regarding where to purchase it?
 
I have used medium and fine. I think the medium looks better for HO scale but ya have to pack it down before applying the glue. Ya do this by just pushing it down with your finger after getting it all distributed were ya want it with a brush.
 
Also, for those of you that posted about using rock, do you have links you can share regarding where to purchase it?

As far as rock, or natural, ballast; I made my own using a fine screen to sift the natural material. Since I work for the highway department, we have a screen set that we use to grade the aggregate material that is used in road construction. You may get the same results if you can find a couple different size screens at a kitchen or hardware store.

The # 200 size sifts out the very finest materials. Those I use for walkways or packed dirt. The #40 and #60 can sift out a size that will make ballast. I sift out the finest and put them off to the side then sift the other sizes and select the size I want for ballast.

I am going to guess that the commercial sources do it the same way. Materials from different grave pits, or different sources, will yield different shades.
 
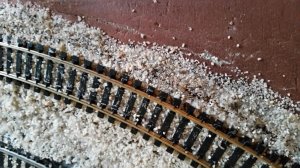
i got my rock from a craft shop called joanns, was like 3 and change for a 2 lb bag. this is my first attempt at it and the size of ballast i used20150319_105608.jpg
 
Last edited by a moderator:
I took a 3' strip of 2" foam I had laying around from building my layout. I attached roadbed and track as I normally do and used this to practice putting down ballast. I had read different articles and such about how to do it and I tried each approach.

So I would suggest you practice first until you are confident before proceeding on your layout.


Back
Top