A new beginning inspired from my old Central Midland Layout


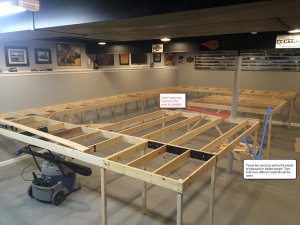
Like Chet said, I also used the cookie cutter approach. It makes it a lot easier to have access installing all the wiring, tortoises and scenery. I'm using 1/2" plywood under the tracks and it's cut 4" wide, the rest will be plaster and foam. Some locations are large plywood areas because I know that a certain industry goes there and that there's no elevation changes.

Now, if you're not going to have any elevations, where everything is flat, then it's much easier to just install a full sheet of plywood or foam, but you're stuck having to work under the table often and just a bit more expensive. When I started on my first layout, I was building one huge flat layout and when I started working under the table, I was getting very frustrated. Being almost 6' tall, I noticed that at 56 years old, the body doesn't bend that well and not for long....LOL

Now that I know better, I tore down the layout after 1 year of work and just started on a new one.

P.S. I like your neatness
 
That's why I like the cookie cutter method. Without any scenery it is so easy to install feeder wires and switch machines. My layout averages about 48 inches in height which is great for viewing, and now that I getting older (69) and find that I don't seem to want to bend as good as I did years ago, the height is working out fine. I never used hard foam, like the sheets for insulation, but did use foam such as a mattress pad under wire screen to help form scenery. Once the hydrocal had dried, I could easily remove the foam and reuse it on another scenery project.

I used 1x4's for risers to hold up the plywood that the track would be laid on and the transition to a sheet of plywood there a town or yard was going to be was painless
 
All great things to consider. May be using a combination of each. I am think of using full sheet plywood on the 6 X 6 turn sections for weight and us foam to bring me up to my higher level. I have some sets of Woodland Scenics 2% riser sets that worked well in my other layout. I think the weight will help keep the free standing part of the layout down better. I will anchor the one side of the layout to the support pole in the middle of the layout that you see in the picture below. I will make some mistakes along the way I'm sure. Yes Chet I am using mostly PECO flex code 83. I'm am trying to make all the track PECO if I can.

PS - I am kind of a neat freak

IMG_1272.jpg
 
Last edited by a moderator:
Peco code 83?? Good choice. I did start off using code 70 because my railroad is a branch line/short line running lighter locomotives. I really like the look of the smaller rail over the standard code 100. It looks so much better. I did use some code 83 in my hidden staging tracks and it's hard to tell the difference to the code 70. IF I were to be starting a new layout today I would probably use Peco or Shinohara code 83. There seems to be more of a choice in turnouts and other track accessories in code 83 over 70.

Mistakes??? They are a good learning tool.
 
Last edited by a moderator:
Chet my old layout was all Atlas code 83. Hade a lot of issues with the turnouts and their flex track does not hold its shape like Peco. I do have some Shinohara Track too. Mainly some specialty turnouts or crossovers.
 
Last edited by a moderator:
Cookie Cutter vs other methods

That's why I like the cookie cutter method. Without any scenery it is so easy to install feeder wires and switch machines. My layout averages about 48 inches in height which is great for viewing, and now that I getting older (69) and find that I don't seem to want to bend as good as I did years ago, the height is working out fine. I never used hard foam, like the sheets for insulation, but did use foam such as a mattress pad under wire screen to help form scenery. Once the hydrocal had dried, I could easily remove the foam and reuse it on another scenery project.

I used 1x4's for risers to hold up the plywood that the track would be laid on and the transition to a sheet of plywood there a town or yard was going to be was painless

I looked up 'cookie cutter' method and need to do a little more reading on it.

Then I went over to the starting thread here:
http://www.modelrailroadforums.com/forum/showthread.php?25919-Building-the-Pinacle-Creek-Mining-amp-Timber-Co-RR
I've forgotten what a 'method' they term it ?,.... but this was very similar to what I had on my original Central Midland layout. I found it to be a good method.
 
I'll post a photo later today. I have an old color photo when my layout was in the early stages of construction but have to scan it. It will give you a good idea of what cookie cutter is.
 
Stucco Patch rocks and netting

...interesting photos and methods on this page:
http://www.modelrailroadforums.com/forum/showthread.php?25919-Building-the-Pinacle-Creek-Mining-amp-Timber-Co-RR/page4&p=256063#post256063

Jim, Seems like the cost is slightly in favor of Stucco Patch rocks and netting. The real savings is in time and effort. For all the rocks I'm using on the PCM&T line it would take 10x as long using hydrocol castings. Glue is cheap and glue guns are $12. The time it takes stapling or gluing carboard webbing is about 6/7 times as long as just netting and gluing. Folded wads of paper Woodland Scenics style is okay and cheapest for smaller layouts. This one would take a months worth of papers. When it all comes out in the wash, remember I've done five roomsized layouts, I would give the nod to stucco and netting if you like this rock 'look.' Thanks, Jim:)
 
Here's an exmple of what cookie cutter is. Pardon the poor quality. It is a scan from a color photo that is around 10 to 15 years old.

attachment.php


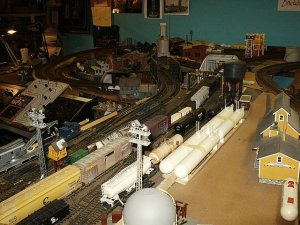
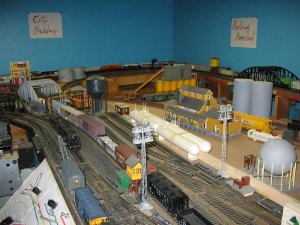
Here are some photos of what the area looks like now.

attachment.php


attachment.php


attachment.php


attachment.php


It's still a work in progress and a lot of detail still has to be added to the salvage yard.
 
I used five eights mainly because that's what I had on hand. Other parts were half inch. Five eights was a little over kill.
 
I used five eights mainly because that's what I had on hand. Other parts were half inch. Five eights was a little over kill.

Wouldn't 3/8 be a little plyable (no pun intended) to vertical changes?
I'd love to be a part of an effort like anything like all of the above.
E
 
Drilled all the holes today so I can get ready to do some wiring . Pretty much at a stand still until I get back from California. It is ready for some plywood to start going down when I get back. Have to do some cross bucks on the legs also but most of it is done. Darn near wore out my DeWalt cordless . ;)

[video=youtube_share;XBHnPVadeFw]https://youtu.be/XBHnPVadeFw[/video]
 
Last edited by a moderator:
Here's an exmple of what cookie cutter is. Pardon the poor quality. It is a scan from a color photo that is around 10 to 15 years old.
attachment.php
I thought that (the photo you show) might be termed a certain frame base with risers that support a plywood sub roadbed?
 
Back when I started this layout almost 30 years ago (or possibly more, time does fly by) this is what cookie cutter was. A plywood roadbed on 1x4 risers screwed to the bench work.
 
Wouldn't 3/8 be a little plyable (no pun intended) to vertical changes?
I'd love to be a part of an effort like anything like all of the above.
E
I had a fair amount of 3/8 on my old central midland (frame work constructed by previous owner), and I found that it tended to sag in a number of locations. My solution at the time was to glue wood paint stir strips on their edge to the sagging portions. The paint stir strips were free from the hardware store at the time.

Here is one such paint stir strip running down between the propane tanks, used to support the sagging freight yard. Had to put this reinforcement on the topside of the board as the trains also ran under this yard. I figured I would eventually disguise it as some sort of a concrete block 'fence'.
PICT0050, freight yard lts, propane, farm supply.jpg
If you look closely at the first photo you will also see another paint-strip reinforcement on the other side of the freight yard behind the crane car and its maintenance car.

IMG_0712.jpg

So 3/8 plywood is just not quite enough in many cases, particularly after a few years of varying temps and humidity .
 
3/8 would be a bit light for a sub roadbed. As I mentioned, I used 5/8, mainly because I had a bit on hand from other projects. When that ran out I did use half inch, but I pit my 1x4 risers closer together. I also used hydrocal for all of my hardshell scenery and I am sure that it also added strength.


Back
Top