Northern Pacific Rocky Valley Branch Switching Layout Build


A thought occurred to me yesterday. I realized that I forgot to utilize a technique I discovered during my last layout build for my roads. On my last layout, I applied the Woodland Scenics asphalt top coat and then dabbed a darker gray color on top to give the road more definition and texture.

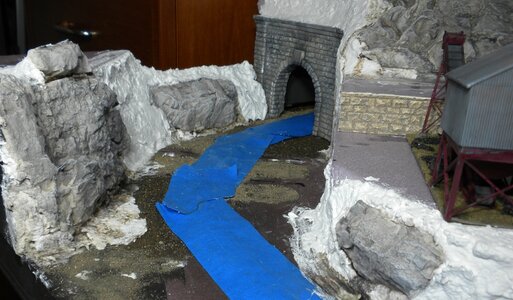
So….I decided I would need to apply the same technique for this layout. However, instead of starting over with a fresh coat of asphalt, I just utilized a lighter shade of gray for the gray blend I applied previously.

Here is the before and after pictures:

View attachment 183464

View attachment 183465

Once this dries, I’ll apply a few more details and patches on the road.

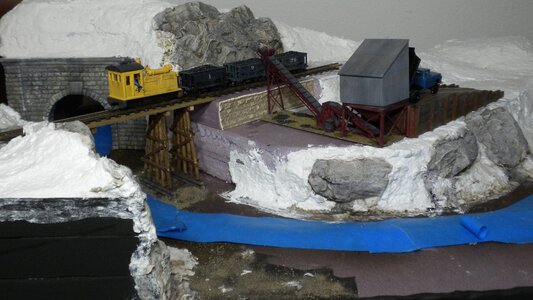
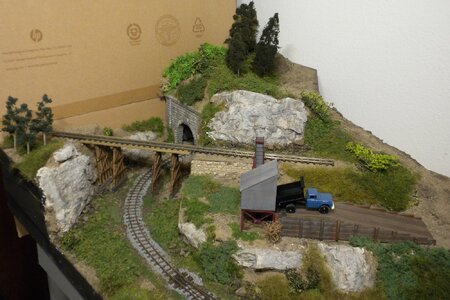
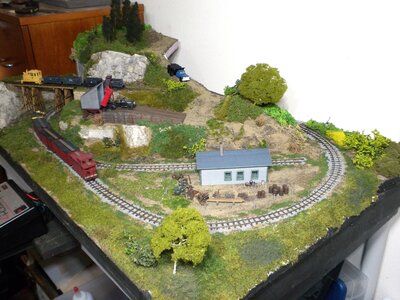
The next thing I decided to do was apply some weathering to the tracks. I learned about using dry brushing several years ago and had used that technique on other layout components such as structures but never tracks. It’s hard to see in these pictures but here’s the final result:

View attachment 183466

View attachment 183467

View attachment 183468

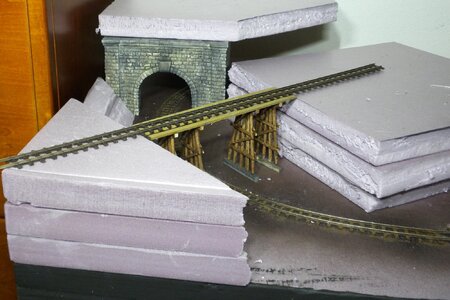
The last thing I did today was use the leftover foam board pieces to create the foundation for some hills. I decided that creating the hills would be the best way to go for the layout. Not only will it save time and money not having to build the barn kit, but it will allow for the tracks to fade into the scenery giving the illusion that the tracks are coming from somewhere.

I’m not sure if this will be the final position for the foam pieces but once I make up my mind, I’ll glue them down and use a variety of tools to shape the pieces into their final form.

View attachment 183469

View attachment 183470
You may want to taper the foam before covering it. It's kind of close to the tracks being that steep. Sculptamold is less messy, lighter, easier to place trees in, and much easier to contour than plaster.

You may want to watch this video,

 
You may want to taper the foam before covering it. It's kind of close to the tracks being that steep. Sculptamold is less messy, lighter, easier to place trees in, and much easier to contour than plaster.

You may want to watch this video,

Yes, I already planned on doing this. These are just the rough cut pieces. I will be tapering them down using a variety of tools and some sanding blocks.

I’m also planning on creating rock races along the edges near the track.
 
Yes, I already planned on doing this. These are just the rough cut pieces. I will be tapering them down using a variety of tools and some sanding blocks.

I’m also planning on creating rock races along the edges near the track.

A cheap serrated knife works great for rough cutting.

I did some rock faces on a 2x3 Hon30 display loop. Scuptamold is easier to work with on vertical surfaces also.
 

Attachments

  • DSCN2482.JPG
    DSCN2482.JPG
    480.1 KB · Views: 28
  • DSCN2485.JPG
    DSCN2485.JPG
    445.6 KB · Views: 25
  • DSCN2487.JPG
    DSCN2487.JPG
    385.2 KB · Views: 29
  • DSCN2490.JPG
    DSCN2490.JPG
    522.7 KB · Views: 26
  • DSCN2494.JPG
    DSCN2494.JPG
    657.7 KB · Views: 27
Spent a few more hours today getting some more work done on the layout!

Before adhering the foam to the layout, I began shaping the hills a little bit using a drywall saw that I had lying around. It works well for creating angled cuts on the foam. I then used some latex caulk to attach the foam to the layout. Once it dries, I’ll continue shaping the hills to my liking.

IMG_6521.jpeg


I also began ballasting today. I use isopropyl alcohol to break the surface tension of the ballast before applying a 50/50 mixture of white glue and water.

IMG_6522.jpeg


I haven’t applied the ballast around that turnout yet as I really like to take my time around those so I usually save them for last.

Next weekend I’m hoping to have both the hills and ballasting completed so I can move on to the next steps.
 
I’ve gone ahead and ordered a few things for the layout.

I ordered the first structure for the layout, the Walthers Smith’s General Store kit, as well as the Woodland Scenics road striping pens, both white and yellow.

I also ordered some fine cinders ballast for the coal loading conveyor area and some various weathering/detailing along the tracks.

Lastly per @santafewillie ’s suggestion in another thread, I ordered some Labelle’s 108 multi-purpose oil for my squeaky ground throw issue I’ve been having.
 
Work continues on the build!

I was able to finish all the ballasting, including the turnouts. However, I still need to ballast around the ground throws. Once it dries entirely, I plan to use the weathering powders I got at the Amherst Railway Society train show this year to weather the track.

I also decided to utilize some leftover Cellu-clay from my last layout to help shape the hills. Once it dries, I will sand it down and use the leftover Smooth-it from the road to create some rock faces along the tracks.

IMG_6546.jpeg


IMG_6545.jpeg


IMG_6543.jpeg


IMG_6544.jpeg
 
Made a lot of progress today on the layout. Since the cellu-clay on my hills was completely dried, I went ahead and sanded them down. I then proceeded to begin working on the rock faces, I think they turned out well!

IMG_6580.jpeg


IMG_6576.jpeg


IMG_6577.jpeg


IMG_6578.jpeg


Once the plaster dries on these rock formations, I’ll etch some finer details into them before painting.

I also received my various items this week which included the Walthers Smiths General Store kit.

IMG_6573.jpeg


I was pleasantly surprised to find that the kit comes with everything needed to light the structure! I wasn’t aware of this and probably missed it in the description but since I’ve never had lighted buildings before, I figured now’s my chance to give it a go:)

Next steps for the layout are probably weathering the ballast and roads, or possibly painting the rock formations, not sure yet.

Edit: I decided to name the layout Rocky Valley Railroad (RVRR) so I will change the title of the thread accordingly:)
 
Last edited:
Progress update on the Rocky Valley Railroad!

I took some time today to etch the fine details into the rock work. I’m hoping that this will allow for some more depth in the rock faces after painting and weathering.

I also weathered the ballast using some of my weathering powders, primarily the dark gray powder. After I applied that, I then utilized the fine cinders and various turf I previously purchased to begin adding coal and plant material along the rails. It’s finally starting to come to life!

IMG_6601.jpeg


IMG_6602.jpeg


IMG_6603.jpeg


The glue isn’t dried yet in the photos but you can get the idea of what I’m going for:)

One thing I’m trying to decide is how to go about doing scenic work around the ground throws…do I use ballast or just fine turf? I’ve seen it done both ways so I guess it would depend on the look I’m going for which at the moment is undetermined.

Next weekend I’m hoping to complete work around the ground throws and get the track weathering fully completed.
 
Looks great!

I have to ask how did you get perfect ballast between the ties?
Thanks!

So…my process does take some time but it’s well worth it!

1) I use a spoon and apply the ballast along the tracks, inside and outside the rails.

2) I use the handle of a paint brush and tap the tops of the rails lightly along the entire area being ballasted. This allows the ballast particles to settle in low spaces.

3) I then use the paint brush to tidy up the outside edges of the ballast.

4) Next, I apply 70% isopropyl alcohol to the ballast using an eye dropper, being careful to not get it on the painted rails.

5) I then use the eye dropper to apply a 50/50 mixture of white glue and water to the ballast. I use the paint brush to remove any ballast particles that have shifted onto the track ties.

Hope this helps! :)
 
I had a little more time to complete some work today. I started painting the rock faces. For my rock faces, I use a four part system from a video by Ron’s Trains and Things on YouTube.

The first part, which I completed today, is to apply a light gray acrylic wash over the rock castings, one part water to six parts acrylic paint. This allows the paint to settle into the various cracks and crevices in the rocks.

IMG_6612.jpeg


IMG_6610.jpeg


IMG_6611.jpeg


I’ve also gone ahead and painted a base coat on the hills as well. I may apply a darker coating next time I work on the layout as I’m not sure about this color.

Next weekend i’ll continue working on the rock faces as planned and perhaps if time allows, I will begin with the trackside scenics which includes applying ballast around the ground throws.


Back
Top