Inglenook or tuning fork ?


Neat! Here's another section from my layout that started as an Inglenook design less than 4' wide and 1' deep, with 2 car capacity on each spur (and the mainline in the street) and just enough room for a shorty switcher and 1 car on the left-hand side, assuming the 6" piece of connector track was in place.

20231214_145404.jpg
 
Hello William Burg ! What are the dimensions of your amazing layout? What kind of track did you use? Peco Setrack maybe ? Could you post more photos or is there a thread somewhere on your layout? Many thanks in advance.
 
Hello William Burg ! What are the dimensions of your amazing layout? What kind of track did you use? Peco Setrack maybe ? Could you post more photos or is there a thread somewhere on your layout? Many thanks in advance.
Current dimensions are 9'6"x23', previously 11'x25' before relocation to its current home, with room to add a 5'5"x10' future branch line. Here's what the main layout looks like--9'6"x12' in its current form. Peco Code 100 Setrack with some Streamline switches. Minimum radius 15" mainline, 12" industrial spur, setting 1940-50 northern California interurban/industrial switching. Sectional construction has let me move the layout twice & grow sections as I had time & energy to do so. I run Digitrax DCC with manually operated turnouts. Operation is nominally by "wheel report" system, sometimes combined with switch lists, but often reverting to "let's move this boxcar over there and that tank car over here" ad-hoc switching. Passenger operation is occasional as this was principally an industrial belt line, but frequently chartered for fan trips by trolley jollies taking in the last days of electric railroading in Sacramento.


20230327_161935.jpg


This view of the layout shows the original L-shaped mini layout, behind it is Haggin Yard, my main division point yard; a pair of sections measuring 12"x10' (formerly 12"x12' but had to cut down 2' to fit into current layout room), capacity about 40 cars. Once the around-the-room loop is complete, Haggin Yard will serve as both northbound and southbound division point yard, depending on which way the train is facing, but theoretically there are no through trains; all arrivals from north (Chico) or south (Oakland) are broken up upon arrival on either end of the Belt Line, which is all considered yard limits, and carried from one end to the other (or various interchanges) by local switching turns.
20240128_212340.jpg

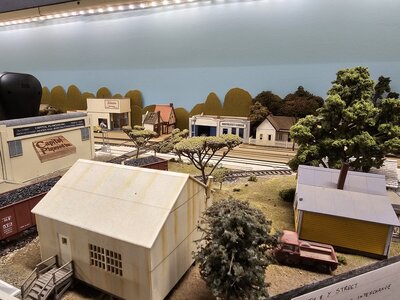
X Street is the middle of the layout, combining a large passing track (capacity about 10-12 cars, enough to hold the longest trains I'd regularly run), two interchanges, team track and 2 industries, and a connecting partial wye where the "branch line" (actually a separate railroad that shared the belt line, Central California Traction) diverges from the belt line. By the 1940s, the belt line, built around the perimeter of the city, was a densely populated residential neighborhood and tracks ran down the middle of the street.
20230414_210534_2.jpg

Front Street is a waterfront dock and industrial area along the Sacramento River; this small freight depot and yard at 2nd & M Street is another Inglenook-behind-a-passing-track combination, complicated by a 4% grade from the river levee to Sacramento's original street level (the city's downtown streets & buildings were raised an entire story to limit the effects of floods, but the alleys dip down to the old grade.)
20240118_204335.jpg


West Sacramento/Westgate Yard section is currently under construction, it will be the largest single section at 8'x3' at its full extent, but can be broken down into 2 sections so if I have to move it again I can fit each section in the 6'x3' bed of my station wagon. It's a combination of industrial area, small supplemental yard for northbound trains, with a wye for reversing equipment that models the wye that led to Sacramento Northern's Woodland Branch (obviously some benchwork's going to go here). The curve to the right will connect to a bridge across the main garage entrance (removable) and a section that will feature a bridge over the American River (not removable) that connects to Haggin Yard, forming a loop.
20240128_212409.jpg
 

Attachments

  • 20240118_204507.jpg
    20240118_204507.jpg
    690.6 KB · Views: 22
Current dimensions are 9'6"x23', previously 11'x25' before relocation to its current home, with room to add a 5'5"x10' future branch line. Here's what the main layout looks like--9'6"x12' in its current form. Peco Code 100 Setrack with some Streamline switches. Minimum radius 15" mainline, 12" industrial spur, setting 1940-50 northern California interurban/industrial switching. Sectional construction has let me move the layout twice & grow sections as I had time & energy to do so. I run Digitrax DCC with manually operated turnouts. Operation is nominally by "wheel report" system, sometimes combined with switch lists, but often reverting to "let's move this boxcar over there and that tank car over here" ad-hoc switching. Passenger operation is occasional as this was principally an industrial belt line, but frequently chartered for fan trips by trolley jollies taking in the last days of electric railroading in Sacramento.


View attachment 181065


This view of the layout shows the original L-shaped mini layout, behind it is Haggin Yard, my main division point yard; a pair of sections measuring 12"x10' (formerly 12"x12' but had to cut down 2' to fit into current layout room), capacity about 40 cars. Once the around-the-room loop is complete, Haggin Yard will serve as both northbound and southbound division point yard, depending on which way the train is facing, but theoretically there are no through trains; all arrivals from north (Chico) or south (Oakland) are broken up upon arrival on either end of the Belt Line, which is all considered yard limits, and carried from one end to the other (or various interchanges) by local switching turns.
View attachment 181068
X Street is the middle of the layout, combining a large passing track (capacity about 10-12 cars, enough to hold the longest trains I'd regularly run), two interchanges, team track and 2 industries, and a connecting partial wye where the "branch line" (actually a separate railroad that shared the belt line, Central California Traction) diverges from the belt line. By the 1940s, the belt line, built around the perimeter of the city, was a densely populated residential neighborhood and tracks ran down the middle of the street.
View attachment 181071
Front Street is a waterfront dock and industrial area along the Sacramento River; this small freight depot and yard at 2nd & M Street is another Inglenook-behind-a-passing-track combination, complicated by a 4% grade from the river levee to Sacramento's original street level (the city's downtown streets & buildings were raised an entire story to limit the effects of floods, but the alleys dip down to the old grade.)
View attachment 181072

West Sacramento/Westgate Yard section is currently under construction, it will be the largest single section at 8'x3' at its full extent, but can be broken down into 2 sections so if I have to move it again I can fit each section in the 6'x3' bed of my station wagon. It's a combination of industrial area, small supplemental yard for northbound trains, with a wye for reversing equipment that models the wye that led to Sacramento Northern's Woodland Branch (obviously some benchwork's going to go here). The curve to the right will connect to a bridge across the main garage entrance (removable) and a section that will feature a bridge over the American River (not removable) that connects to Haggin Yard, forming a loop.
View attachment 181069
Incredible layout!
 
I totally agree with that. Thanks for sharing your photos.I don't play in the same league as you guys. But I am very happy to see such wonderful layouts.
We're all in different parts of the same league; this is the same layout in much smaller/earlier form from 2005, 2 house moves ago (the house at the time was 731 square feet, with an 8'x16' un-insulated garage.) My advice is always "start by building a small layout, keep doing that and the big league layout will arrive later!"
Picture 007.jpg


Haggin Yard was still single-ended at that point (with an escape track); both of these sections were built very simply, 1/2" MDF surface (I know lots of people hate MDF but it works for me) on top of a 1"x2" lath frame, sitting on top of medium-strength shelf brackets.
Picture 008.jpg
 
Hello there,
I had planned to build a 4'x6' layout but I discovered an absolutely brilliant idea:

Another Build - 1 ft x 6.5 ft Shelf Layout

I think I'm going to change my plans very soon.
If you have the space, money, and time? I would do both have have them connected. That way you can do switching and continuous running, and have a place for the train to come from and go to. Just a thought, don’t take it too seriously
 
Project cancelled. Sorry...:oops: I must find a better idea.

Not yet...But I'm working on it ! :D
The best way to learn how to build a model railroad is by building a model railroad, even if it's a tiny one! An Inglenook or "Tuning Fork" is enough to get you started, and can be completed quickly enough to give you great satisfaction and inspire further construction. Something small enough to put on a bookshelf is big enough to give you experience with benchwork, tracklaying, wiring, operation, scenery, structures, kitbuilding, kitbashing, scratchbuilding, detailing, weathering, and C-clamping, all the essential skills of model railroading, without breaking the bank. In my opinion, if there's one common mistake many model railroaders make, it's waiting for decades before they get started on building their first model railroad.
 
The best way to learn how to build a model railroad is by building a model railroad, even if it's a tiny one! An Inglenook or "Tuning Fork" is enough to get you started, and can be completed quickly enough to give you great satisfaction and inspire further construction. Something small enough to put on a bookshelf is big enough to give you experience with benchwork, tracklaying, wiring, operation, scenery, structures, kitbuilding, kitbashing, scratchbuilding, detailing, weathering, and C-clamping, all the essential skills of model railroading, without breaking the bank. In my opinion, if there's one common mistake many model railroaders make, it's waiting for decades before they get started on building their first model railroad.
Agreed! 100%


Back
Top