
IronBeltKen
Lazy Daydreamer
I’ve had a small fleet of Stewart/Kato F7s since they came on the market in the mid-1990’s, and they are still among my favorite locos – they run smoother and pull more than any of my other engines of comparable size. However, there is one major shortcoming that can not be easily hidden - the headlight:
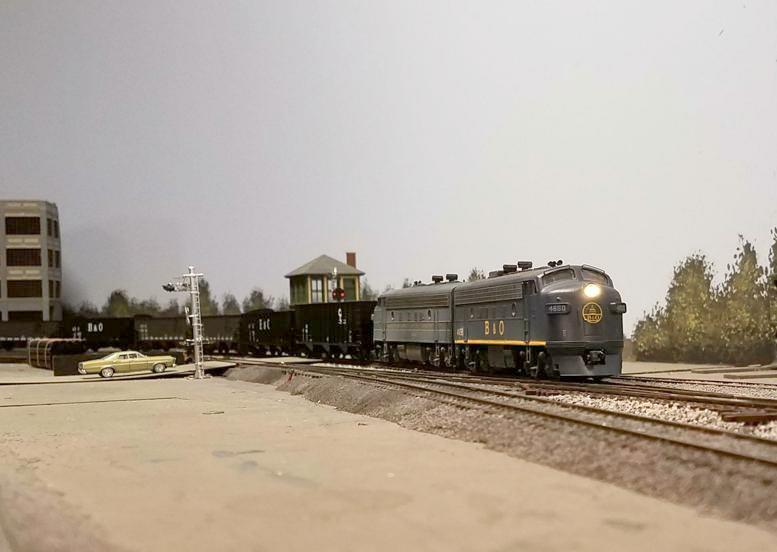
If I ever wanted to shoot photos of these models to look “real”, that searchlight-sized headlight would be a dead giveaway. Since I don’t have the budget to go out and replace all the Stewarts with Genesis models, I had to do my own corrective surgery on them. This thread will describe the approach that finally worked for me after a few failed attempts.
The concept is actually quite simple: I just needed something to mask-out everything that does NOT look like a sealed twin-beam headlight. Since the lens used in Stewart body shells is cylindrical in shape, the mask would have to go directly in front of it – with an additional piece of clear sheet styrene to simulate the outer glass cover.
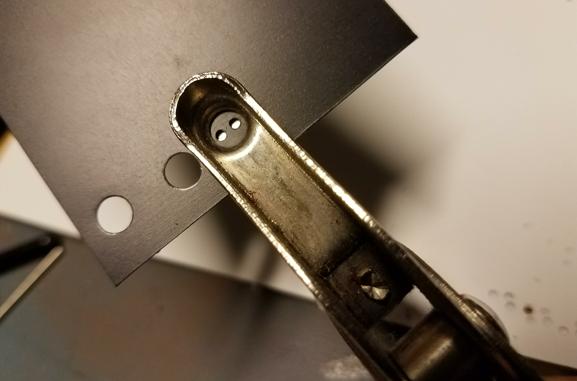
First, I needed to determine the correct size discs to cut out. The headlight lens diameter measured out at exactly 3/16ths of an inch; luckily, a local friend of mine had a collection of paper hole punchers of different diameters, including 3/16", which he kindly let me borrow. Starting with a sheet of Evergreen .040”-thick black sheet styrene, I drilled out several pairs of holes using a home-made template:

Once the light beam holes were drilled, all I needed to do was align them in the hole puncher and make the cut:
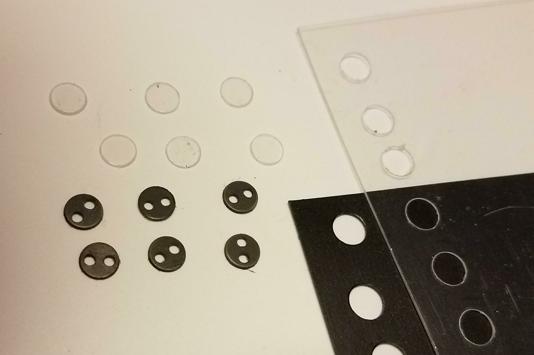
…and that gave me perfectly-sized masking discs. I also took a sheet of Evergreen clear sheet styrene and punched-out a few “glass” covers as well:
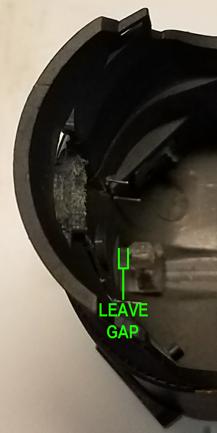
By recessing the front surface of the lens cylinder roughly 0.080” from the headlight opening, I was able to press-fit both the mask and the clear cover in front of it. But I ran into a problem when I tried to put the body shell back on the chassis: the rear of the headlight lens wasn't clearing the frame. I needed to cut some of it away [to the left of the red line]:
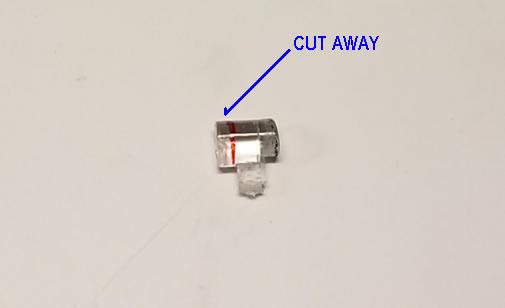
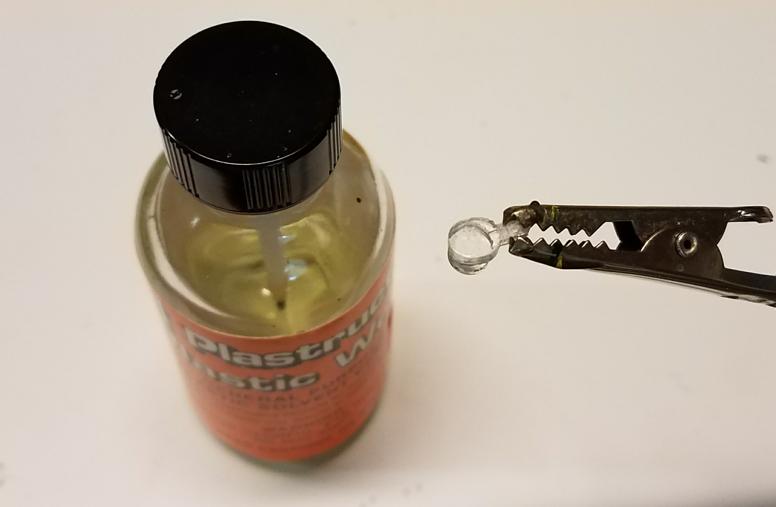
This introduced yet another problem: The back of the lens was no longer smooth as glass, but frosted - which might potentially dull the brightness of the LED:
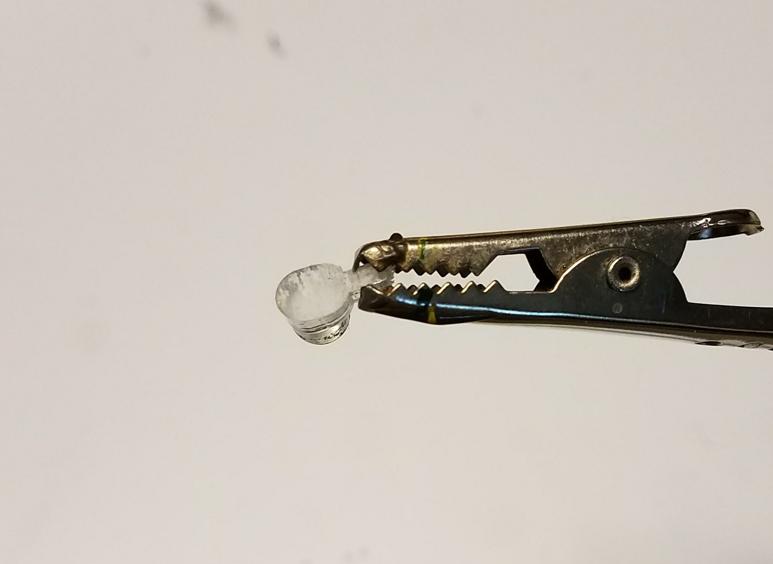
…luckily, a single drop of PlasticWeld was all I needed to restore the clear finish:
** HINT: Don’t try to cut away material from the FRONT end of the lens – I tried that and found that I could no longer fit it into the headlight cavity. Luckily I had a spare lens in my scrapbox!
My next step was to attach the mask to the front of the lens. This was important, because I would need to be able to twist the lens cylinder inside the headlight cavity in order to properly align the two light holes. I also had to avoid using too much cement, which could cause it to leak onto the outside surface of the lens cylinder or into the light holes. I used Testors Model Master plastic cement for this, since it would dry slowly enough for me fine-tune the position of the mask:
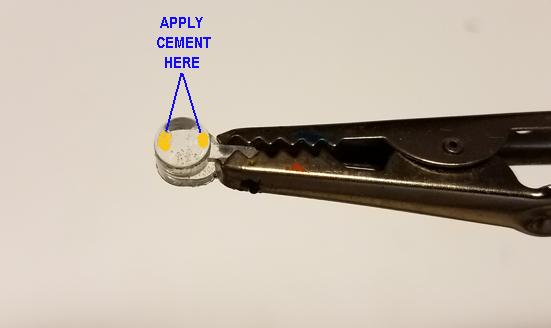
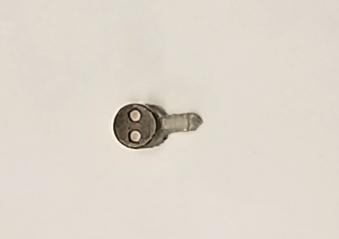
Since the prototype B&O F7s I was modeling had their headlight beams horizontally oriented, I lined up the light holes to form a "T" shape with the stem of the lens:
I allowed 20 minutes for the cement to cure before re-inserting the lens in the body shell. Since the unmodified lens reaches all the way to the front of the headlight cavity, I had to avoid pushing it all the way back in if I wanted adequate space to fit in the mask and cover:
As soon as I got the lens re-inserted, I was able to get the light holes aligned by gently nudging on the lens cylinder's stem. Once I was satisfied with the alignment, I placed a tiny dab of Testors cement to the lens inside the body so it wouldn’t be accidentally knocked out of alignment later on. I made sure to leave enough space for the glass cover:
To keep the outside [cut] surface of the glass cover from catching light and thereby being too visible, I traced over it with a black permanent marker. After allowing enough time for the cement inside the shell to cure, I pressed-on the clear styrene disk...
…and, voila: I now had a Stewart F-unit with a more believable-looking headlight!
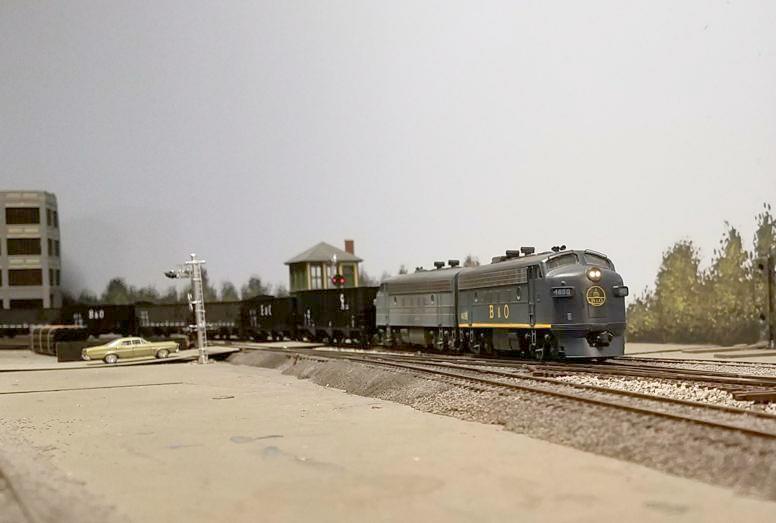
Also, the clear inside surfaces of the lens allow the smaller beams of light to still appear bright when viewed from a distance of 6 feet or more:
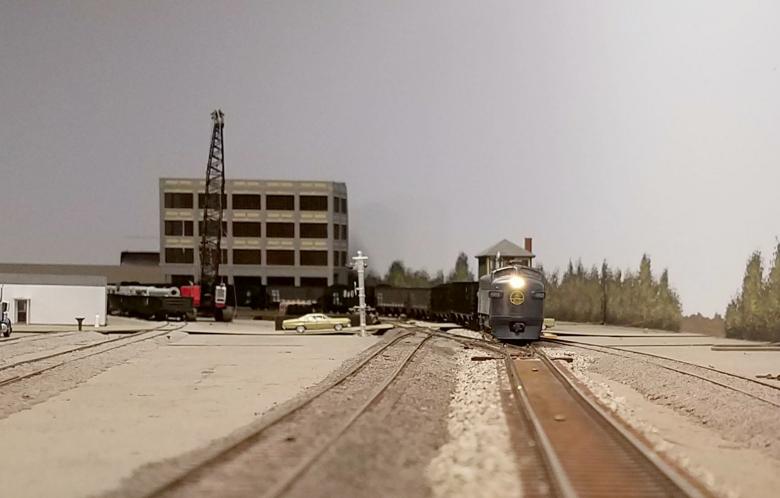
If I want to get decent-looking photos, all I need to do now is apply some natural-looking scenery (e.g. trees, grass, and terrain) to the layout - a skill I have not yet mastered. That will be my New Years Resolution for 2017!
If I ever wanted to shoot photos of these models to look “real”, that searchlight-sized headlight would be a dead giveaway. Since I don’t have the budget to go out and replace all the Stewarts with Genesis models, I had to do my own corrective surgery on them. This thread will describe the approach that finally worked for me after a few failed attempts.
The concept is actually quite simple: I just needed something to mask-out everything that does NOT look like a sealed twin-beam headlight. Since the lens used in Stewart body shells is cylindrical in shape, the mask would have to go directly in front of it – with an additional piece of clear sheet styrene to simulate the outer glass cover.
First, I needed to determine the correct size discs to cut out. The headlight lens diameter measured out at exactly 3/16ths of an inch; luckily, a local friend of mine had a collection of paper hole punchers of different diameters, including 3/16", which he kindly let me borrow. Starting with a sheet of Evergreen .040”-thick black sheet styrene, I drilled out several pairs of holes using a home-made template:
Once the light beam holes were drilled, all I needed to do was align them in the hole puncher and make the cut:
…and that gave me perfectly-sized masking discs. I also took a sheet of Evergreen clear sheet styrene and punched-out a few “glass” covers as well:
By recessing the front surface of the lens cylinder roughly 0.080” from the headlight opening, I was able to press-fit both the mask and the clear cover in front of it. But I ran into a problem when I tried to put the body shell back on the chassis: the rear of the headlight lens wasn't clearing the frame. I needed to cut some of it away [to the left of the red line]:
This introduced yet another problem: The back of the lens was no longer smooth as glass, but frosted - which might potentially dull the brightness of the LED:
…luckily, a single drop of PlasticWeld was all I needed to restore the clear finish:
** HINT: Don’t try to cut away material from the FRONT end of the lens – I tried that and found that I could no longer fit it into the headlight cavity. Luckily I had a spare lens in my scrapbox!
My next step was to attach the mask to the front of the lens. This was important, because I would need to be able to twist the lens cylinder inside the headlight cavity in order to properly align the two light holes. I also had to avoid using too much cement, which could cause it to leak onto the outside surface of the lens cylinder or into the light holes. I used Testors Model Master plastic cement for this, since it would dry slowly enough for me fine-tune the position of the mask:
Since the prototype B&O F7s I was modeling had their headlight beams horizontally oriented, I lined up the light holes to form a "T" shape with the stem of the lens:
I allowed 20 minutes for the cement to cure before re-inserting the lens in the body shell. Since the unmodified lens reaches all the way to the front of the headlight cavity, I had to avoid pushing it all the way back in if I wanted adequate space to fit in the mask and cover:
As soon as I got the lens re-inserted, I was able to get the light holes aligned by gently nudging on the lens cylinder's stem. Once I was satisfied with the alignment, I placed a tiny dab of Testors cement to the lens inside the body so it wouldn’t be accidentally knocked out of alignment later on. I made sure to leave enough space for the glass cover:
To keep the outside [cut] surface of the glass cover from catching light and thereby being too visible, I traced over it with a black permanent marker. After allowing enough time for the cement inside the shell to cure, I pressed-on the clear styrene disk...
…and, voila: I now had a Stewart F-unit with a more believable-looking headlight!
Also, the clear inside surfaces of the lens allow the smaller beams of light to still appear bright when viewed from a distance of 6 feet or more:
If I want to get decent-looking photos, all I need to do now is apply some natural-looking scenery (e.g. trees, grass, and terrain) to the layout - a skill I have not yet mastered. That will be my New Years Resolution for 2017!
Last edited by a moderator:
 Quote). in actual fact they are at right angles to the perpendicular, a better description might be that they form a letter "T" configuration with the stem.