Using real dirt......


PrairieKnight

Active Member
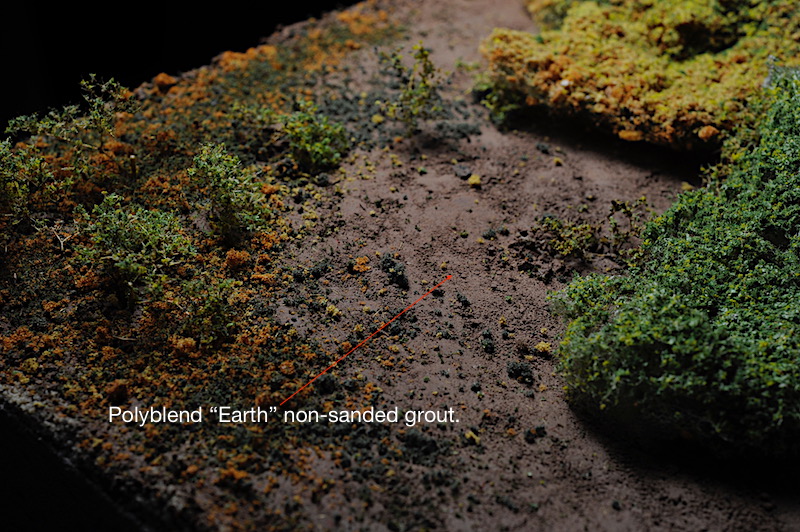
I am contemplating using real dirt on my layout for ground cover. I have been reading where this is quite a process:

1. Sift the dirt through a couple different sized strainers/screens. Depending on how fine a dirt you want to use.
2. Put the dirt in a blender. And if my wife asks... you do not know what happened to her blender.
3. Run a magnet over the dirt.
4. Bake in the oven.
5. Mix in colored chalk if you want to use some dirt as a gravel road.


I have also read that the following steps should be used in putting the dirt on the layout:

1. Spray 70 % alcohol on the area to be covered.
2. Apply (brush on) a 50/50 mixture of glue and distilled water.
3. Spread the dirt on the area.
4. Spray with 70% alcohol
5. Apply more 50/50 glue mixture
6. Vacuum up loose material especially if this is going to be used anywhere near the tracks on the layout.

If anyone knows of a different/better way of doing this, I would love to hear it. The question I have is.... what type of dirt is best to start with? Go out and dig up a bucket full from the back yard? is potting soil better( although it might be a bit dark)

Or perhaps someone has tried this and wished they would have used a commercial scenic ground cover such as Woodland Scenics instead.
 
I have used real dirt in this part of my layout. Not the best photo. Took a shovel of dirt from my garden and sifted it to get rid of larger grains and put it down using diluted white glue just like any other ground cover. I didn't bake it although I have heard that some people did.

IMAG0278_BURST002.jpg
 
I used some old pantyhose and sifted garden soil through those. Our soil is quite sandy and needs to be improved for agriculture, so the pantyhose lets fine grit and some organic matter through, a nice blend. I added another 30% by volume of Plaster of Paris powder.

I sprinkled it in place, rolled it flat with the curved wall of a baby food jar, and then heavily misted it with a solution of water-diluted yellow wood glue to which I added a couple of drops of liquid dish detergent. When it was dry, it was near 1/4" thick (6 mm).

I did not treat it in any way other than to add what I said I added and to apply it as I described. As a change, I might first spray lightly with 70% isopropyl alcohol before applying the glue mist, but it wasn't necessary. I had no issues, and did not vacuum it later. I did not pass a magnet over it because it wasn't going to be very close to my locomotives' motors or any uncoupling magnets.

Cs-bestwater.png


SenecaYardfinalcloner_zps2f30f1c7.png
 
I used real dirt on my entire layout. I used dirt that was naturally dry. I found that clay clumps were the best because of the fine texture, however I used a variety of sieves to create both ballast and different dirt products. Simple kitchen colanders work fine.

Scenic Cement works very well to adhere the dry dirt. Also, the diluted elmers glue/water mixture works. First wet the area then apply dirt, then mist.

Check out the video of the completed layout to get an idea of the different effects that can be obtained:

[video=youtube;n0_XJIQDYVo]https://www.youtube.com/watch?v=n0_XJIQDYVo[/video]

hope this helps
 
I've found that it is very important to bake the dirt. The reasons are to dry out the dirt, but more importantly, get rid of spiders, ants and other living creatures. Failure to do so will result in massive amounts of spider webs and all that invading the layout. I baked dirt at 250' for 30 minutes. Along the lines of one thing previously mentioned, it's important to keep the oven use to yourself.... I don't want to "have to" buy a new oven because of the associated paranoia....

I used a diluted wood glue and water solution for the base and I sealed it with Elmers Spray Glue, although I imagine hair spray would work better.
 
2. Put the dirt in a blender. And if my wife asks... you do not know what happened to her blender.

4. Bake in the oven.

#2: $50 and she never finds out.
#4: I believe this is done to kill any microorganisms that may be living in the dirt. Some of them can be pretty nasty.
 
I model N-scale, so I need finer "dirt." I use non-sanded Polyblend grout from Home Depot. I use Polyblend's "Earth" for dirt, and Polyblend's "Haystack" for sand. Plus, they make a ton of other earth-tone, concrete- and asphalt-looking colors. Below is a test scene I did on the corner of my layout to try it out. My application process is super-simple:

• Sprinkle non-sanded grout in desired color onto layout.
• Smooth and flatten with an index card.
• Spray with scenic cement.
• Voila!

scenex-1.jpg


scenex-2.jpg


scenex-3.jpg
 
Last edited by a moderator:
Since most of us are looking at our layouts from 2-3 feet away, that's about 150-300' away in HO. At that distance you won't see any grain in the dirt. If you don't believe that, put a figure on the dirt & think if you would walk on it. >}
 
Last edited by a moderator:
I have a friend who repairs the baseball fields for my city.
He uses a very fine sand to add to the baseline areas and a clay sand mixture for the pitchers mound.
I have added some charcoal briquette dust to darken the dirt color.

I do NOT suggest gathering samples during a ball game.
 
I have used clay and sand from baseball fields and it looks great. I sifted it, baked it, and mixed it with white glue. I agree that its not a good idea to gather the material during a game.
 
Well I am finally able to get back on and read the forums.Taking a break from the yardwork, honey do list, and other things that keep us all from our hobby during the months when sunshine comes to Michigan. I have read the posts in this thread and am truly impressed with the pictures that have been posted.Thanks for all of the advice and information. And by the way Flyboy you must have gotten my check to you in the mail…the wife has not said anything about the gritty substance when she makes her smoothies in the morning.:rolleyes:
I did try this using real dirt from the back yard on a piece of foam and it worked fine. I also tried making ballast and a “gravel” road. For these I baked the dirt as suggested and used a couple different sieves and not the blender so it would be coarser then the dirt. I also crushed some grey pastel chalk and mixed it in to give some color to the ballast and gravel. However, when I put the ballast down on some small test track pieces, it did not seem to want to totally stick. After letting the second application of the gluemixture dry I would go over the track with a shopvac and I always had smallparticles come off the ties and foam roadbed. I do not want this to happen whenI do it on the layout and have those particles get up into the gears of my locomotives. I used an eye dropper to apply the glue mixture around the rails before and after laying down the ballast…could that be my problem?
When I tested laying down the dirt for scenery, I used a brush to apply the glue mixture. Perhaps I should use a brush on the track and rails to apply the ballast…and clean the rails with a Briteboy.Or, maybe I should just use commercial HO ballast and adhesive and methods from the LHO and save the real dirt for scenery

Any suggestions or advice on this?
 
Last edited by a moderator:
Crandell, very nice yard scene! I've not heard of the plaster of paris addition before. Are you adding that for a particular effect or as a volume filler?
 
Dave, I'd say you got the dirt technique down good! Nice placement of the tulips to......I like details.........


Back
Top