Tortoise Machine Installation...


goscrewyourselves

I'm the one
When installing a TM it says you have "tension" the wire so you get a proper left/right right/left throw. I have only seen a TM installed once and it took two people to put it in and tension the wire for the proper throw.

Does it really need two people for the installation so as to get the proper throw tension or is there a way it can be done by one person?

If it does take two people then I am going to need another method for remote turnout operation.
 
Hi,

I drilled the hole for the wire, from the top of the layout, making sure it was in the correct location relative to the turnout throw-bar.

I also made very sure to dill the hole perpendicular to the layout surface.

Then using a source of DC (power supply, battery) I positioned the Tortoise in the exact middle of it's throw.

Then armed with 3M exterior mounting tape, from under the layout, I carefully positioned the Tortoise so wire was dead center in the hole and pressed it into place.

Held in place by the tape I verified that all was well.

I then fastened the Tortoise in place with the screws provided.

Frederick
 
Yup that's pretty much how I do it too.
Trying to hold it by hand and line it up from above is a pain!
 
I use Liquid Nails to glue mine in place. I also drill a couple small holes outboard on each side of the turn out so I can stretch a rubberband done and under the TM and a screwdriver through the ends of the rubberband that extends out of the two holes. This holds the TM in place till the LN dries and I can make the fine adjustments of the TM before the LN dries.
 
Thanks gents, good to know that it only takes one person as I still have 3 or 4 of them floating around here some where. So just to clarify to make sure I understand this correctly. The points need to be positioned midway through the throw, neither fully left nor fully right when they are connected to wire from the TM. The tension that is talked about is what is required to move the points fully left or right so as to have a full and proper connection with the rails. Am I more or less on the right path?

Thanks again guys, appreciate the advice and tips for installing them.
 
Yep, you're on the right path. Once you start setting it up, it will become intuitively obvious what you have to do. Remember, you can adjust the tension of the points against the rail by sliding the green plastic bar up or down the track on the side of the TM. If you're using thick plywood under the roadbed and the spring wire won't reach all the way through to the track throw bar, you can use piano wire for the same function.
 
Yup both the points and the tortoise need to be in the centre position.
Tension can be adjusted later by sliding the green bar thing up or down the grooves they slide in.

Ha! You beat me to the post button Ken!
 
Thanks guys, that makes complete sense and I can now even picture what needs to be done.

Ken, you mentioned using piano wire if going through thick ply. I will be using 1/2 or 5/8 ply for the sun roadbed plus cork road bed for the track to sit. I am assuming that it would have to be the same diameter as what comes with the machines for it to work. Bear in mind that these will be attached to N Scale turnouts if that makes any difference.
 
Tortoise machines use a positive pressure on the points when they are thrown to keep the points tight to the rail(s), so it's "always on". If you're using turnouts with built in springs, you will want to take them out for use with the turtles.
 
Thanks guys, that makes complete sense and I can now even picture what needs to be done.

Ken, you mentioned using piano wire if going through thick ply. I will be using 1/2 or 5/8 ply for the sun roadbed plus cork road bed for the track to sit. I am assuming that it would have to be the same diameter as what comes with the machines for it to work. Bear in mind that these will be attached to N Scale turnouts if that makes any difference.

The main concern of the thickness of the wire is that it will fit through the hole in the turnout throw bar as well as the holes in the TM for the wire. I wouldn't go to much thicker than the wire that's provided because you will loose the springyness of the wire.
 
Ken, you mentioned using piano wire if going through thick ply. I will be using 1/2 or 5/8 ply for the sun roadbed plus cork road bed for the track to sit.

If you only have the plywood and cork roadbed between the Tortoise and the turnout the wire provided should be fine.

I had to provide my own wire BUT I was going through 1/2" plywood and 2" foam.

Frederick
 
Thanks everyone.

OldGuy,

Thanks for the tip re springs. I will be using Peco Insulfrog turnouts and to the best of my knowledge I don't think they have the springs you refer to BUT will check.
 
So, one other question if I may. People seem to gravitate to TM's as they appear to be the most popular or better known machines; but, is there something better or as good? What options are you guys aware that do the job?

I remember when SuzieX was on the forums talking about servo's for turnouts. Does anyone have experience with them or other types of switch machines/mechanisms?

The main reason I am asking is because of the price of the TM's. Even at Klein's, they are $15.99 each or $169.99 for 12 (plus tax). I don't know but that seems a lot for being able to remotely change your points.

Okay now I am going to contradict myself, in terms of the cost. Does anyone have any experience with these DCC Concept Cobalt Machines? If anyone does, are they THAT MUCH better than TM's? In short, are they worth the money ($22.49 DCP-000089-IP-Digital-Motor)?
 
Last edited by a moderator:
Thanks everyone.

OldGuy,

Thanks for the tip re springs. I will be using Peco Insulfrog turnouts and to the best of my knowledge I don't think they have the springs you refer to BUT will check.

Yes those turnouts have the springs.

Frederick
 
While I have not used Servos for switch machines I believe that they are quite a bit cheaper. Tam Valley has a controller that can drive up to 8 servos per board. here is a link to their site.http://www.tamvalleydepot.com/products/octopusservodriver.html. I use tortoise switch machines. I have 1/2"- 1" Subroadbed and 1/4" Road bed on top of that. I use 0.039 Steel wire to make the link to the tortoise.

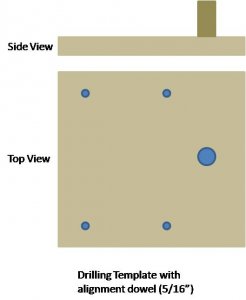
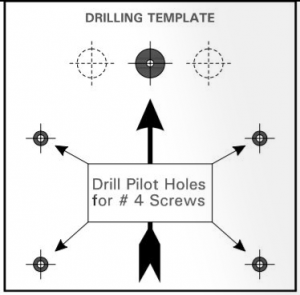
What I do is when laying turnouts I mark the center hole of the throwbar using a fine tip permanent marker. I then drill a 5/16" hole through the roadbed and subroadbed. I then lay the turnout. The hole is pretty much unnoticeable. I created a jig using the template provided with the tortoise instructions. I cut the template out and glued it to a 1/4" piece of plywood. I drilled out the mounting holes with a 1/16" bit and drilled the wire hole out (Black dot on image below) with the same 5/16" bit. I glue a 5/16" dowel in the hole. This make sure that the template lines up with the hole drilled in the subroadbed perfectly every time. The second image shows the completed jig.

Tortoise drilling guide.PNG\

Tortoise Template.jpg
The 5/16" dowel is place into the hole drilled in the subroadbed and held in place by a finger while I drill the 4 mounting holes using the same 1/16" bit I used to make the jig. I then remove the jig and install 2 #4 screws on one side. I then install the tortoise machine (minus the wire) onto those two screws. I then use a third screw to secure the tortoise in place.

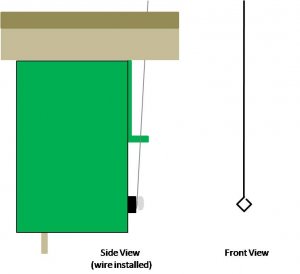
I buy 0.039 steel wire in 3 foot lengths as this seems to have the right amount of tension I need to be able to hold over my Peco/shinohara turnouts. I like it because I can also cut it to the length that I need. I drop the steel wire in from the top side of the layout through the throwbar hole. I then pass it through the green bar used to increase or decease the amount of torque on the wire. I then bend the end of the wire into a diamond shape (as seen in the image below) and secure it to the tortoise with the provided screw. This seems to be alot easier then trying to bend the wire to the shape given in the instructions and eliminate a lot of hassle. It jsut wraps around screw instead of trying to be pushed into a little tiny hole. The last thing I do is trim off the excess wire on the top side of the layout after cycling the machine back and forth a few time. Trim off the wire when it is on the one of the sides because if it is centered it is possible to cut the wire too short and it could pop out when you throw the turnout (ask me how i know, :p) it takes me about 10 minutes to get a machine installed and fully wired up. I hope this helps.
Tortoise wire.jpg
 
Yes those turnouts have the springs.

Frederick

Frederick,

Oh crap :( The obvious question now then is - how do you remove the spring and where is it? I'll be darned if I can see one.

While I have not used Servos for switch machines I believe that they are quite a bit cheaper. Tam Valley has a controller that can drive up to 8 servos per board. here is a link to their site.http://www.tamvalleydepot.com/products/octopusservodriver.html. I use tortoise switch machines. I have 1/2"- 1" Subroadbed and 1/4" Road bed on top of that. I use 0.039 Steel wire to make the link to the tortoise.

What I do is when laying turnouts I mark the center hole of the throwbar using a fine tip permanent marker. I then drill a 5/16" hole through the roadbed and subroadbed. I then lay the turnout. The hole is pretty much unnoticeable. I created a jig using the template provided with the tortoise instructions. I cut the template out and glued it to a 1/4" piece of plywood. I drilled out the mounting holes with a 1/16" bit and drilled the wire hole out (Black dot on image below) with the same 5/16" bit. I glue a 5/16" dowel in the hole. This make sure that the template lines up with the hole drilled in the subroadbed perfectly every time. The second image shows the completed jig.

View attachment 58128\

View attachment 58129
The 5/16" dowel is place into the hole drilled in the subroadbed and held in place by a finger while I drill the 4 mounting holes using the same 1/16" bit I used to make the jig. I then remove the jig and install 2 #4 screws on one side. I then install the tortoise machine (minus the wire) onto those two screws. I then use a third screw to secure the tortoise in place.

I buy 0.039 steel wire in 3 foot lengths as this seems to have the right amount of tension I need to be able to hold over my Peco/shinohara turnouts. I like it because I can also cut it to the length that I need. I drop the steel wire in from the top side of the layout through the throwbar hole. I then pass it through the green bar used to increase or decease the amount of torque on the wire. I then bend the end of the wire into a diamond shape (as seen in the image below) and secure it to the tortoise with the provided screw. This seems to be alot easier then trying to bend the wire to the shape given in the instructions and eliminate a lot of hassle. It jsut wraps around screw instead of trying to be pushed into a little tiny hole. The last thing I do is trim off the excess wire on the top side of the layout after cycling the machine back and forth a few time. Trim off the wire when it is on the one of the sides because if it is centered it is possible to cut the wire too short and it could pop out when you throw the turnout (ask me how i know, :p) it takes me about 10 minutes to get a machine installed and fully wired up. I hope this helps.
View attachment 58130

Thanks mate for such a detailed explanation. 10 minutes to install huh - well, maybe for you :)
 
Hi,

I tried the Cobalt machines and had problems.

The manufacture replaced them and I still had problems.

At that point I gave up and went with Tortoise.

Using servos can be cheaper but I haven't seen any that I really liked as much as the Tortoise.

Frederick
 
Hi,

The spring is on the underside of the turnout near the throw-bar.

There is a little metal plate that covers it and it is really easy to remove.

Take a look and I think you will see what you need to do.

Frederick
 
Last edited by a moderator:
Hi,

The springs are on the underside of the turnout near the throw-bar.

There is a little metal plate that covers it and it is really easy to remove.

Take a look and I think you will see what you need to do.

Frederick

It does help when you know what you are looking for. Thanks Frederick.
 
Thanks mate for such a detailed explanation. 10 minutes to install huh - well, maybe for you :)

I have had a lot of practice. I have installed about 150 of them (three personal layouts and one club layout)


Sent from my SAMSUNG-SM-G900A using Tapatalk


Back
Top