Resin model autos. Any advice for painting?


Jim 68cuda

Well-Known Member
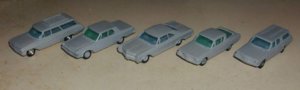
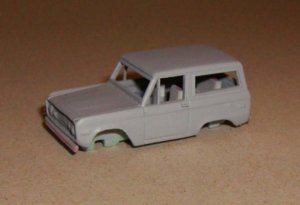
I've recently purchased several 1/87 scale 1960's American car resin model kits from 87RPM Models. The models look very nice, so I don't want to screw up painting them. I know spray paint will provide a smoother finish than brush, but my concern is the small scale. with spray paint I'm afraid of the paint going on too thick and obscuring fine details. With resin, a primer coat is required too. Attached are pictures of a few of the ones I bought. They are not my photos though.
I don't have an airbrush, so I'll be using rattle cans. Should I be spraying the models directly, or kind of spraying over them so they don't get a direct shot, or is there a better way? I've bought more than 25 of these kits over the last couple years, but have been afraid to even start on any of them. If anyone has experience with painting and detailing small scale resin vehicles, please help.

Here's a link to pictures of the 1/87 scale resin kits they have available (mostly late 50's to early 70's cars and trucks).
https://www.flickr.com/photos/79454319@N08/albums/72157633388464352/page1
 

Attachments

  • rings5.jpg
    rings5.jpg
    34.8 KB · Views: 331
  • rings7.jpg
    rings7.jpg
    30 KB · Views: 392
Last edited:
I haven't assembled any resin vehicles since the Magnuson ones from the late 80's, but if all is still the same, wash them well with warm soapy water prior to painting. Don't bother asking how I know this!
 
Wash them with Dawn soap use a toothbrush lightly dry well then primer them let them set for a day to make sure the primer sets up resin sometimes will react to primer and will not dry from inside out it may feel dry to the touch on the surface but underneath it’s not.
 
Buy yourself an airbrush. If you don't want to get a compressor - you can rent a cylinder of compressed air.
You will wonder why you waited so long!
 
If you are willing to use rattle cans check out the Tamiya spray can lines including ones for auto modelers. In any case use use the Tamiya primers. I ditched my airbrush two years ago as more trouble than it was worth particularly the clean up. Between Vallejo Model Color brushed and Tamiya spray cans I have been getting excellent results. Last resort has been to a PreVal sprayer for True Color and PBL Star Brand when there was no other option to get the correct color.
 
Thanks for the input. I also bought a couple of 3D printed cars from Shapeways that I will be trying as well. In the past, I have stayed away from the 3D printed models because the medium has always been the grainy white plastic with too rough a surface to paint in expectation of a smooth finish. Any sanding would eliminate critical detail. I bought a couple cars to try now that they are available with a smoother surface. I bought one in the "smooth detail" plastic and one in the "smoothest detail" plastic. They look alot better than the original grainy finish 3D printed models. I think I'll be able to paint them without sanding them smooth, but alot of the detail is so faint, I think it will be completely gone with a single coat of paint.

https://www.shapeways.com/product/P...et-coupe-kit?optionId=65400929&li=marketplace
 
I have done a few resin vehicles in the past and just used an air bruch. I did not prinme them, but did wash them before painting as mentioned. Some times a shot of clear gloss is needed to complete the vehicle.
 
Chet-
I have used glossy craft paints, thinned with a couple drops of water, and brushed it on primed vehicles.
The thinned paint does not hide detail.
Other times, I used flat craft paint for color and sprayed a clear gloss sealer on the paint after drying.
 
Fellas, with these resin/Shapeways vehicle kits, they do not appear to have “glass” in them. What is the best way to simulate windows on these type of kits?
 
Fellas, with these resin/Shapeways vehicle kits, they do not appear to have “glass” in them. What is the best way to simulate windows on these type of kits?
Depending on the shape and size of the windows, there are options. Don't know if its still available or not, or even if I'm getting the name right, but, there is or was a product made for making small windows on models. I believe it was called Krystal Kleer. The stuff looked and felt like plain old Elmers white glue, but it dried clear. You just filled the window openings with the thick glue like stuff and let it dry.
More recently, following modelers of 1/87 scale vehicles on Facebook, they seem to have success just using clear adhesive tape. I would assume that after the "tape" windows are in place, a clear paint over the entire model would further seal the window in place. But the modelers using tape for car windows don't mention clear coating the vehicle. They just say that the windows stay in place with the tape's adhesive if the vehicle isn't handled much.
3D printed vehicle kits generally don't have window glass unless its printed out as part of the rest of the body. The 3D printed models generally look like they require a fair amount of finishing to make a nice looking model. I have a couple 3D printed models and several 1/87 scale resin models that I have yet to paint, detail and assemble. On the left, in the photos, the one piece 65 Olds Vista Cruiser Fire Chief car and the two piece 67 Dodge Coronet, are 3D printed models (both from Shapeways). All the others on the right, are resin models (from Peter Rings of RPM models). The resin models came with vacuum formed windows. The 3D printed Coronet has no window glass. The Olds Vista Cruiser has the windows as part of the one piece hollow body. There is no interior in the Vista Cruiser by the way.
The third photo I borrowed from my Facebook friend Mike Budde. I hope he doesn't mind. I included it because the 1/87 scale vehicles in the photo, are 3D printed models that he has worked on extensively to make them into nice presentable models. He used clear tape to make the windows on these vehicles. Mike's work is amazing, and not just on the 1/87 scale vehicles. I would love to see his layout some day.
DSCN7835.JPG
DSCN7836.JPG
3dprint mike.jpg
 
Last edited:


Back
Top