Glad you found one! The Walthers ones are British standard. Everything on your models is metric. The hardware is all metric threads, and so on.Yeah, the bolts are 2mm. Walthers has some nice drivers but the say size 00, 1, 2, 3 HUH????? doesn't say whether they are metric and I have no earthly idea as to what those sizes are. Lucily, my M-1A NOS loco has the 2mm nut driver in the plastic bag.
https://www.walthers.com/catalogsearch/result/?q=nut+drivers

You are using an out of date browser. It may not display this or other websites correctly.
You should upgrade or use an alternative browser.
You should upgrade or use an alternative browser.
Pennsylvania RR 4-8-2 M1 and M1A Project coming up
- Thread starter Emperor of the North
- Start date
Emperor of the North
Active Member
Glad you found one! The Walthers ones are British standard. Everything on your models is metric. The hardware is all metric threads, and so on.
That explains THAT!... Thanks Alan. I'm ordering a precision Nut Driver Set from 1.7mm to 7mm since I don't have any. I'll order an SAE set next month just in case I quit finding Sunset Models to putz on.... I better not lose any of the crank pin bolts... They are shaped different with like a built in washer below the 2mm head. (2mm x 4.5mm)
Greenway Products has spares in case disaster strikes!That explains THAT!... Thanks Alan. I'm ordering a precision Nut Driver Set from 1.7mm to 7mm since I don't have any. I'll order an SAE set next month just in case I quit finding Sunset Models to putz on.... I better not lose any of the crank pin bolts... They are shaped different with like a built in washer below the 2mm head. (2mm x 4.5mm)
Emperor of the North
Active Member
Emperor of the North
Active Member
Alan, it's all your fault!!!!
Needed a couple cheaper units to practice my skills (or lack thereof) on so I bought a couple more. The caboose will be here in a few days, the 2 Loco's and Tenders are on layaway and will take a month or 2. The N-5 Caboose will match the M-1/M1-A Loco and tender (time wise) above. I just have to figure out what color to paint it (the caboose). I think the N-5B was built well after the M-1/A but it was possible they were used since the scrap dates of the loco's were after the build date of the caboose. Guess I had better get some kind of paint on order asap. The roof will be black to emulate the tar they used to fix the leaks, and I believe the body would be "Freight Car Color" , I'm going to use Boxcar Red #3, its so close to the Freight Car red I can't tell the diff...
NPP Nickel Plate Milwaukee Road 2-8-2 L-2
PFM PRR Pennsylvania 2-8-2 L-1 Mikado
and a NIB Sunset PRR N-5B caboose
Emperor of the North
Active Member
Si............
Emperor of the North
Active Member
Aint THAT the truth.....
I need to sit and get all the paint off the face of the drivers on the Loco... Only took a few minutes for the tender. I need to make a cradle.
I need to sit and get all the paint off the face of the drivers on the Loco... Only took a few minutes for the tender. I need to make a cradle.
Emperor of the North
Active Member
The one Bowser sells is pretty good
I'm ordering some paint from Walthers, I'll look at what they have.
Bowser no longer makes their metal kit locomotives, sadly. This was one of the reasons I quit model railroading. I found out years ago when I wanted to challenge myself with heavily modifying a T1 4-4-4-4. (dual motor version) I have a Challenger, 2 PRR 2-10-0's a K4, and a USRA 4-8-2 I turned into a N&W K2. Built 8 of their "old Lady" 2-8-0's for my dad in SRR paint, along with 2 2-10-2's. Wish I had got a late model version of the Big Boy. The most reliable engine I ever built from a Bowser kit was their PRR H9 2-8-0. Look at Scalecoat 1 paints for their high gloss Brunswick Green. Micro sized pigment and no primer needed. Decals adhere very well.
Emperor of the North
Active Member
Bowser no longer makes their metal kit locomotives, sadly. This was one of the reasons I quit model railroading. I found out years ago when I wanted to challenge myself with heavily modifying a T1 4-4-4-4. (dual motor version) I have a Challenger, 2 PRR 2-10-0's a K4, and a USRA 4-8-2 I turned into a N&W K2. Built 8 of their "old Lady" 2-8-0's for my dad in SRR paint, along with 2 2-10-2's. Wish I had got a late model version of the Big Boy. The most reliable engine I ever built from a Bowser kit was their PRR H9 2-8-0. Look at Scalecoat 1 paints for their high gloss Brunswick Green. Micro sized pigment and no primer needed. Decals adhere very well.
Yep, got me plenty of Brunswick Green, just needed some of the darker reds for caboose/boxcars. I just disassembled the M1 AGAIN so I could paint the smoke box gray. It came out nice. I ordered some Driver springs too so, since I have it apart, I'll clean and install new springs, and do some work to the drivers and rods. I did do a run test and the Locomotive runs excellent. That is, until my power supply gave up the ghost. Just ordered an new power supply which I can also use working on my amps/preamps so I spent a little more and got a HP 6033A 0-20 VDC, and 0-30Amps. It will plug right in to my test track. I scored a Caboose (as seen above) and some decals so this will complete the set for my display. If I decide to run this old set up, I'll have to get some kits and paint them. Having fun here for sure. I'll post some pics in a couple days when I put this back together and get it touched up. I still need to ballast the tender (putting in some weight as low as I can go). I have some 2 part urethane rubber and plan on lining the inside of the tender when I take the bottom off. A little bit of saran wrap aid in, and the urethane poured in about a quarter inch deep should be enough.
Emperor of the North
Active Member
along with the paint and springs from Walthers, I bought a foam cradle so I can work on the loco's a bit easier. Also got a nice set of Nut Drivers (2mm-7mm including half sizes) and some new precision screwdrivers for use strictly on the models. Thanks Alan.
I miss the days painting Brass for others. I'd dismantle them strip them and paint the major parts and heat dry the paint in an old aquarium with a flood light overhead. Then test the mechanics, re-quarter if needed and research the tiny markings an weathering of the prototypes. Did LOTS of PRR stuff. Got some coal and put it in the tender, slide glass windows and those teeny marker jewels. used Champ and Microscale decals. Sealed the model with Testors clear gloss lacquer. Then did the weathering. Soot on top. Sand sprayed from lower angles. Rust as washes. Oil would be the only gloss paint color. Some had constant intensity lights too. Usually charged $125 for single frame jobs, 150 for articulateds and 350 for Shays. Passenger cars 40 bucks each. Diesels 75 each unless the paint was complex. Cabeese 50 each. I painted them with a 'door mirror' against the back wall so I could compare amounts of weathering so both sides looked about the same.
Emperor of the North
Active Member
This is how I'm going to do the Caboose.

Emperor of the North
Active Member
How did they heat it? Electric? I don't see a stack. Great paint though. Is it at the PRR Museum in Strasburg?
My model has a smokestack, maybe they had wood stoves back in the 20's and 30's ?????
Emperor of the North
Active Member
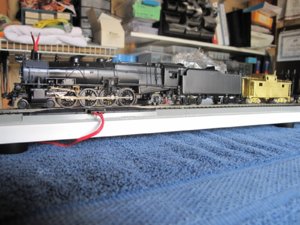
I spent several hours playing around. I painted the smoke box Gray, and I tried some gloss on the front. I'm going to paint the roof of the cab and I did some touch ups. No matter how careful I was, I still nicked the paint on the wheels. I also popped a couple rivets on the truck mechanisms. They were really sloppy so I'm going to try to find some and repair the whole shebang. Not sure if I will stay with gloss or tone it down a bit. Having fun though nd I'm getting better with the airbrush. I won't make the mistake of leaving paint in it while I ate dinner. Disassembled it and gave it a good scrubbing. Got my caboose today too ")
Attachments

Emperor of the North
Active Member
Has anybody sourced rivets???
How about the plastic pieces on the frame that the brakes screw to??? I got some worn out ones.
How about the plastic pieces on the frame that the brakes screw to??? I got some worn out ones.
