My CSX Gainesville & Northern


csxgandn

Member
[video=youtube_share;ebrw1iquml4]https://youtu.be/ebrw1iquml4[/video]Hi, everybody. I recently posted a pic of my layout in the "Showin' Off" section of this forum but "showin' off" seems a bit of a heavy handed phrase for a beginner like myself. I do, however, want to share pics and vids of my progress as I build my fictional HO scale railroad.

In this first vid you can see I will need some kind of bridge so the upper track can pass over the lower. I would love some suggestions on building such a bridge.

Thanks, all
Paul
 
new old timer

[video=youtube_share;ebrw1iquml4]https://youtu.be/ebrw1iquml4[/video]Hi, everybody. I recently posted a pic of my layout in the "Showin' Off" section of this forum but "showin' off" seems a bit of a heavy handed phrase for a beginner like myself. I do, however, want to share pics and vids of my progress as I build my fictional HO scale railroad.

In this first vid you can see I will need some kind of bridge so the upper track can pass over the lower. I would love some suggestions on building such a bridge.

Thanks, all
Paul
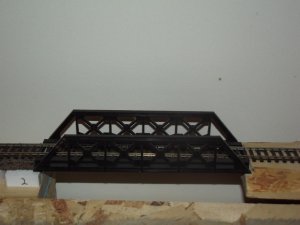
Nice set up Paul. I am the rookie of rookies on model trains. Would like to ask a question for you or any of the experts. I am putting up a ceiling HO train with the room being 10' w by 25' long. What would be the best radius for my corners tracks? Maybe 18? Maybe 24? Thanks so much. Ken.
 
Thanks, Ken. The more experienced in this group would be more qualified to talk about your particular situation. However, I would guess that it depends on a few things... not the least of which, what kind of locos and rolling stock do you want to run? Some require broader curves than others.
 
Paul - It's a bit hard to tell what you can do. I assume that you want to go from where the track currently ends to the turnout inside the opposite end. Due to space requirements for a reasonable grade and clearance, the bridge would need to be almost immediately after the current track ends. A bridge there would require a rather sharp turn, as bridges over initially parallel tracks would either have to be very long with a gradual curve, or short with a sharp curve. Using commercially available bridges does limit you to some extent.
First step is to look at some bridges that Conrail might be using, girder, truss, wood, etc. Then look at what is available, and their dimensions. For example, many Atlas bridges are 9", or the length of a piece of their sectional straight track.
On a side note. I prefer not to put trackwork as close to the edge of the benchwork as it appears to be in your videos. It may just be an optical illusion in the video. Any derailment on track without some degree of side protection such as a broad shoulder or barrier wall, will end up producing "floor" models. It won't be a matter of if, but a matter of when. Especially with visitors and shirtsleeves. Don't ask how I know this!
Best of luck.

Willie

Thanks, Willie. Yes, the track is closer to the edge than is ideal but nothing is permanent yet. I will probably be able to move it in an inch or so anyway. the grade shown is 3%. the bridge will likely have to be a 22 or 24 radius curved section. It's my understanding that nothing is available commercially like this so I was wondering about making my own bridge. I will need two bridges (preferably different types) as track will pass over track again before another 3% grade back down.

That is good advice. I will look online to see prototype bridges and get ideas.
Thanks!
 
CSXGandn, Where is it you want to put a bridge? I've watched the video twice and where you want to place the bridge doesn't jump out at me. Is it in the far right corner?

Some questions:

Will the track on the bridge be curved? If so, you will likely have to build the bridge from scratch; or, kit bash.

If the track can be straight, any number of bridges can be purchased to do the job.

What will the length of the bridge be?
 
Last edited by a moderator:
Using a piece of wood cut to the curve as the bridge base, you could add side girder sections from a bridge kit or from one you buy on line and it would look pretty good. The side girders on these come off and using them would be an option.
DSCF4301.jpg
 
CSXGandn, Where is it you want to put a bridge? I've watched the video twice and where you want to place the bridge doesn't jump out at me. Is it in the far right corner?

Some questions:

Will the track on the bridge be curved? If so, you will likely have to build the bridge from scratch; or, kit bash.

If the track can be straight, any number of bridges can be purchased to do the job.

What will the length of the bridge be?

Yes the bridge will probably have to be curved.
It will be where the inclined risers end in the background.
 
Using a piece of wood cut to the curve as the bridge base, you could add side girder sections from a bridge kit or from one you buy on line and it would look pretty good. The side girders on these come off and using them would be an option.
View attachment 59654

Thanks, new guy. That seems like a good way to go! By the way
the bridge won't be longer than 9"
 
CSXGandn,

First, I would suggest the track next to the elevated track be moved away from the elevated track by a few inches. This will allow the elevated trackbed to have a realistic slope down to the lower level. I have several places where my slope down to the track is too steep and it just doesn't look real. You may need to slide some of your yard tracks over a bit to allow this all to take place.

Second, For the elevated track, this will allow some of the turn to be accomplished before crossing the lower track, maybe alleviating the need for a curved track on the bridge, allowing a kit bridge to be used, instead of kit bashing; or, scratch building a bridge to fit. Be aware that you will need abutments to support the bridge ends.

After the elevated track crosses over the lower track, where does it go?
 
Thanks np2626. That all makes sense. I was thinking about a retaining wall instead of a slope but I'll play with my track plan and see if I can improve it.
 
CSXgandn, Most railroad track is placed on Road bed. You might want to consider cork road bed. Your call, of course! Road bed would be used on track, not in a yard.
 
CSXgandn, Most railroad track is placed on Road bed. You might want to consider cork road bed. Your call, of course! Road bed would be used on track, not in a yard.


I'm glad you brought that up. Once the trackwork is permanent I will install Road bad for the mainline. The long siding in the foreground is going to be my arrival departure track would that be on road bed or level with the yard tracks?
 
Too close too steep, go with the retaining wall look of different materials, they do it in the real world when the ground will not cooperate, why not on layouts too?
 
The purpose of the cork is simply to lift the track up, some. Your ballast materials will fill in where it is needed. Like Willie said you could use N scale for Arrival/Departure and sidings and then maybe HO scale Cork for the rest. Your yard should be flat, no cork. Yes, retaining walls were used by the full scale in developed locations like cities/towns; or, where they were absolutely necessary. However, I think they where far less prevalent than as seen on many Model Railroads. Like all of us, I would assume CSXGandn wants to save some money where he can on his layout. Buying retaining wall materials for the length of his elevated track could be costly. Apparently, none of his track work is permanent at this point; so, why not give himself some room and make the slope between the elevated track and lower track more realistic. He could even narrow down the track bed on the elevated road bed to help with this matter, start the slope by lopping of some of the extra width of the woodland scenics risers.

I believe I might be overstepping my bounds by making these suggestions! If this is the case, I certainly will back off! This is a hobby where artistic expression should be first and foremost. CSXGandn please do what you want/like and pay no attention to what others suggest, if you like!
 
Last edited by a moderator:


Back
Top