Mantua and Tyco Booster 0-4-0 and Little Six 0-6-0?


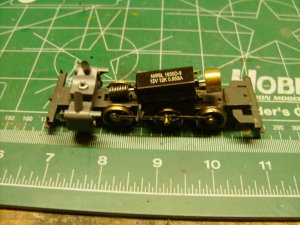
Not that this thread will be a "How to re-build a steam locomotive" thread; but, I will from time to time update my progress. As of late I have mounted the new gear, re-quartered the driver set that I needed to put NWSL's new gear on and mounted the new motor. My confidence in NWSL's products is so high that I will go ahead and put the LED head and back-up lights in and install my Digitrax Decoder in the loco, before ever having run the locomotive with the new motor. Using the pliable rubber material NWSL sent with the re-motor kit and then attaching the motor with the Permatex sealant NWSL recommended, was an easy job and went very well! Photos to follow.
 
Sirfoldalot, please don't hurt yourself, the photos will not be Earth Shattering! No law suits please. The photos will have to be next week at the earliest. It is Saturday today, so next week is in less than 24 hours.
 
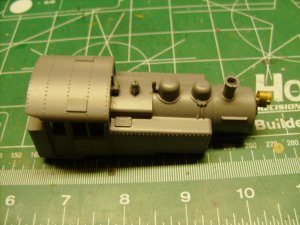
HPIM7707.jpg HPIM7706.jpg

Here are some photos of the locomotive. The body is only in baked on primer and is ready for paint. The chassis still has some stiffness that needs to be worked out before I am going to be happy with it.
 
I have found a problem with how the original builder attached the connecting rod to the piston rod's crosshead. There is a lobe on the bottom of the crosshead that he connected the connecting rod to. This lobe is where, if the loco had had valve gear installed, it would have been connected here. The connecting rod should have been connected to the center of the cross head. This location causes a little binding of this joint. I will have to fix this! I don't know how he could have chosen this location for the connecting rod to be hooked to as everything in the instructions shows it hooked up at the correct location.
 
Last edited by a moderator:
I have separated the connecting rod from the crosshead. Now I need to figure out how to re-attach in the proper location.
 
I am going to make the pin for attaching the conn. rod to the crosshead from a locomotive brass handrail stand-off and peen one end over as a rivet. I will let you know how this goes!
 
Motor and gear look very nice there. Good luck with trying to redo the valve gear. That's tedious!
 
Sherrel, It's not the valve gear, as there is none. It is the Main; or, Connecting Rod to the crosshead connection.
 
Last edited by a moderator:
uN-BELIEVABLE!

Is a screw from a pair of reading glasses too large to work with?

Some even have a sholder, and what I call a "butt", or bottom stop.
 
Last edited by a moderator:
Wow, that's an Idea, Sherrel! I will check that out. I have enough old glasses laying around that I may be able to get a pair of screws from them! Also have a friend who is an optometrist that may have those tiny screws, too.
 
Well, I have a hitch in the locos get along. Since I had to press off one driver so I could remove the old gear and replace with the new, I am figuring my quartering isn't exactly right, so I will need to further check this out.
 
I am convinced the hitch doesn't come from the quartering. It would seem simple to find out what is going on. However, none of my ideas seem to be showing me what is causing the hitch. I'm looking for suggestions. With the side rods off none of the wheel sets has any problems. I have put the forward side rods on and everything is good. Removed the forward side rods and installed the rear side rods and all is good. Put both forward and rear side rods and I have a problem. To me this doesn't make sense. Will look at any suggestions!
 
Sometimes the best way to determine a fix for a problem is to write down what you've done to correct the problem. My doing so above, brought other possibilities to light. The fact that only when both the front and rear side rods where connected made me think I should look at the actual side rods themselves, which I did and I found burrs where the two connected to the center wheel set. These burrs would have been there since the original manufacturing and my guess is this locomotive has always had a a hitch in it's get along! Removed the burrs and the loco runs very smoothly now.
 
LOL - MARK - Sometimes when we just want to get the time ... we wind up building a watch!

Glad the fix was simple. Nice going.
 
I am getting closer and closer to shutting down on the hobby as Summer approaches. I will still come here to peruse the forum an make comment when I can; but, for the most part doing things for the hobby will be limited to the things I can do in my small shop where we spend our Summers. I have painted the shell Microlux Engine Black and was surprised at how glossy the paint was. This will get toned down with weathering and Dull Coat, so I'm not concerned.
 
NP2626
I just found your forum on the Mantua repower you did. I'm currently working on a couple of the Mantua 0-4-0's and 0-6-0's myself. Would you happen to have a list of the parts and their suppliers form your repowering.
Bob


Back
Top