Hand laying track


rzw0wr

Newbie Switchman
I use Fast Tracks jigs for turnouts and some curves.
The are OK, however I have ran into some limitations just like I did with mass produced track.

I would like to learn to hand lay track.
Turnouts are my may concern at the moment.

Are there tutorials on line or any books that explain how?

All of my searches so far have ended at the Fast Tracks site.

Thanks,
Dale
 
Here is a post quoted from another thread.

Hi Taihoku,
Yes welcome to the forum you'll enjoy it here.

I have many years of experience hand laying track in HO and am currently using both code 70 & 55 on my layout, an Early 1900's theme. I have some various shots on the forum here too. I also build all my switches from just a paper template or even a drawing using at least a pair of three point guages if not two pair and they work fine. For straight track and especially laying curves at least three pair if not four of guages are needed to help hold the rail in position and allignmet.

Micro Engineering http://microengineering.com/, [A supply source I did have available through my distributor till the owner died so now I'm geting reistablished again], is the site you want to go to for most of your supply needs as they have both code 40 and 55 rail available as well as the spikes, ties and the apropriate three point track guages you'll need. If I can get restablished I can possibly offer you some better pricing on these items! I think you should be able to get by with guages for code 55 rail to handle code 40 too as I use my code 70 guages to also work with code 55 and don't really notice any difference. There's only a few thousands differences in the actual rail head width anyway.

The beauty of building your own switches/turnouts and handlaying your own track is that you have total flexability in the creation of the switch to suit your given situation just like on the real RR. Also, you can build not only your Standard style of switch but also a Stub switch if your lacking space.

The guy that showed me how to build switches had an N scale layout with all hand laid track in code 55 and 40 as well as switches and his trains ran great as do mine and you can't beat the realism.

You will need some, Fine Cut Jewelers files as well as some decent rail nippers and a decent Razor Saw as well as a good hand vise or small table vise to hold the rail easily when cutting it although nippers and files work pretty well in most cases. Micro Mark will probably have most of the latter things mentioned.

I can show you the tricks to build turnouts easily too using PC strips to solder the rail to in a few places before spiking it down.

As far as a soldering iron you only need one with a fairly light tip such as an ungar with inter interchangeable tips as you don't really need too much heat.

This should give you a good start to getting things together for yourself. Who knows, you might decide to build a layout too or even encorporate your diorama into a layout!

Let me know if I can help you more.

http://www.modelrailroadforums.com/forum/showthread.php?16049-Getting-Started-with-Hand-Laid-Track
 
I used to have an article I copied out of (I think) Model Railroader years ago. It was on building custom turnouts and was extremely detailed. I read that article through a dozen times and I knew I would be able to build one after learning the methods in that article. But I never did get the chance to build one and I got away from the hobby until recently. I think I still have the article, but I haven't seen it in a couple years. Every time I find it stored away in a box I think to myself "I am going to need that some day". Now that I need it I'll never find it. If you go on a hunt and manage to find it please tell me where to go to get it again.
 
Oh and I forgot to mention, I used to hand lay track for my dioramas. The Micro Engineering weathered rail looks so much better than anything else out there. When you pair that with real wood ties and stain them with a weathering stain the track will take center stage on any layout. I still have some sticks of code 55 rail. I thought about hand laying the track on my layout. But my eyes aren't what they used to be so the thought of all those tiny N scale spikes has me thinking Peko code 55 ;)
 
I handlay my track in HO with code 70 rail mostly (although I have done 100, 83, 70, and 55 in HO standard, code 70 and 55 in HOn3 and 55 in N scale at various times).

There are many ways to handlay track, don't be afraid to try different techniques. I built my standard turnouts on photocopies of turnouts glued to the roadbed, ties glued on top of them and then the rail laid on top of that.

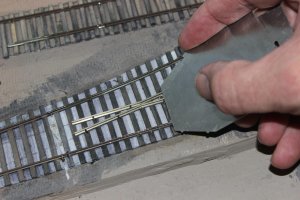
If you are wanting to build custom alignment turnouts a method I use is to lay out the centerlines on the roadbed, then tack a piece of flex track along one route. I then lay a big piece of paper over the flex track and use thumbtacks to secure one edge. I then use a pencil to trace the ends of the ties and the rails from the flex track. I carefully lift the paper off the track, then reposition the flex track along the other route. Normally one end of the flex track stays in its original position and the other end moves. I carefully lay the paper back down over the flex track and re-trace the ties and rails. this gives me a template to build the custom switch. You can identify where the points should be and about where the frog would be.
Since I build in place I would cut out the switch template and glue it to the roadbed. Depending on how you arrange the switch mechanism, I would glue down ties and cut the switch mechanism slot (the order depends on the mechanism arrangement.)

I lay the straightest stock rail first. I notch the base of the rail for the points. Next I lay the stock rail for the diverging route, using the traced rail as a guide. I then lay the frog rail on the straight side. I file the frog rail to a point and spike it roughly in place, then slide it back and forth until its in gauge with both stock rails. I then lay the other frog rail and tack solder the frog rails together. I bend the frog closure and wing rails and spike them in place, soldering them when positioned.

I use bending rails for the points, so the points and the rest of the closure rails are one piece. Since I use insulated and powered frogs I have to have a gap in the closure rail, I use that gap as the break between the assembly of the points and frog. I fabricate the points and then trim then to length to match with the frog.

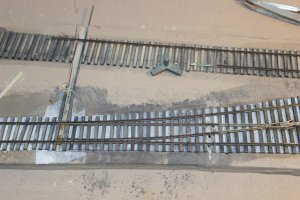
IMG_2432.jpgIMG_2457.jpg
 
I use Fast Tracks jigs for turnouts and some curves.
The are OK, however I have ran into some limitations just like I did with mass produced track.

...
All of my searches so far have ended at the Fast Tracks site.

Thanks,
Dale

Dale, what limitations? I have built several Fast Tracks turnouts, and used the know-how to build three others freehand to fit the unique geometry found where I needed them. They work very well, even with a BLI Niagara towing a string of BLI reefers and Walthers long heavyweights at a scale 90 mph through a two-way. Both directions.
 
Crandell, One of my main problems is curved turnouts.
I see several places I might be able to use them.
Fast Tracks does not have the size I need nor do I want to purchase a jig for 1 turnout if they did.

I like Fast Tracks however, I would like to be able to make my own track.

Easements are another problem.
I don't want flex track or plastic ties.
Fast Tracks will not allow you to make an easement easily.

I was told when I started using Fast Tracks that it would not be long before I would want to hand lay my track.
Guess they were right.

It just sounds like fun.
I like to build more than I like to run my trains.
 
I did find a program for making track templates.
You can draw up a custom turnout or whatever you like and the program give you the information about it and allows you to print out a 1:1 template of it.

Pretty cool if I only knew how to use it.

http://www.templot.com/
 
Dale, if you can make a straight turnout, a regular one, you can make a curved one. Start by placing several sections of flex, connected and pinned so that the joints aren't kinked, along your intended centerline. Overlay another section of flex on the tracks where you want your curved turnout to be. Trace it with a piece of printer paper and the side of a pencil graphite. You'll have to keep everything still, including the paper, so use masking tape. Then, use the knowledge you have to build the turnout geometry that is depicted by your tracing, complete with guards, points rails, except curved, etc. Place the paper on a flat surface and start cutting and shaping rails to fit. The frog goes where the obvious place shows it on the diagramme. When you go to insert it, the curves will flow and your turnout will have the great running characteristics that all good turnouts have.

I made two wye turnouts and a long curved turnout using the method above. They all work well. The long curved turnout is the one freelanced turnout I salvaged from my previous layout and I already have it operational on my new layout.
 
Dale,

You asked if there was a book that had some techniques for learning how to free hand some turnouts. The best one IMHO, is Paul Mallery's "Trackwork for Model Railroaders", published by Cartsen's, the folks that bring us RMC. A good place to look for it is on Amazon. He explains some real good techniques in his book, and although I've handlain my track since I was 12, I adapted several of his techniques many years ago to mine and have had great success. He even shows you how to lay out a turnout using nothing more than a pencil and a ruler.

Out of over 60 turnouts on my layout, only 14 are commercial, and that's because they are hidden, and would be impossible to service if hand laid. I've hand laid track in O-Scale using code 172 rail, S-gauge with code 124, and code 100, as well as HO & N using 100, 83, 70, 55, & 40. No solder was ever used in making any of these turnouts, except where absolutely needed on the points and frog. They were all hand spiked to appropriate sized wooden ties.

Your complaint about the limitations on what sizes you can build is also one of my biggest complaints with Fast Tracks. If you need a turnout that a jig isn't made for, what do you do? Its the same using plain commercial components for your turnouts. Plus because of the price involved with the jigs, you have to lay a minimum of 10, just to get into the price range of current top of the line commercial components. Lay 20 of that same size, and the price is down to about $12-15. Best thing is I can freehand any turnout that I need, straight or curved, and while I'll admit that with a table saw I cut my own ties, (I do love the skrill of the bagpipes), my fanciest turnout on this layout, a #6 double crossover only cost me @ $7.00 in materials, and about 6 hours work.

For someone who is looking to save a lot of money when it comes to trackwork, if you're willing to impart some sweat equity, (work), learn to 1. Cut your own ties. 2. Handlay all the track. Using this method, a regular turnout will run you about $1.75, and 3 feet of track will be $2.52. Those are my current costs for my track.
 
Last edited by a moderator:
Thank you all for the replies.
Carey, I looked up the book you mentioned, WOW..... $66.00 used.
$260.00 new.
Must be good.

I have been playing with some software I mentioned in another post.
Templot2.
Basically it is for making templates for track pieces.
Attached is a template from Templot2 for a turnout I was playing with.
After reading the help files for about 5 mins this took maybe 90 seconds to make.

View attachment market_street_pages_2013_12_31_2025_17.pdf
 
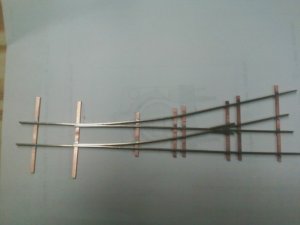
Attached is a turnout I made tonight with a template from Templot2.

It is a #4 I think.

I found it to be about as easy to make as a Fast Tracks turnout.

I did not make guide rails for it yet.

It works fine.
The next one I will have to watch a few places closer but, it works.
Now this is fun stuff. :p

downsize.jpg
 
Thank you all for the replies.
Carey, I looked up the book you mentioned, WOW..... $66.00 used.
$260.00 new.
Must be good...

Dale, those prices are a little out of hand. I would suggest that you keep looking. I bought my latest copy, the others were covered with notes, off of Amazon for a little under $40.00. Keep looking. I haven't looked but they can be seen on E-bay as well.
 
I just bought the book on Amazon for $34.00 shipped. I bought the 1977 edition. There is a newer 1997 edition on there. One used in "Library Used" condition for $44. Another in "Like New" condition for $94. I'll let you know what I think. But I bet it's worth every penny because I remember that name from back in the day.
 
I would like to learn to hand lay track.
Turnouts are my may concern at the moment.

Are there tutorials on line or any books that explain how?
I just lay out the track where I want it. Put in the two outside rails. Then use the track gauge to bring in the inside rails. Where they meet is the frog. Add the closing rails, once again just using the track gauge from the outside rails. Then the points. then the guard rails. The hardest part is filing the ribbing off the outside rail for the points to lay flat against. I don't believe I have ever used a jig (other than a tie spacer jig) when hand laying track. Just put the track down where you want it to go.


Thanks,
Dale[/QUOTE]
 
FastTrax also has the template for a lot of different turn-outs. These are what I use, not the jigs to build turnouts.
Once you've done a few on a paper template then you can build any type or size.


Back
Top