Elevating track and scenery


Raincoat2

Well-Known Member
Okay - newbie question time, everyone - My HO layout is flat to this point, and I am at a place where I want to elevate the mainline to simulate going up a hillside, rolling along there for a while, then descending. I have the WS 2% incline/decline sets which raises the track about 4". Here's my question: what do you cover over those incline pieces with - because if you leave them as they are it looks really fakey, even if you spray paint them. Do you use SculptaMold to fill in those accordion gaps? Right now I'm thinking about tracing those 2% incline pieces on 2" thick pink insulation board (the kind you get at DIY stores), and make solid inclines out of them. That way I can add grass, bushes, trees, rocks, etc. alongside the track. Just want to know what you guys and gals do, what works and what doesn't. Thanks.
 
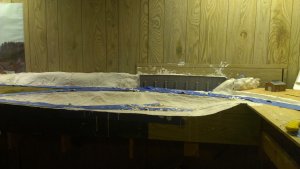
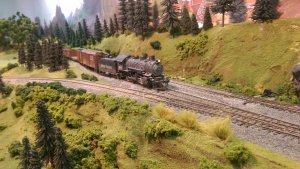
You could use plaster cloth to cover the risers and apply ground cover. I used Hydrocal soaked paper towels because I had it on hand. Here's a before and after of the same area.

IMAG0655.jpg IMAG1015.jpg
 
Chet - Wow!! That's the same area before and after? Man that looks great! Hydrocal-soaked paper towels, huh? I wonder if you can do the same thing with Sculpt-a-Mold, b/c that's what I have several bags of? I also have a lot of small shop rags - maybe soaking them would work, too? I may have to experiment and see what works. I have the mainline diverging, with one branch going up the hill and on to other parts of the layout, while the other branch stays at bench-top level and curves back toward the main town. In between the two branches I'm building the hill that elevates the upper branch, a little bit like your second photo. BTW, I know I've said this before, but your layout is so stinking realistic!! It looks really great, and shows how much time and care you put into it. That's a good example for rookies like me - I've got to be careful not to start going fast and getting sloppy in my work!! Thanks for the info.
 
I don't see why it wouldn't work. I used hydrocal cecause that's what I had on hand. Bought a couple of 50 pound sacks 20 some years ago and still had some left.
 
I'll try the Sculptamold with either paper towels or cloth shop rags, and see how it comes out. I also have seen a YouTube demo using quilt batting over Styrofoam insulation board, but that may not work on this part of the layout. I'm assuming Sculptamold and Hydrocal are about the same chemical makeup. Thanks again. Always great to hear your ideas, Chet.
 
You can carve extruded foam insulation board, the pink or blue stuff, you can lay a lattice of cardboard using hot glue or staples where the cardboard strips intersect, or use the Ground Goop method that I use (credit to Joe Fugate).

I get aluminum window screen and cut it to fit locally. I use a hot glue gun to affix the pieces to the side of the sub-roadbed and to the nearby flat plywood. Then, I mix a goop comprising vermiculite, Portland Cement, Plaster of Paris, and a couple of pinches of masonry dye powder with water. I slather it over the screen and then sprinkle ground foam.

IMG_2198_edited_zps1e4d52b0.png


You can see a bit of the bared plywood that will eventually become the river bed.

Next, some examples of how the ground goop looks with trains:

Challengerclonefinal_zps0cdb2d55.png


Here you can see the bare screen glued into place with wooden braces here and there. I'll show the completed scene in the photo that follows this one:

DSCF3484JPGr.png


Same scene, but now with ground goop and a low-grade photo backdrop I printed at home from one of my photos.

T1firststack_edited_2res_zps7d8f574d.png
 
Crandell - Really nice photos - thanks for the information. Your layout looks very realistic. This is my first build, so I'm into experimenting, but I also want to produce acceptable results as a newbie. I think I'm going to try a combination of extruded insulation-carving plus Hydrocal or SculptaMold. I may also try the quilt batting method, too. While your screen and cardboard techniques coupled with Ground Goop produce very nice results, I'm going to steer away from them for this build - I don't know if I would do very good with them. Thanks again, and I really like your layout!
 
I would use hydrocal instead of SculptaMold only because SculptaMold tends to be on the drier side than hydrocal or even plaster of paris and may not grab on the cloth or screen base as well. SculptaMold will make great scenery where it is used to create lower land forms or features and can be worked very nicely.

Both are great products and I've used both on my layout.

As you gain more experience, I'm certain that both products will find a use on your layout.

Greg

Greg - Thanks for your input, too. I've used SculptaMold on landscaping around the edges of the layout, and so, yes, I have found that it is thicker, at least when you mix it according to directions. Wonder if adding more water would make it as malleable as the Hydrocal. Well, with your information I'll probably try the Hydrocal for this part of the layout, and maybe the SculptaMold for adjacent areas. I'll have to experiment and see how it looks. Thanks again for your ideas.
 
Hydrocal is harder to carve if you have to, but it is incredibly strong compared to plaster or sculptamold.
 
Before the advent of plaster cloth, I made 2x8-10 strips of cloth soaked in a soupy mix of hydrocal and laid over crumpled newspaper shaped with masking tape. For the base I used two coatings of the strips - taking out the newspaper after the first covering. It was strong enough that I could lean on it without any cracking - hence the name "hard shell". Very easy to do - if you don't like something - just take a hammer to it and a "do over".


Back
Top