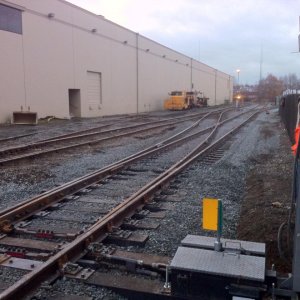
Choosing correct ballast for track


Raincoat2

Well-Known Member
PK - time for a newbie question - - got the benchwork built, laying roadbed and track now. The question comes up: how do I know what ballast to use? There are fine, medium, and coarse grains as well as a number of colors to choose from. So is it personal preference? Does real-world ballast actually vary by train line or from one part of the country to the other? Any suggestions are welcome.
thanks.
Johnny (Raincoat2)
 
I've seen every color combo from white stone to black cinders to muti-colored, a random mix. No "standard" color that I've ever heard of. But no matter what color, don't forget the streak of oil down the middle! LOL!

It's the size of what they claim as ballast that confuses me. it's YOOGE! My wife bought bags and bags of the stuff and it looks too big to be ballast, sand would be more proto size wize. I'm going to have to make a "rock crushing" kind of "industry" for all this oversize rock!
 
What an open question this really can become. You need to think about how you are modeling before you can answer this question. There are many factors to get to the correct answer many you already asked in your question.
The firs thing to figure out is the layout a prototypical or fantasy layout. Should it be proto then you will need to use what is used by the line you model. If not then you can do what you think works for what you like. As far as the type and size again this will be your taste if not a prototypical type used. The size can be any that looks good. I know many use N scale with the HO mixed it to get a more realistic looking scale size. Mixing the different colors is also a way to get a look you like best. For what brand you want to use there are many out there and all different typre of materials are used to make the ballast. Google is a great place to start to review the images section and see what other look like.

Dave
 
If you are modeling a certain specific road, get a photo and go from there.

I used several different ballasts, including native material that I ran through a fine screen. The tracks around here often have different ballasts in different areas on their track.

hope this helps
 
Local material and conditions will "color" the whole road. Certain industries will leave their mark on miles of track with spillage and suchlike.
 
I prefer using Woodland Scenics' "Fine" scale ballast on my layout. I believe that the fine is more in scale for HO use. I custom mixed three colors to achieve the main line ballast color I wanted.

Major mistake was not recording the mix ratio for future preference, but I did mix enough to finish the layout. And like New Guy pointed out, certain spurs can have a different color as the result of staining, spillage or the industry using the spur using their only ballast.

One area I used sand from Sedona Arizona to get my results.

Thanks.

Greg
 
Last edited by a moderator:
I would agree with Greg. I used to use a ballast from "johns Ballast" but the company has gone out of business. It was a fairly fine ballast. Now I am also using the Woodland Scenics fine ballast.
 
If I have to do it over, I might switch to Woodland Scenics "fine" ballast as opposed to the medium that I used. It is closer to scale for HO than the medium. The medium scales out to 5"-6". As for color, as others have posted, any color will do. I loosely follow the ATSF practice (at least in this area) of having lighter color ballast on the main line than on the passing sidings. I use light gray (as close to white as they offer) on the mains, a mix of light gray and gray on passing sidings and straight gray on industry sidings and spurs. The latter is representational of used, dirty ballast that doesn't get refreshed by the RR. I do believe that many other RR's use different shades as well to distinguish the mains. Rock from different quarries varies so you get a lot of variety.

Willie
 
One thing to beware of with Woodland Scenics ballast is that it is not made of stone, but crushed walnut shells. This makes it lighter than water. I discovered this the hard way on my previous layout, when I had the ballast packed down neatly between the ties. I poured on a mixture of "wet" water [i.e., a few drops of dish soap mixed in] and white glue, and when I returned the following day, pieces of ballast between the rails had floated up over the ties and stuck to the inner sides of the rails.

Bottom line: If you plan to use WS ballast, make sure that whatever cementing liquid you apply does not cover the ties.
 
I have used 70% alcohol to wet the Woodland Scenic's ballast prior to applying the diluted white glue. The alcohol aids in allowing the white glue to be absorbed by the ballast. Don't over do the amount of alcohol you used as a wetting agent.

This should help in keeping the ballast from attaching to the sides of the rails as Ken above experienced.

Thanks.

Greg

PS: I think the Woodland Scenic's site has a short video on using their ballasts in the ballast selection of WS on-line web site.
 
Last edited by a moderator:
Use only medium or fine ballast in your choice of supplier. The coarse stuff works out to chunks of rock nearly 6" across, much too large for conventional ballast on Class 1 railroad mains.
 
One thing to beware of with Woodland Scenics ballast is that it is not made of stone, but crushed walnut shells. This makes it lighter than water. I discovered this the hard way on my previous layout, when I had the ballast packed down neatly between the ties. I poured on a mixture of "wet" water [i.e., a few drops of dish soap mixed in] and white glue, and when I returned the following day, pieces of ballast between the rails had floated up over the ties and stuck to the inner sides of the rails.

Bottom line: If you plan to use WS ballast, make sure that whatever cementing liquid you apply does not cover the ties.

I have always known about the crushed walnut shells. While I have read of this happening, I have never experienced it. I do as Greg posted. I always wet the ballast down with a alcohol/water spray before applying the diluted glue/water mixture. I currently have over 1200' of track done this way with the Woodland Scenics product. I don't worry about the glue getting on top of the ties, as it runs down between them before drying.

Willie
 
Remember, railroads would use the cheapest material available. This is why the colors vary so much across the country - it is from locally sourced materials. During the steam era, track around service facilities would frequently be ballasted with cinders - cheap, readily available, and local.

For model railroads, so many sizes are available for several reasons: we have lots of different scales, real roads used various sized materials, but mostly because we, as modelers, want the different sizes. As new guy said, sand would be closer to the prototype, which mostly used 1/2" to 1-1/2" crushed stone. But most modelers don't like the "look" of such small grains.
 
... But most modelers don't like the "look" of such small grains.

Very much so. A person has to like what he creates so that he feels pride, pleasure, and satisfaction in his creation, and this applies to the rather laborious task of crafting realistic trackwork. As a caution, though, once we get the objective lens of an imaging device down near the tracks and attempt to show the quality of the work we have to display, things like oversized rails, poorly groomed ballast, and oversized ballast particles, tend to show up rather annoyingly and will lead to some less complimentary observations from onlookers. This is why finer ballast has been on the market for some time and why the smaller codes of rails have become more popular in the past couple of decades or so.
 
Yes, the prototype does use different sizes of track ballast.

If you grab your copy of the AREMA Manual and check out Chapter 1, Part 2 you'll see the various gradations. What's that you say? You don't have a copy of the AREMA Manual for Railway Engineering? It's a great reference for model (or real) railroaders. You can pick one up for the low, low price of $1470. ($920 if you're an AREMA member.) Yes, it is by far the most expensive book I've ever purchased, and thankfully work paid for it. It's actually several books, each quite large, and takes up a couple feet of shelf space. It's also rather dry reading for the most part.

OK, so you probably don't have a copy handy. You can see the common sizes in this chart:

http://armytransportation.tpub.com/TI-850-02/Table-6-8-Recommended-Ballast-Gradations-64.htm

Short version?
Size 4A is 2" to 3/4" This the big stuff, used on high speed mainlines with concrete ties.
Size 4 is 1-1/2" to 3/4" This is the standard track ballast. Basically normal crushed rock, no fines.
Size 5 is 1" to 3/8 This walkway rock and yard ballast. Used for areas where trainmen are walking.

Some of the other comments are correct, a lot of the railroad ballast model railroaders use is too big. On the other hand, it does have a texture to it, and that's what you're trying to capture.

You will often see various colors in the rocks. This is a good way to get the impression of ballast without having to use big chunks. A speckled texture will highlight the fact it's made up of various pieces.

Color varies, sometimes a lot. I seem to recall that the D&RGW out of Denver was known for pink ballast.

Here's an example of a typical modern mainline. You can definitely see texture in the rock as well as some color variation.
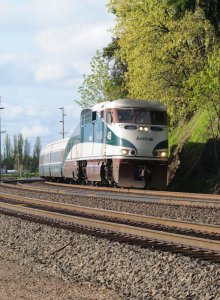
BH1_8334.jpg

Like the "nail holes" that many model railroaders put in structures (some of which are more like bullet holes in size), sometimes you need to go a bit oversize for effect. The best approach is to work from photos and then take photos of the the model and compare.
 
Last edited by a moderator:
Remember, railroads would use the cheapest material available.

The cheapest material that meets their requirements. They have pretty stringent requirements for ballast these days. First of all, it has to be fractured rock, no gravel. It has to be clean, with no dirt or fines. It also has to be a sound material, able to withstand loads and freeze/thaw cycles etc. The materials are sent to a lab and undergo a variety of tests. It's not unusual for a railroad to ship rock quite a ways to get a good product. The idea is to create a roadbed that's rock solid (groan) and drains well with no mud to attract weeds.

Of course this applies to modern railroads, especially the class ones and well to do shortlines. If you're talking about railroads in the steam days, it's a different story. Cinders were common on yard and industry track, and some lines did use gravel or even sand. Logging and mine railroads were the worst, and sometimes they just laid the track on the ground, maybe tossing some dirt on it. The best thing to do is to research the railroad you're modeling (if you have a specific prototype) or at least pick a region and era, and say "Well, the PRR and NYC ran nearby, and in those days, this is what their track looked like, so my fictional bridge line would probably have used..."
 
I prefer using Woodland Scenics' "Fine" scale ballast on my layout. I believe that the fine is more in scale for HO use. I custom mixed three colors to achieve the main line ballast color I wanted.

Major mistake was not recording the mix ratio for future preference, but I did mix enough to finish the layout. And like New Guy pointed out, certain spurs can have a different color as the result of staining, spillage or the industry using the spur using their only ballast.

One area I used sand from Sedona Arizona to get my results.

Thanks.

Greg

I'm going to have to remember that. Probably a good idea to record things like that in some sort of notebook that can live with the trains for future reference.
 
It is a good idea to write down your mix proportions. But don't get too worried if you can't match it exactly. As others have mentioned, its common for spurs and yards to have different colors. Even the main track can have different colored rock, depending on when they last surfaced the track.

"Fresh" ballast is lighter in color, and darkens as it ages. How can you have "fresh" rock, when it's millions of years old? Well, the fresh part is when it's crushed, exposing the interior of the rock. It's often a lighter color, and then it gets darker as exposure to the air reacts with the rocks.

This shot is good example (if not a great photo, it's an iPhone shot taken in low light). Notice how the new ballast is light grey while the other ballast is brown and darker. They're not even close to matching.

ballast.jpg
 
There is a down side to Woodland Scenic's ballast. I have some but left it in the bag when a number of other reported WS ballast tends to "float" when you are wetting it and applying a liquid adhesive such as dilute white glue or matt medium. They report that WS ballast is made from crushed walnut shells, the reason why it floats easily.

Another hobbyist recommended scenic express ballast because it is real rock and stays down nice and solid when wetting it and applying dilute liquid adhesive. I have put some down on my layout and I agree - I really like the Scenic Express, nice and heavy and like real ballast!

Scenic Express gets my vote.
 
The question comes up: how do I know what ballast to use? There are fine, medium, and coarse grains as well as a number of colors to choose from.

Real ballast comes in a variety of sizes. Mainline ballast is normally a crushed rock, typically limestone, granite or trap rock, that is in the 2" size. Ballast for concrete ties may be a bit larger, 2-3" size. Ballast in yards or subgrade may be smaller, 1" or so and ballast for walkways may be chat, 1/4-1/2". So the size model ballast you use should be appropriate to that. I have found that smaller is usually better if you have to chose between two.

The color varies depending on where the ballast is sourced. The MP got a lot of its ballast that from a quarry at Granite Mtn, Ark. Since it was a blue grey they called it "blue" ballast. Other ballast was sourced from a quarry in Allamore, TX and it was a reddish brown. The CNW use a red or pink granite so theirs was called "pink lady" ballast. Railroads along coasts might use shells. The SP served a lot of copper smelters so used a very dark colored copper slag. On the east coast there were lots of steel mills and coal fired plants so slag, cinders and ashes made up a lot of ballast.

I would choose either a color that matches a prototype you are fond of or a color you like. You can use a darker, cinder color for the sidings and yard tracks if you are modeling up through the 1960's.

You can use a lager size on the mains and a smaller size on other tracks. by changing color and size between the main and the other tracks it makes it easy to tell which track i sthe main track.

Any suggestions are welcome.

I would suggest Arizona Rock and Mineral ballast. It is actual crushed rock and comes in a wide variety of colors. I have found it to be the easiest to apply. John's Lab and Woodland Scenics have been some of the hardest to apply. Woodland Scenics is crushed walnut shells dyed to various colors. For HO I would use either medium or HO for the main and Fine or N scale for the other tracks. Or..... I generally use Fine or N scale for everything in HO. I mix water with either rubbing alcohol or a couple drops of dish detergent in a spray bottle. I apply the ballast and arrange it (fingers, small flat brushes), then gently mist it with the water spray until its dampened. The spray should be fine enough that there aren't "divots" in the ballast where the spray drops hit.

I mix a 50-50 mix of water and either white glue or matte medium (or matte Mod Podge) in a plastic ketchup squeeze bottle (the plastic ones with the conical nozzles like from a diner) and then dribble the glue mix onto the damp ballast. The glue should flow into the ballast. If it beads up you haven't wetted it enough with the spray. It you can see white glue then its not mixed enough or too thick. After gluing, I let it dry, test it to make sure its glued solid, if not wet it lightly again and reglue.


Back
Top