
You are using an out of date browser. It may not display this or other websites correctly.
You should upgrade or use an alternative browser.
You should upgrade or use an alternative browser.
Building the Pinnacle Creek Mining & Timber Co. RR
- Thread starter HOexplorer
- Start date
HOexplorer
Well-Known Member
Thanks guys. Keep looking. Ask questions if you wish. Jim ")
HOexplorer
Well-Known Member
Mike, I am retired. At 67 I'm too old to play around, my wife wouldn't let me anyway, so why not model railroading? I stated a few posts back that I work on the layout 4-6 hours a day. This is my fifth layout in this room in 6 1/2 years. So what, they last 13 months or something? I can't help it. I like to build. Some say I'm not bad at scenery at least.
On this layout I've included some small operations this time around. Mainly shuffling ore cars. I've put on the fascia and mounted the NCE panel today. When I get the track finished next week I can see how this DCC works.
I played a senior softball game today and was home by 11. Had a Snickers and put in 4.5 hours on the layout until I went to the hot tub to relax. Typical day for me.
Just a small editorial here: I'm thinking that while I may be an exceptionally fast modeler I've been around these sites long enough to have heard every reason why some folks can't or won't finish their layouts. Some are afraid to finish. Yes, afraid. "If I get it done then what do I do?" That kind of thing. Some folks simply can't work for myriads of reasons, some as esoteric as "my work is crappy, why am I even trying this hobby?" Who knows? In truth I think many of us have road blocks. Maybe even stumbling blocks. Family, money, working, other hobbies, can't wire, can't settle on an era, etc. Me? My simple motivation is one thing. If I start something at my age I don't want to leave it unfinished. Maybe I'm afraid in a way? So I just march along building for myself and others. My big problem will be when this is finished what do I do next? I love HO, but there are few layouts that can go in my half a 10'x11' bedroom. I designed this one myself and maybe I'll keep it awhile then quietly take up motocross or base jumping, something like that. As arthritis creeps into my hands and fingers this layout building is getting tougher all the time. Jim
Last edited by a moderator:
Fifer
Member
Jim , that is one of the best posts I have read in years on the net.
I understand it completely. I always tell folks it is not the size , nor the skill level , nor weather someone else likes it , but rather the fun YOU have with it!!!!
Jim you are having FUN and we can all witness that !!!!
Thanks for sharing !!! Mike & Robin Fifer
I understand it completely. I always tell folks it is not the size , nor the skill level , nor weather someone else likes it , but rather the fun YOU have with it!!!!
Jim you are having FUN and we can all witness that !!!!
Thanks for sharing !!! Mike & Robin Fifer
HOexplorer
Well-Known Member
Mike, Thank you ever so much for the comment. It is much appreciated. I didn't mention "fun" in my post because many seem to think it is a cliche. But in reality having 'fun' is very important and thanks for bringing it up. I certainly have fun. If I wasn't I'd be diving with sharks or something. Jim
Fifer
Member
If I wasn't I'd be diving with sharks or something. Jim
Isn't this the same thing !!!!!
Mike
HOexplorer
Well-Known Member
Hi Mike, That's a good one. There may be sharks about, but they seem to only circle here? Jim
HOexplorer
Well-Known Member
Thanks fellows, much appreciated.
Here's an update photo. Fascia is in and will be painted black. All the stuff in the front is on the mining camp area and the lower mine. Tight track turn being put in. It will work out because only small ore cars and a bobber caboose will be stored there. Jim

Here's an update photo. Fascia is in and will be painted black. All the stuff in the front is on the mining camp area and the lower mine. Tight track turn being put in. It will work out because only small ore cars and a bobber caboose will be stored there. Jim
Last edited by a moderator:
HOexplorer
Well-Known Member
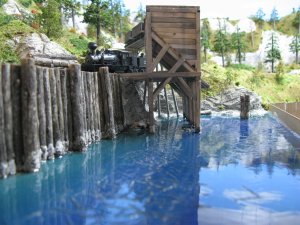
Back on the left side of the layout on the lower level you can see construction started on the ore tipple and the pier. The pier 'logs' are from the park across the street. This plant is lightweight and has much bark definition.
Do to monetary restraints imposed by the CFO around here, almost everything is scratch built on the layout. The ore tipple is NE wood product from my LHS. Paint under the 'water' is acrylics. Lighter toward the shore. Remember this layout is modeled up one of the SE Alaska fjords. So this small water display is the only way to get supplies to the miners. Jim

Do to monetary restraints imposed by the CFO around here, almost everything is scratch built on the layout. The ore tipple is NE wood product from my LHS. Paint under the 'water' is acrylics. Lighter toward the shore. Remember this layout is modeled up one of the SE Alaska fjords. So this small water display is the only way to get supplies to the miners. Jim
Last edited by a moderator:
HOexplorer
Well-Known Member
Here the ore tipple is almost finished. Some weathering and nuts and bolts to follow. The wood is North Eastern wood products from my LHS. I actually had a dull moment and did the inside (never to be seen) of the tipple so it actually works.
Next will be some 'barnacles and sea weed glued down. And of course some woodwork to contain the "water." Jim

Next will be some 'barnacles and sea weed glued down. And of course some woodwork to contain the "water." Jim
Last edited by a moderator:
Fifer
Member
Here the ore tipple is almost finished. Some weathering and nuts and bolts to follow. The wood is North Eastern wood products from my LHS. I actually had a dull moment and did the inside (never to be seen) of the tipple so it actually works.
Next will be some 'barnacles and sea weed glued down. And of course some woodwork to contain the "water." Jim

Jim , that is quite stunning !!!!
Great Scene!
Mike
Just took my first look. Holy crap! Very nicely done sir!
I tried overlaying a new scale over an existing layout. Unfortunately, I got confused, and did it so many times, that I lost friends! I was starting to lose interest too!
I stepped back, really thought about it, what scale worked best - for me...
To paraphrase you - I wanted FUN back into my hobby!!
I love your scenery, the trees especially!! Quite an inspiring layout!
Last edited by a moderator:
HOexplorer
Well-Known Member
Thanks guys I'm glad you are enjoying the PCM&T Co. layout.
Pictured below are the materials I'm using to have in and around the water. The fine sand is from Lowe's. I found it laying on the ground in the store. You may recognise furnace filter material. I will use this for seaweed. This is a salt water scene so you got to have seaweed. Jim

In this photo you can see the 'barnacles and mussels attached to the tipple. Log on the beach and seaweed.

Pictured below are the materials I'm using to have in and around the water. The fine sand is from Lowe's. I found it laying on the ground in the store. You may recognise furnace filter material. I will use this for seaweed. This is a salt water scene so you got to have seaweed. Jim
In this photo you can see the 'barnacles and mussels attached to the tipple. Log on the beach and seaweed.
Attachments
Last edited by a moderator:
N
North Coast Railroad
Guest
Thanks for the inspirational thread....I have produced four trees so far using your method. I hope to post some photos this weekend in WPF. Great work bud. Thanks again for sharing both your methods and your progress.
HOexplorer
Well-Known Member
Thanks for the kind words Devin.
The photo below shows the first pour of Woodland Scenics Realistic Water. I know there are other ways to do this. I've used two-part mixes and Magic Water. All with success. I really don't have a favorite, but I did have the Realistic Water on hand so I used it that's all.
Really it won't matter what type of water I use as this is just 'filler.' I intend to use Modge Podge on top of the Realistic Water after it has dried. I need to create ripples and the Modge Podge takes a bit of the water 'shine' down.
Like it says on the directions each pour is about an 1/8 inch. I let dry over night and pour the next pour. I think four pours should do it. I used some wood I had in the shed for a surround of this water scene. I used Elmer's Wood Glue (yellow) and when dry I caulked the wood meeting edges with clear silicone. I used the No Mildew formula.
This caulking with silicone does a great job filling in the gaps in the wood so the 'water' can be poured and not run onto your floor. Plus silcone is clear as water so no one knows it's there! I've learned my lesson trying to seal water courses. Silicone first is the answer.The cracking you see in the photo is simply air coming up through the wood. With additional pours this is covered up. Jim
Last edited by a moderator:
okiecrip621
Member
that water is lookin good well the whole scene looks great
