
You are using an out of date browser. It may not display this or other websites correctly.
You should upgrade or use an alternative browser.
You should upgrade or use an alternative browser.
Building The CMMR
- Thread starter CMMR
- Start date
Raincoat2
Well-Known Member
GARY - I'm a newbie building my first layout (in HO). I posted on the coffee shop that my wife invited me to bring our railroad out of a 20X14 room into the 20X30 family room in our unfinished basement. Not only twice the size but much nicer area. We had the benchwork already done in the small room, but no track laid yet. Now I'll unscrew everything and move it all to the larger room, redesign the layout, and rebuild. So I was reviewing your forum all the way back to the beginning and saw how you did the benchwork. Lots of good ideas. Since I've got to rebuild and do major redesigning, I might as well do a better build of the benchwork. Bolting rather than screwing modules together, adjustable feet on the legs, etc. - these are all great tips for a beginner like me. Thanks for all the ideas.
Johnny (Raincoat2)
Johnny (Raincoat2)
CMMR
Member
GARY - I'm a newbie building my first layout (in HO). I posted on the coffee shop that my wife invited me to bring our railroad out of a 20X14 room into the 20X30 family room in our unfinished basement. Not only twice the size but much nicer area. We had the benchwork already done in the small room, but no track laid yet. Now I'll unscrew everything and move it all to the larger room, redesign the layout, and rebuild. So I was reviewing your forum all the way back to the beginning and saw how you did the benchwork. Lots of good ideas. Since I've got to rebuild and do major redesigning, I might as well do a better build of the benchwork. Bolting rather than screwing modules together, adjustable feet on the legs, etc. - these are all great tips for a beginner like me. Thanks for all the ideas.
Johnny (Raincoat2)
Thanks Johnny, but I can't really take credit. Most of what I have done on the layout I have learned from other forum members or local enthusiasts. I'm glad you were able to pick up a few ideas from my post though!
One of the things that I found when I began assembling everything was that the feet were more stable without the adjusters, and since my floor is pretty level I ended up just leaving them out. The carpet and under pad takes up a lot of the minor deviations.
Good luck with the reconstruction!
Raincoat2
Well-Known Member
Thanks Johnny, but I can't really take credit. Most of what I have done on the layout I have learned from other forum members or local enthusiasts. I'm glad you were able to pick up a few ideas from my post though!
One of the things that I found when I began assembling everything was that the feet were more stable without the adjusters, and since my floor is pretty level I ended up just leaving them out. The carpet and under pad takes up a lot of the minor deviations.
Good luck with the reconstruction!
GARY - That's good to know about the foot levelers. I was going to ask where you got yours and whether having the smaller contact between leg and floor was detrimental, as opposed to having the full 2X4 touching the floor. I found some cheap levelers at Home Depot ($3.99 for 4, I think) in case. The basement room where I'll build our layout is cement, and appears fairly level, but at least I have the leveler option if I need it. I suppose another option is to lay an area rug or runner under the free-standing legs part of the layout.
Thanks again.
Johnny
CMMR
Member
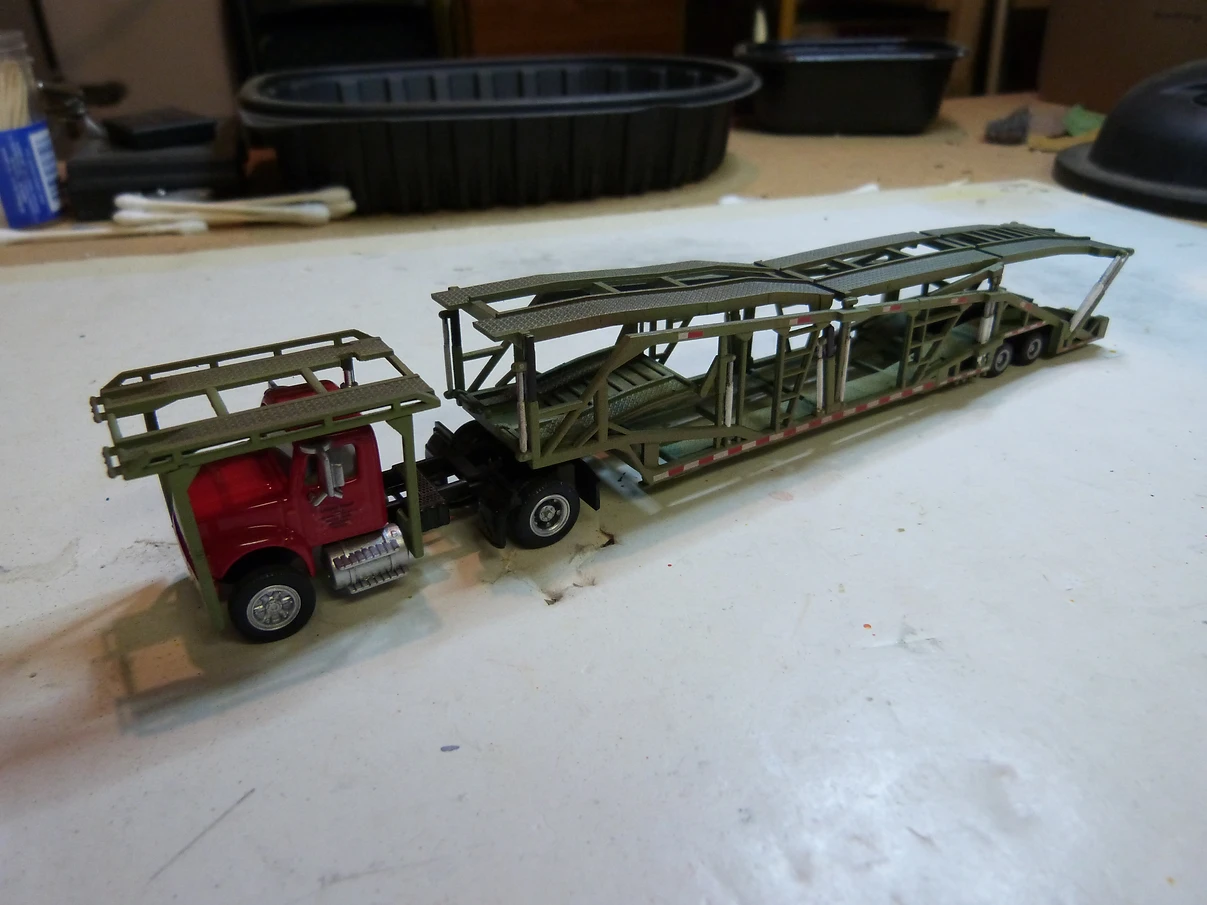
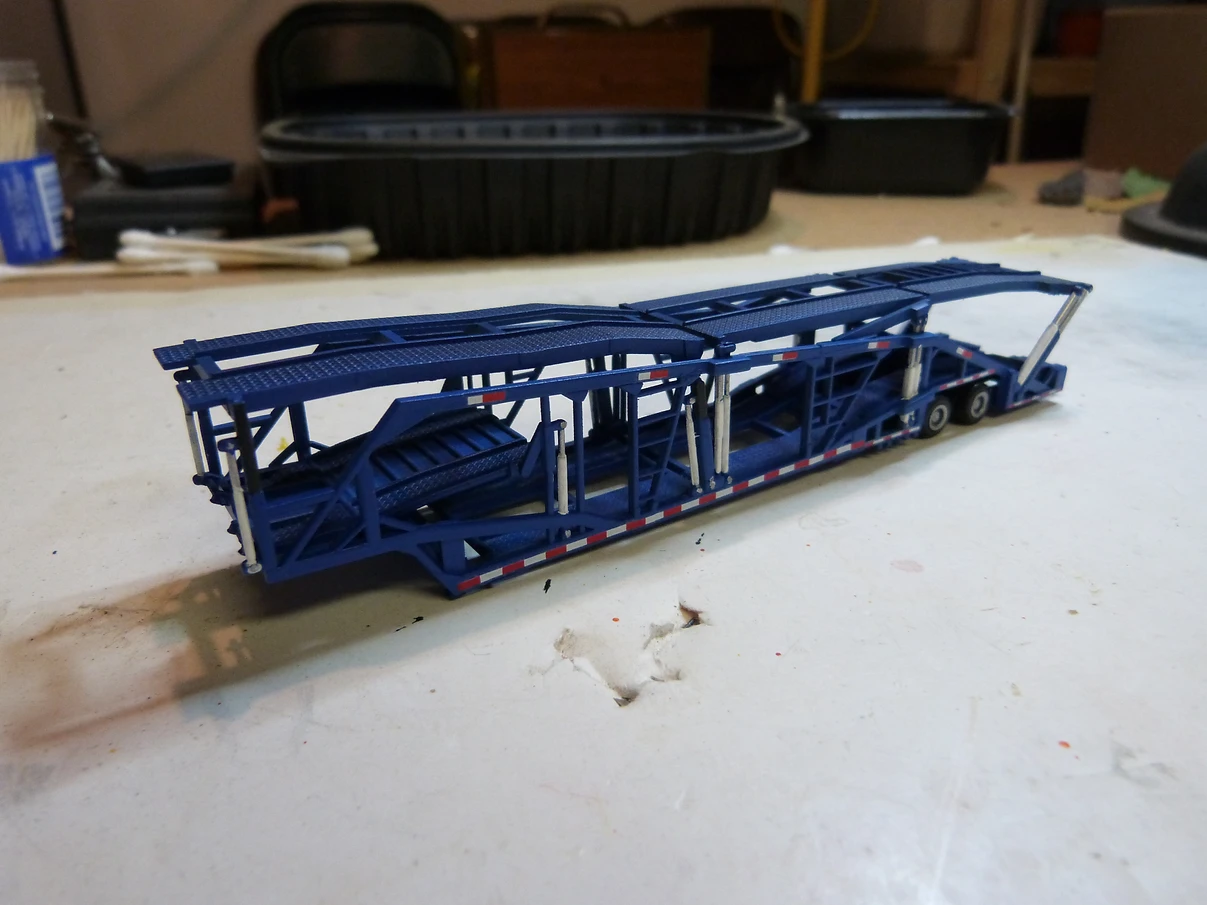
Having gotten fed up paying on average $5.00 for a little bottle of Testors acrylic paint I decided to check the Internet for an alternative. Turns out a lot of the model car guys are just using the cheap bottles of acrylic paint from Michaels and Walmart and thinning it with windshield washer fluid. If a gloss finish is required they spray floor polish!
I painted all the parts for the Distribution Facility using craft smart acrylic paint from Michaels and couldn't be happier with the results. Still need to detail, weather and decal everything, then give it a coat of clear. As part of the decals I ordered some conspicuity tape decals for the trailers, so will see how they turn out.
I also ordered some cheap cars off of ebay to fill one of the trailers. If the quality is half decent I will order more to fill the parking lot of the Distribution Facility.
CMMR
Member
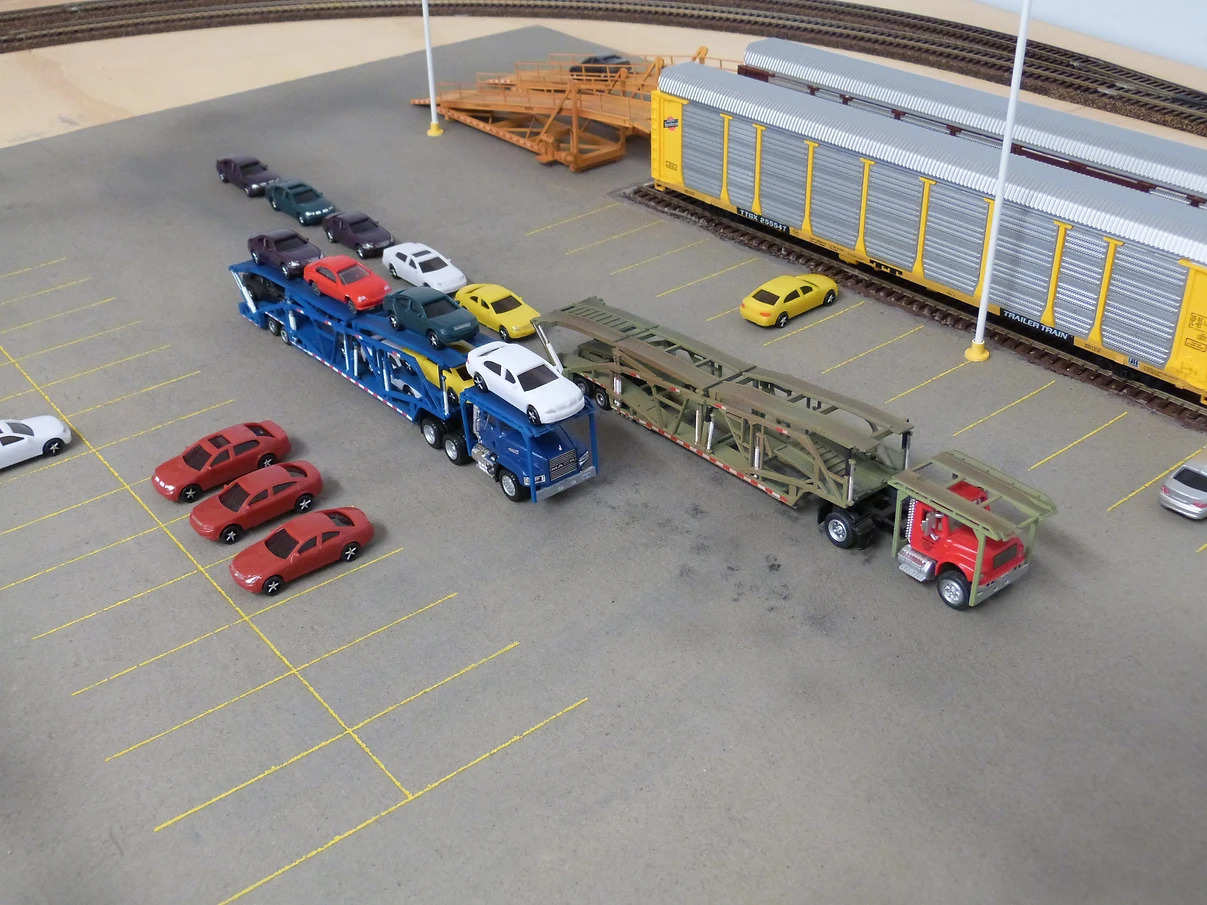
Received my package of cheap cars from ebay today. All in all they aren't too bad - maybe a little under scale but they will do fine for the Distribution Facility and auto racks. I think I will order some more to fill up the parking lot.
I also did up some decals for the unloaders as well as for the truck cabs. Will let them dry and apply them tomorrow.


I also did up some decals for the unloaders as well as for the truck cabs. Will let them dry and apply them tomorrow.
Hawkesburytrain
Well-Known Member
Very nice Gary,
I ordered the same but with head lights wired
I ordered the same but with head lights wired
CMMR
Member
The cars look right at home, are they 1/100?
Hey Rick - the ebay ad says HO but I suspect they are more like 1/100. Still close enough to fill up the parking lot and racks.
CMMR
Member
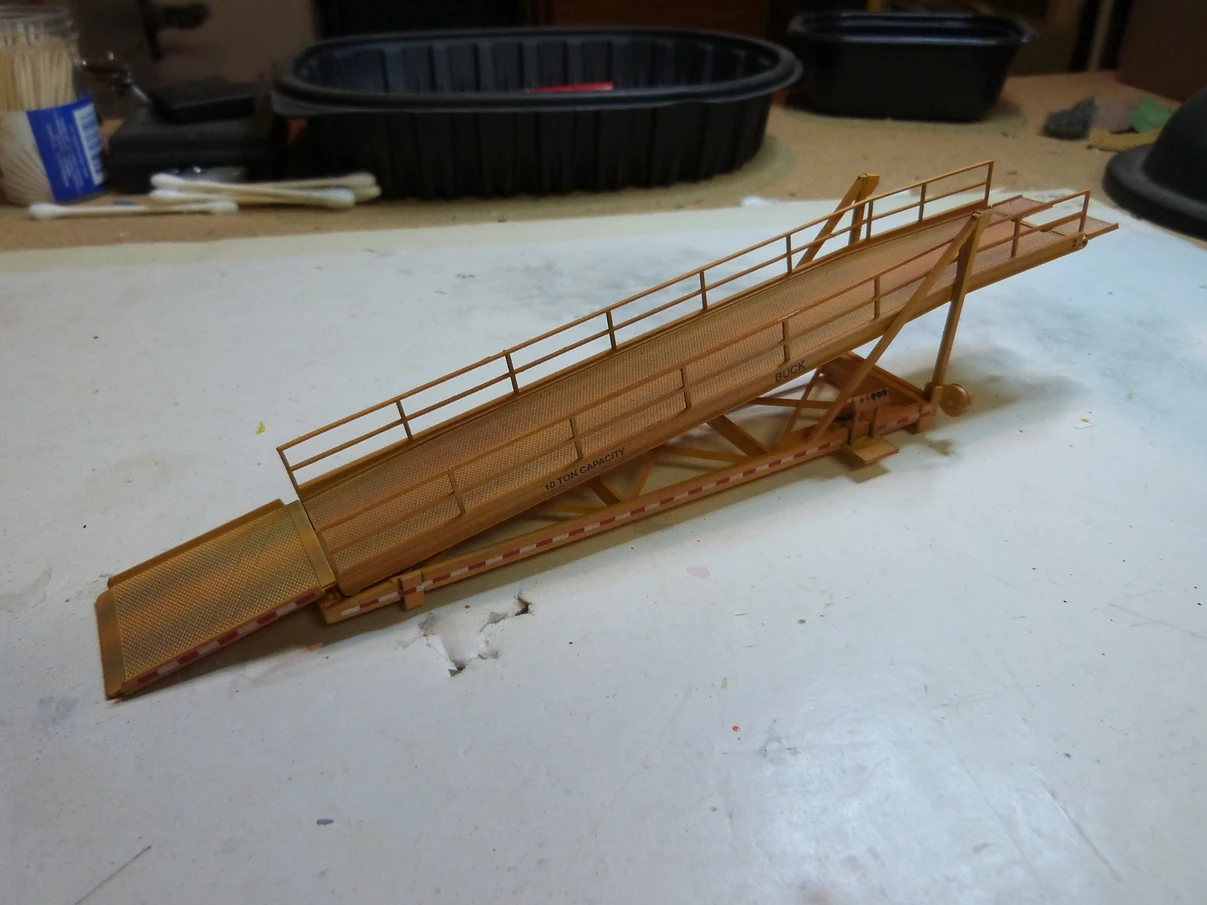
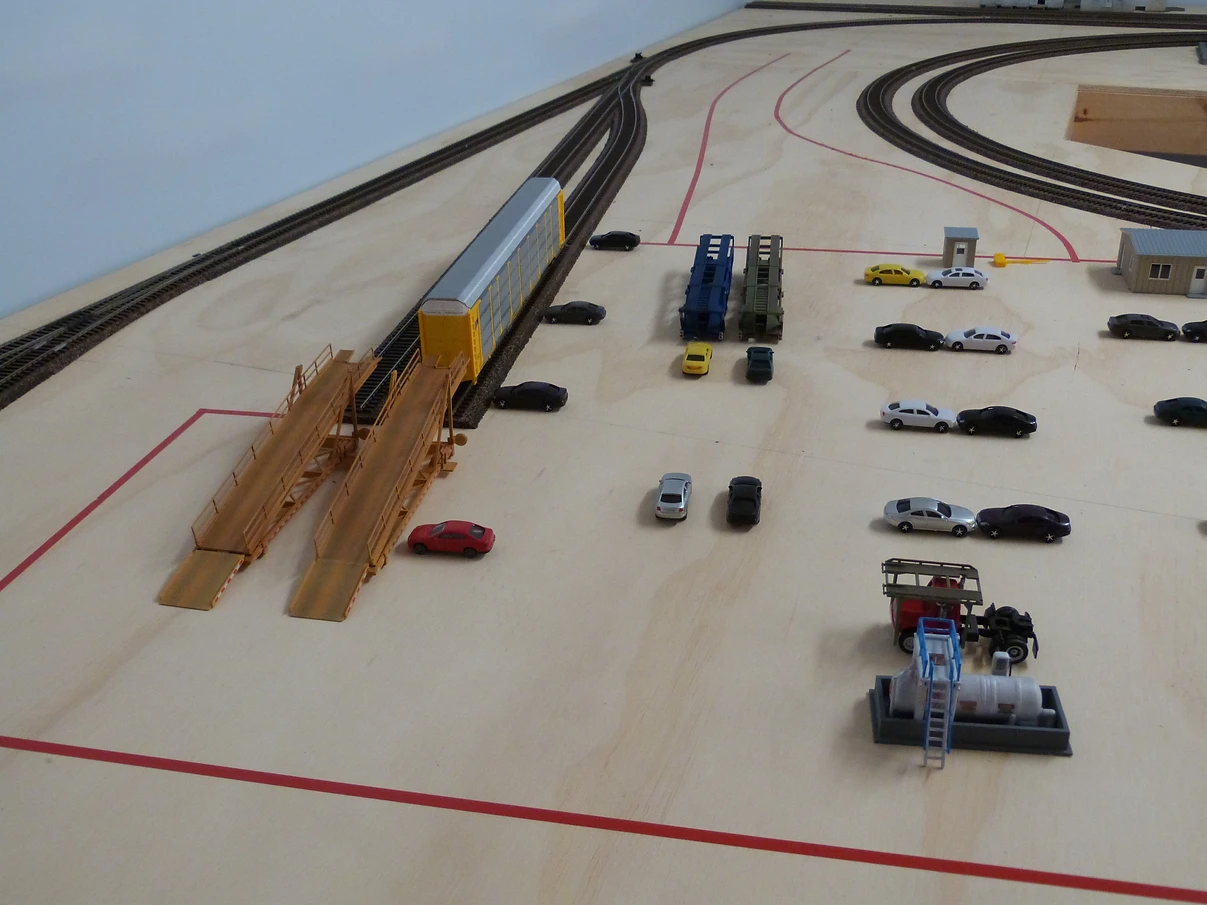
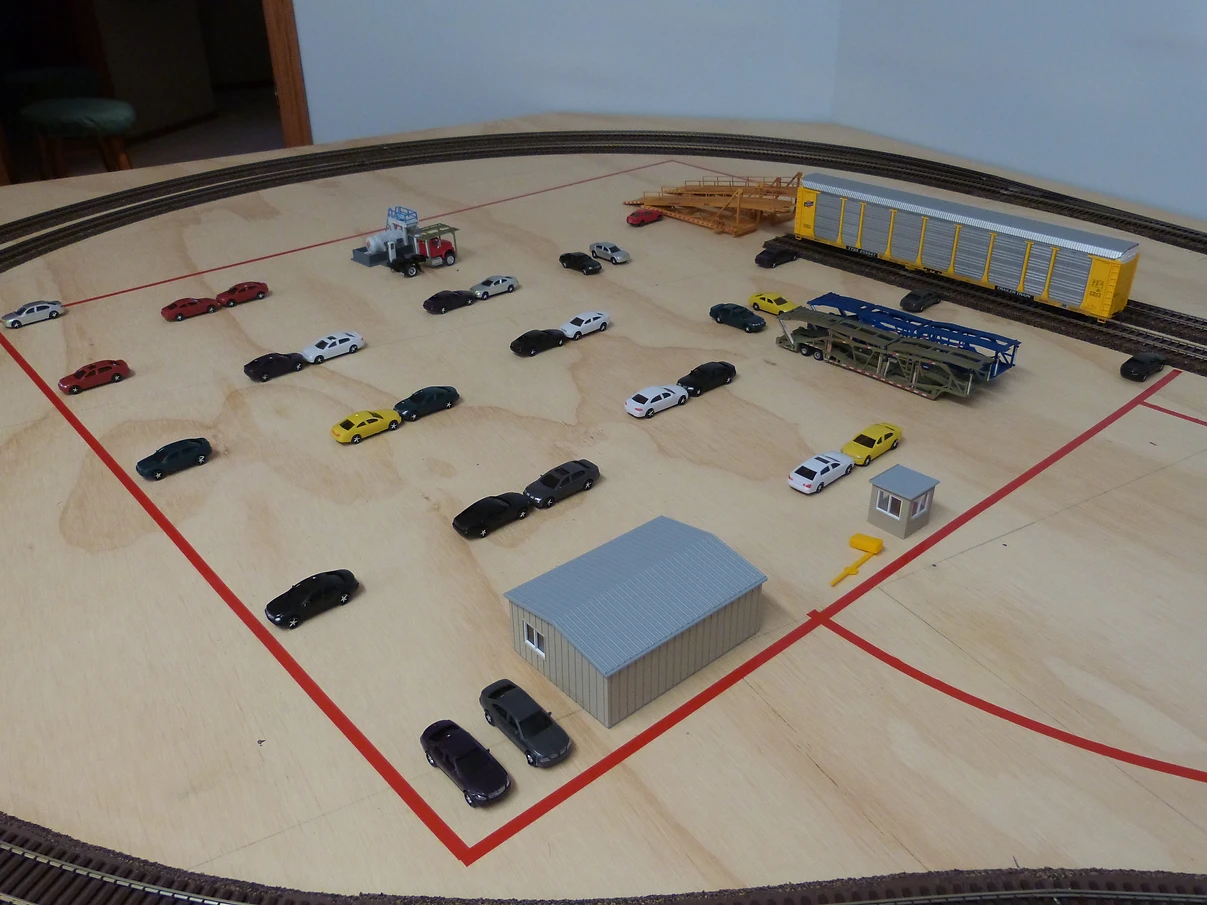
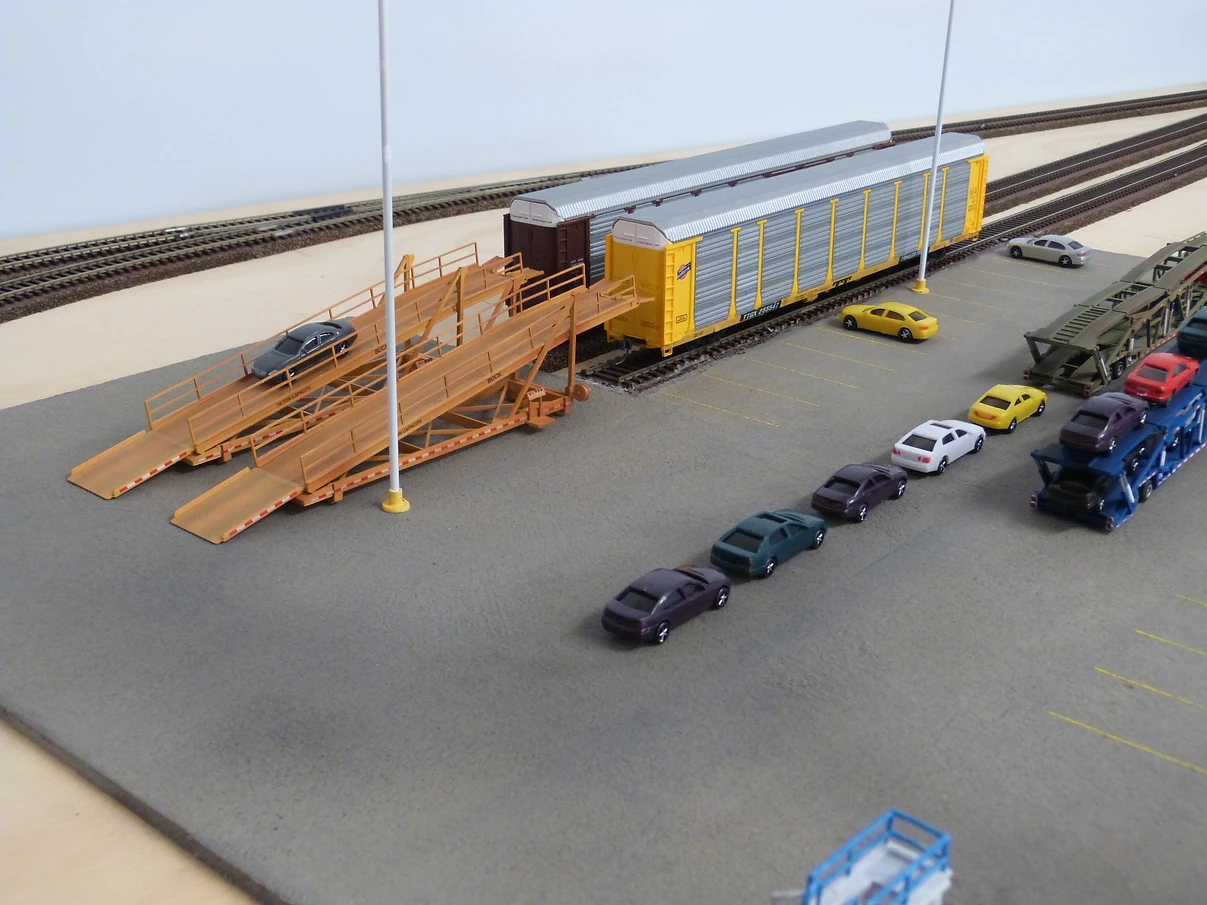
I finished painting the auto carriers and unloading ramps for the Distribution Facility. The last touch were the conspicuity tape decals.
I also laid out the facility on the layout. I tried to make the flow somewhat realistic, based on the limited space I have. The under scale cars make it appear larger than it is.
I have another cab on order for the blue carrier, and will need to order more cars to fill in the lot and one of the carriers.
The next step is to get some patching compound and start making pavement. I also need to think about what I am going to do for fencing. The fencing included in the kit won't be enough for the whole facility.
Hey Rick - the ebay ad says HO but I suspect they are more like 1/100. Still close enough to fill up the parking lot and racks.
If that's an HO carrier they're in, I would say they're HO scale.
montanan
Whiskey Merchant
I really like the auto carriers. I am interested in trying to find one, but I model the transition era and these ate too modern. Years ago there was one put out by a manufacturer who I can't remember with a Ford can over tractor. Just haven't been able to locate one of these old kits.
Nice work. I'll have to remember the paint also.
Nice work. I'll have to remember the paint also.
Rico
BN Modeller
Chet, are you looking for something like this?
REVELL HO SCALE FORD AUTO TRANSPORT TRUCK KIT #T-6021 Model 1960 SEALED PARTS | eBay http://r.ebay.com/713du6
REVELL HO SCALE FORD AUTO TRANSPORT TRUCK KIT #T-6021 Model 1960 SEALED PARTS | eBay http://r.ebay.com/713du6
CMMR
Member
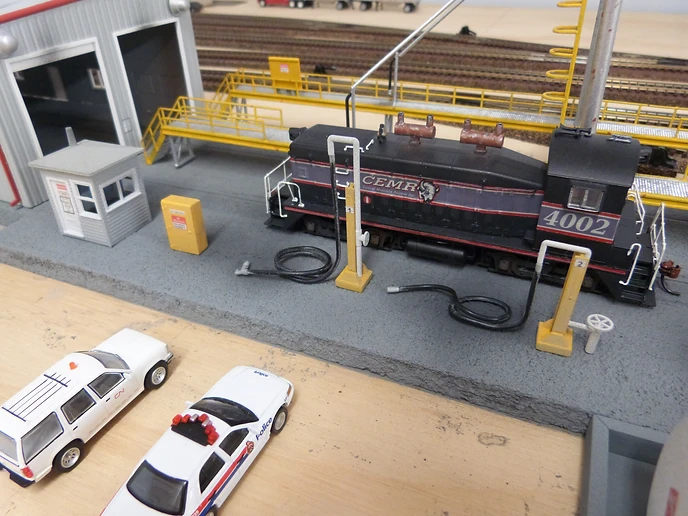
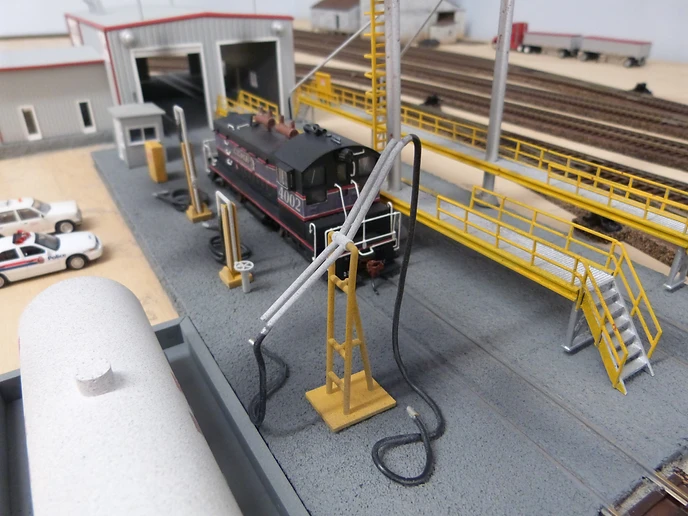
The more I thought about it the more I thought that the twin sand towers and maintenance platforms were a bit of overkill on the Maintenance Facility. I also wanted to have fueling capabilities, so I decided to eliminate one of the towers and platforms.
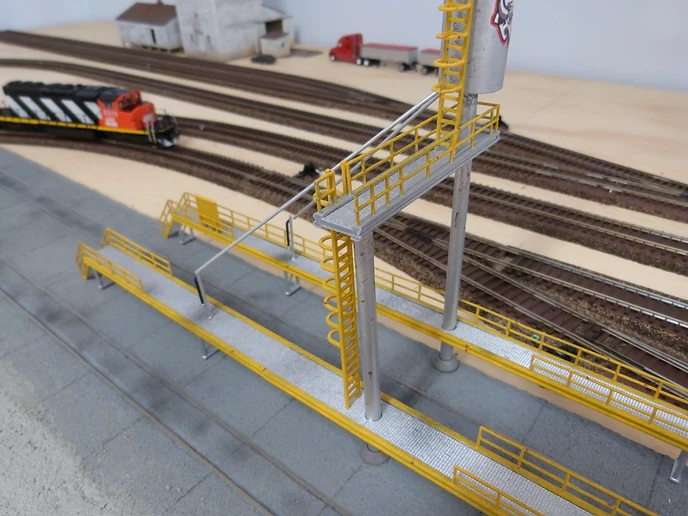
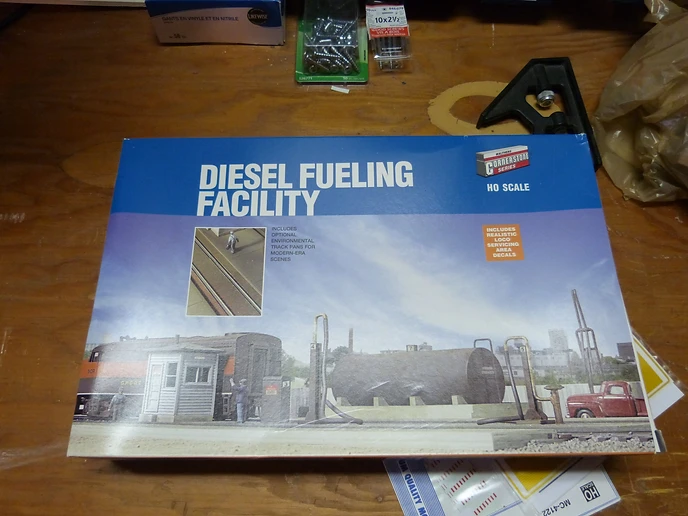
I looked for a fueling station kit and decided on the Walthers Diesel Fueling Facility. It had everything I wanted to add.
I built the kit as per the instructions but did not use the base or the track pans, as I already had the concrete put down. Instead I cut out the base brackets for the fueling cranes and used them to mount the cranes to the concrete.

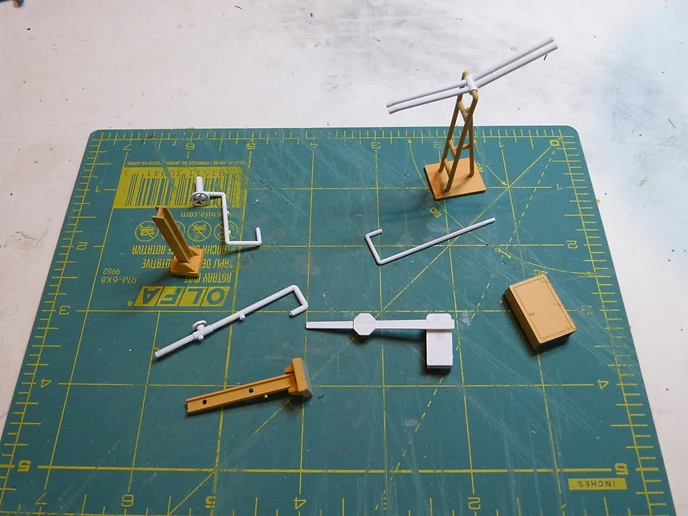
In order to fit everything from the kit and still have clearance I had to extend the concrete base.

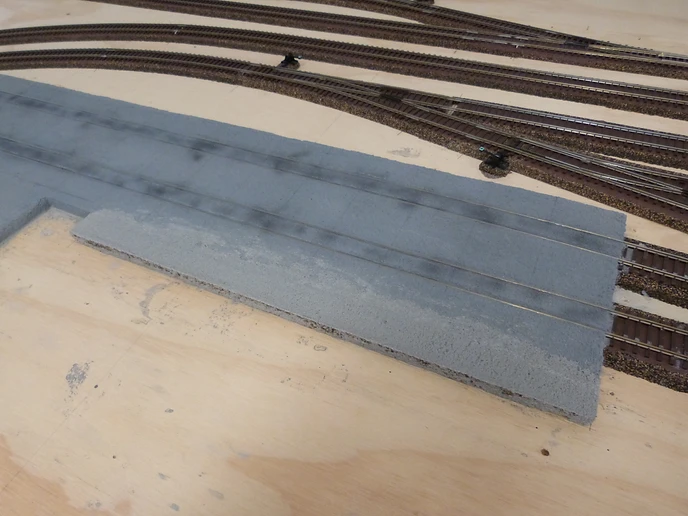
Here are some shots with the new concrete painted to match and everything mounted. I think the new additions add a little more to the scene.

I looked for a fueling station kit and decided on the Walthers Diesel Fueling Facility. It had everything I wanted to add.
I built the kit as per the instructions but did not use the base or the track pans, as I already had the concrete put down. Instead I cut out the base brackets for the fueling cranes and used them to mount the cranes to the concrete.
In order to fit everything from the kit and still have clearance I had to extend the concrete base.
Here are some shots with the new concrete painted to match and everything mounted. I think the new additions add a little more to the scene.
ScottoT
Member
I finished painting the auto carriers and unloading ramps for the Distribution Facility. The last touch were the conspicuity tape decals.
I also laid out the facility on the layout. I tried to make the flow somewhat realistic, based on the limited space I have. The under scale cars make it appear larger than it is.
I have another cab on order for the blue carrier, and will need to order more cars to fill in the lot and one of the carriers.
The next step is to get some patching compound and start making pavement. I also need to think about what I am going to do for fencing. The fencing included in the kit won't be enough for the whole facility.
Where did you get the loading ramps for the Autoracks? I need to get 3 or 4 of those for my own layout?
CMMR
Member
Where did you get the loading ramps for the Autoracks? I need to get 3 or 4 of those for my own layout?
ScottoT - the ramps were included in the Walthers Distribution Facility kit.
CMMR
Member
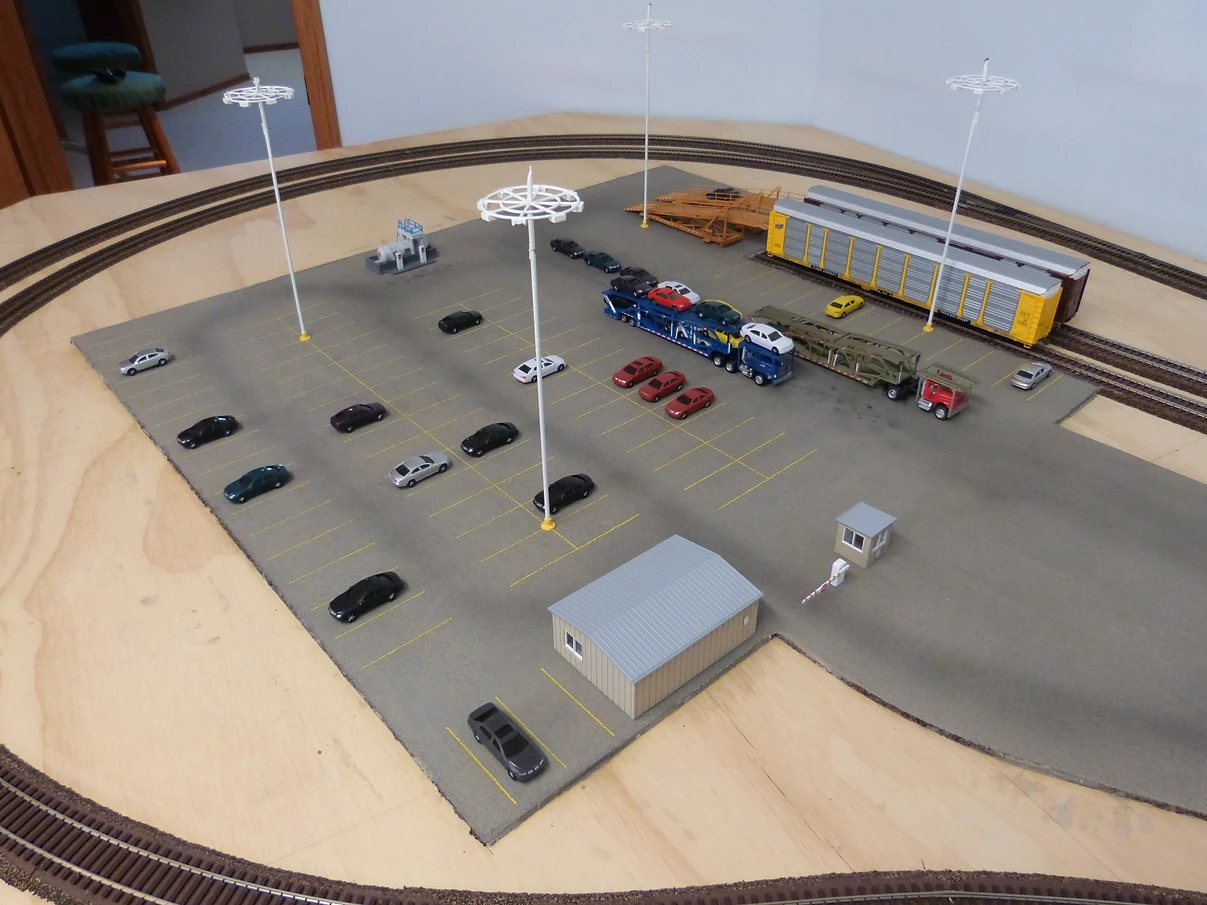
Just about finished the Distribution Facility. Still need to complete and install the fencing as well as add a few more cars.
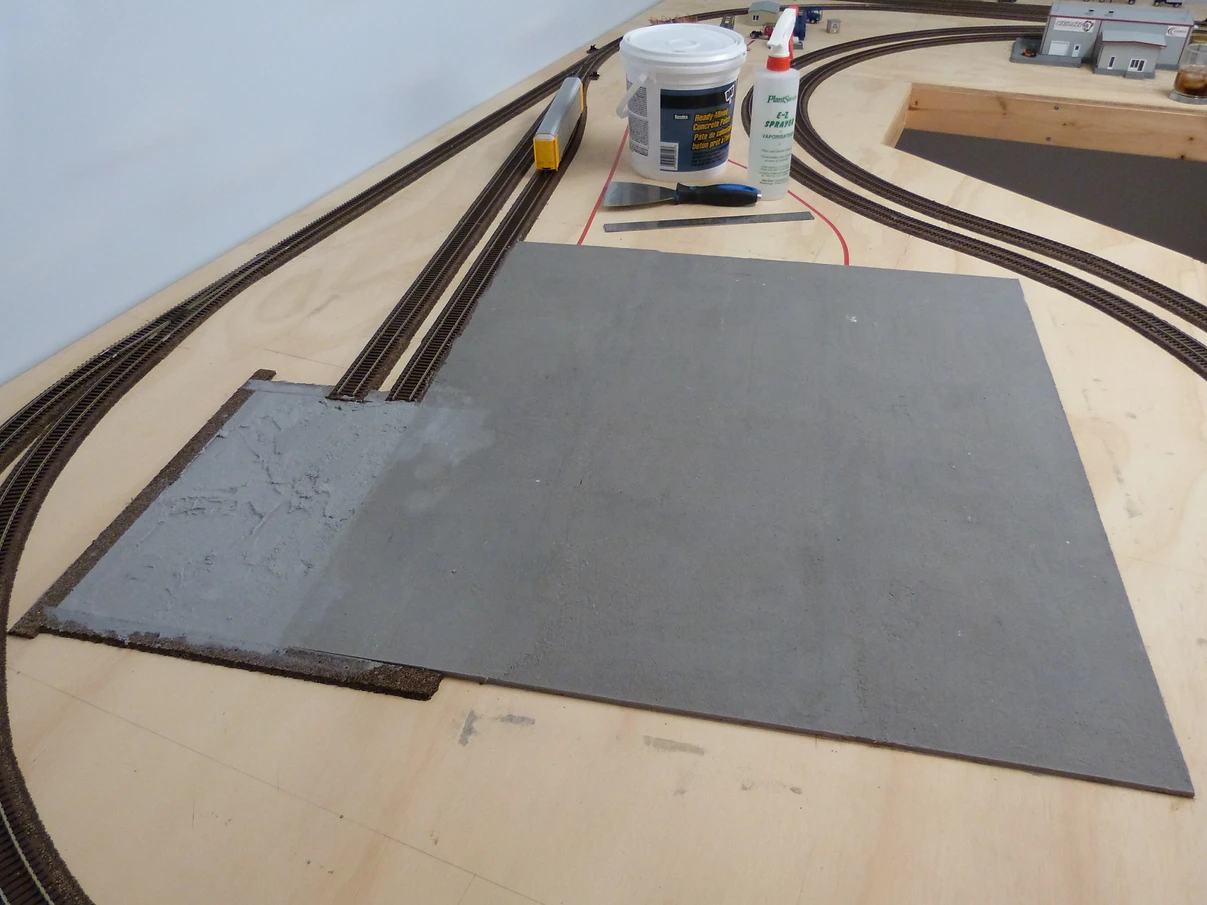
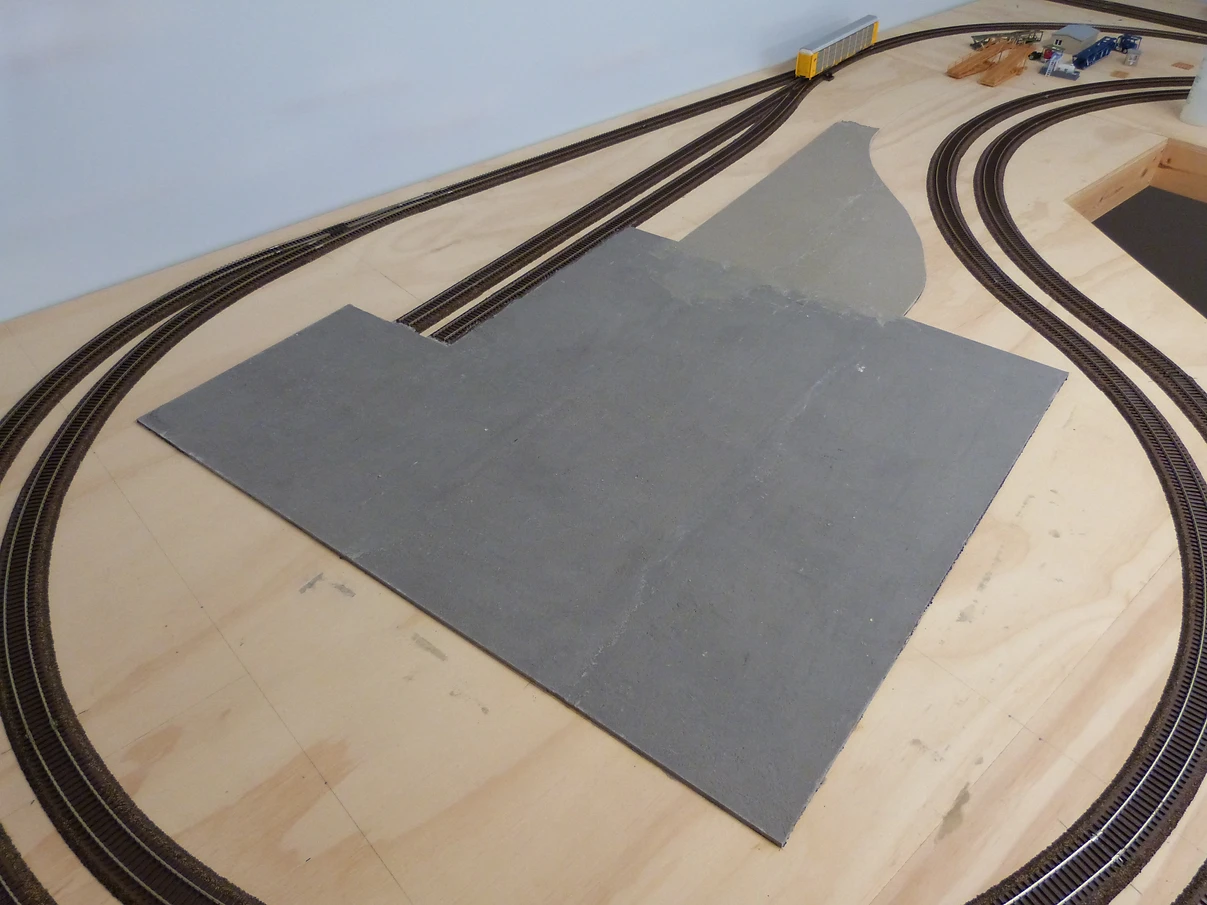
Here are some shots of the "asphalt" being put down. I followed Ken Patterson's video from Model Railroad Hobbyist Magazine. The material is DAP Concrete Patch and dries somewhat flexible. I definitely prefer it to the Stone Mason material I used for the Maintenance Facility.
I put it down in sections to help keep it level.

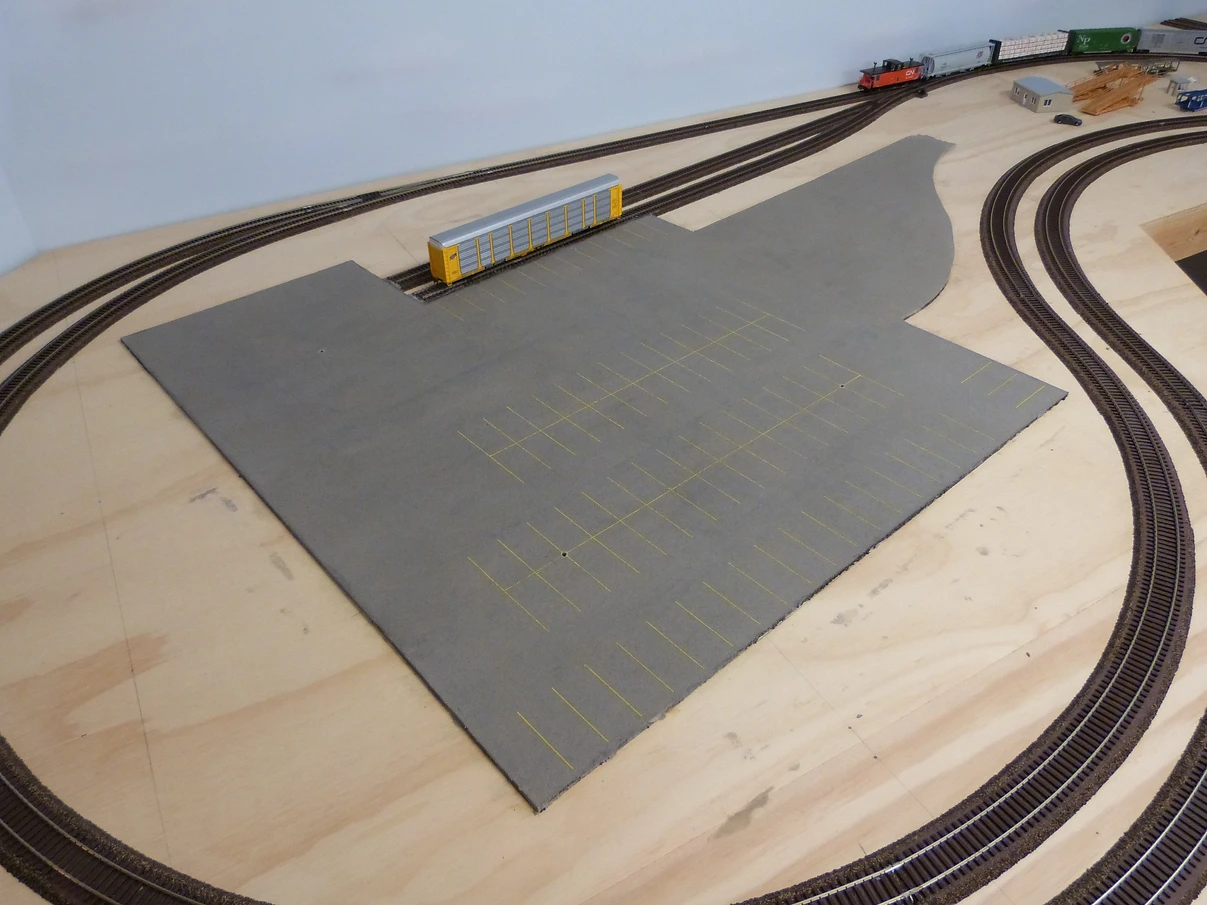
Here it is after a couple of applications of India ink wash and with the parking lines applied. I used an Extra Fine Sharpie Oil Paint pen to apply them.
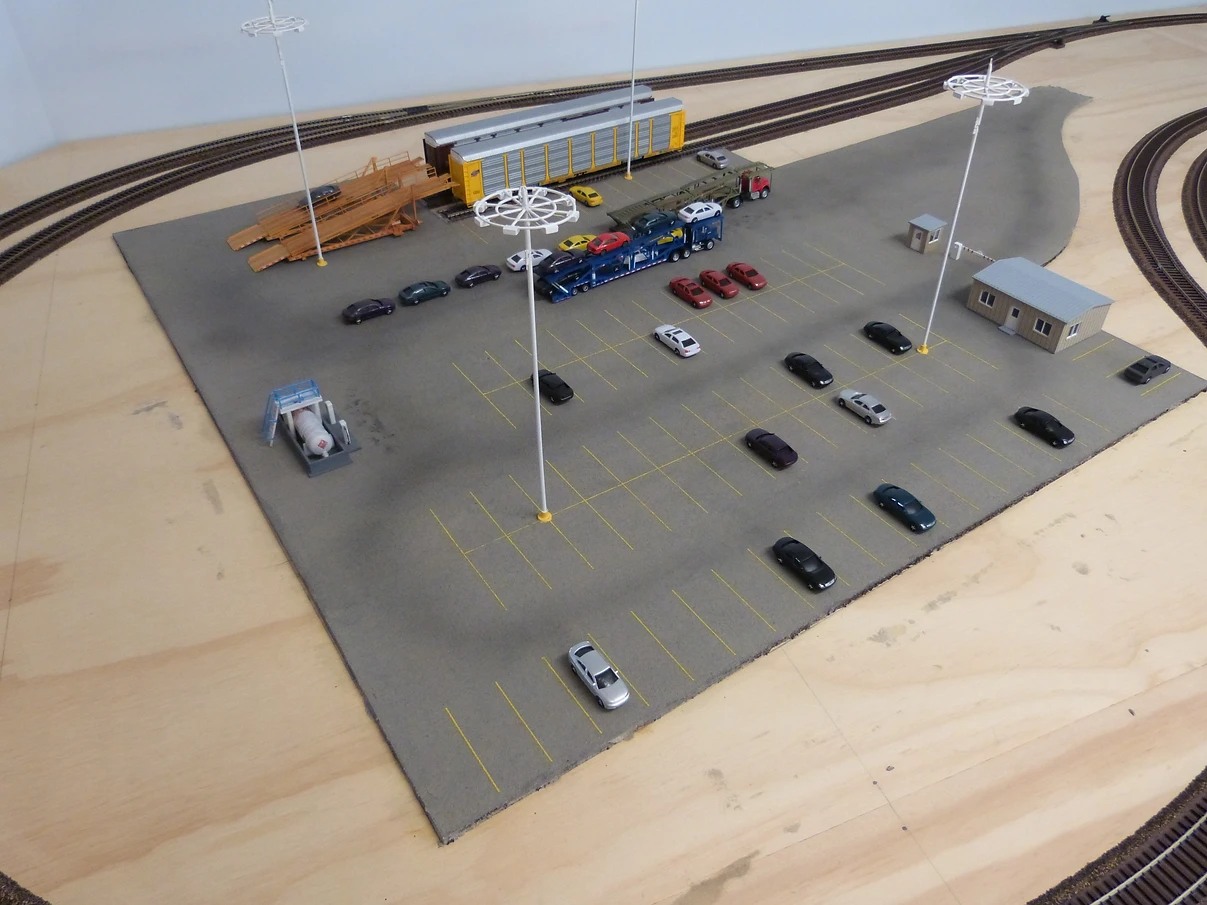
Here it is with some airbrushed weathering and all the accessories added. I ordered the lights off of Ebay - half of the LED's didn't work when I received them but the vendor did send replacements.
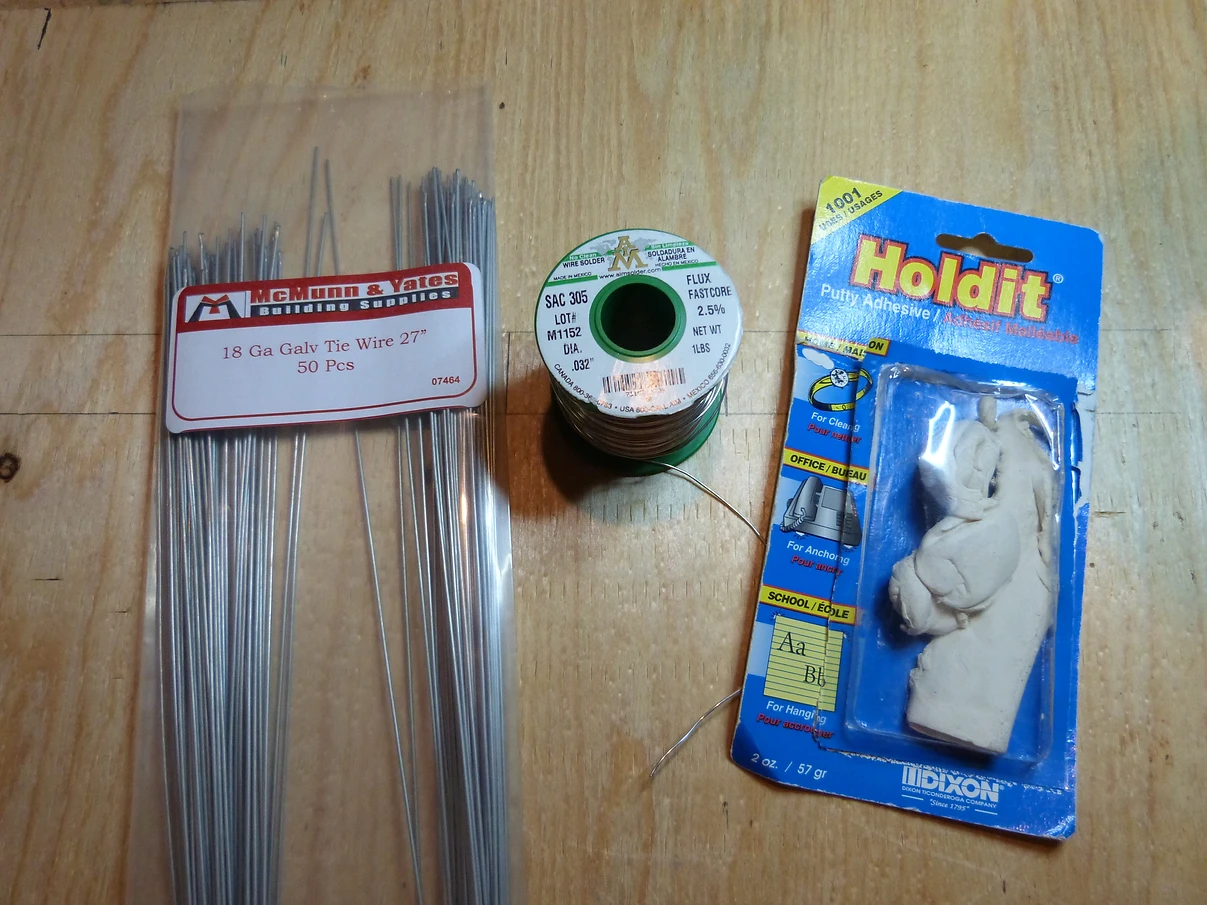
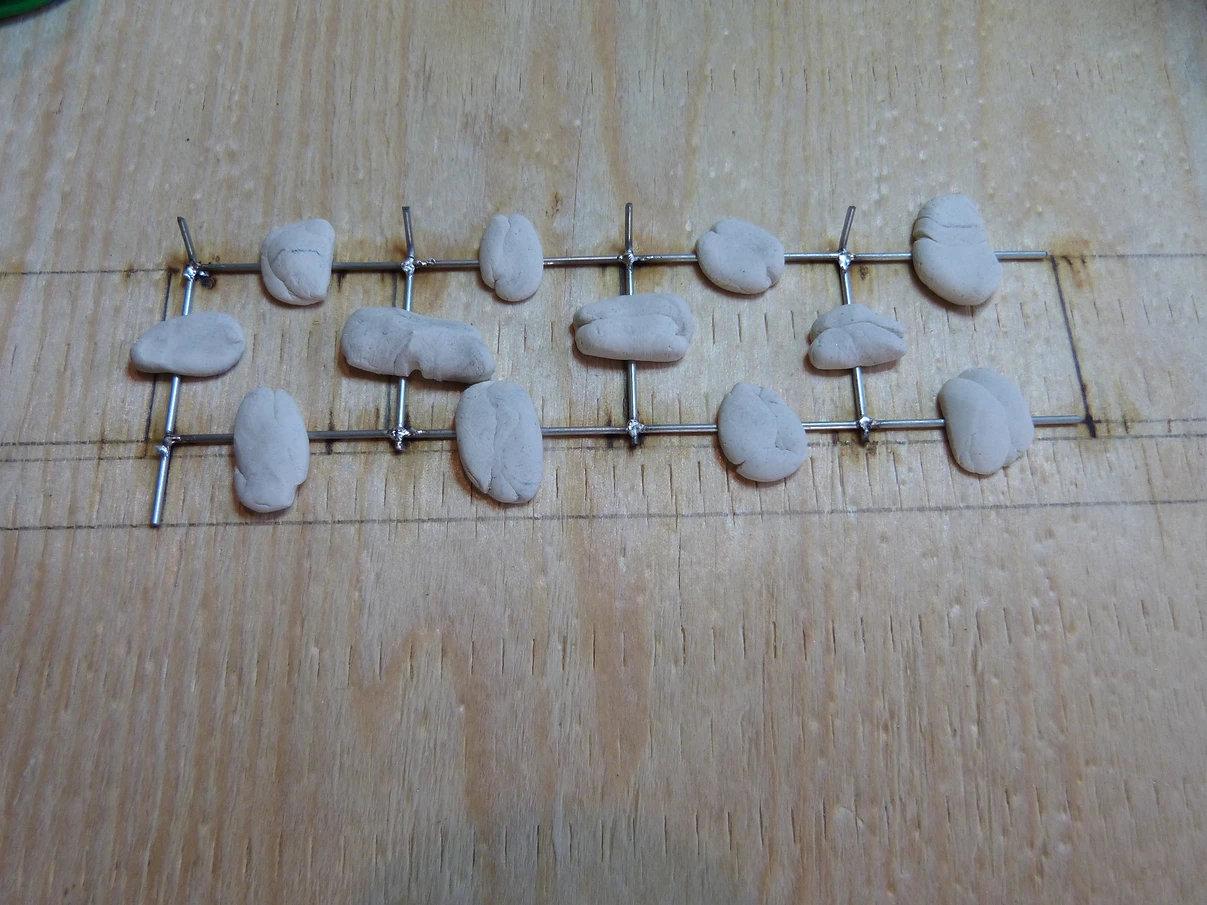
Here is the start of the fencing. I am using 18ga galvanized wire for hanging suspended ceilings. Stick tack holds the pieces in place for soldering.

Here are some shots of the "asphalt" being put down. I followed Ken Patterson's video from Model Railroad Hobbyist Magazine. The material is DAP Concrete Patch and dries somewhat flexible. I definitely prefer it to the Stone Mason material I used for the Maintenance Facility.
I put it down in sections to help keep it level.
Here it is after a couple of applications of India ink wash and with the parking lines applied. I used an Extra Fine Sharpie Oil Paint pen to apply them.
Here it is with some airbrushed weathering and all the accessories added. I ordered the lights off of Ebay - half of the LED's didn't work when I received them but the vendor did send replacements.
Here is the start of the fencing. I am using 18ga galvanized wire for hanging suspended ceilings. Stick tack holds the pieces in place for soldering.
CMMR
Member
What happened to the photos. Saw them earlier on my phone and when I came here to check them out, they're gone. Still see them on the phone???? wassup ??
I don't know Chet - I can see them on my PC.
