
You are using an out of date browser. It may not display this or other websites correctly.
You should upgrade or use an alternative browser.
You should upgrade or use an alternative browser.
Building a swamp & a Roundhouse - Lights!
- Thread starter KB02
- Start date
KB02
Well-Known Member
Got some significant work done this weekend.
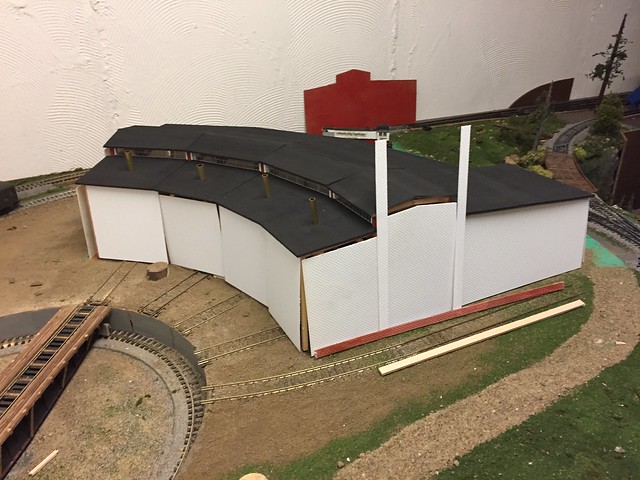
The walls are all cut out of the styrene brick sheets and mocked into place:

The two tall stacks will form "thicker pillars" that will hide some seams. Still need to cut out windows and doors.
Along the back wall, I thought that I would play a little bit with the angle and have the bricks interlock at the corners. This is a work in progress. Not sure if I will keep it or not. It could look cool... or it could look like crap... I haven't decided yet.

Painted the roof sections so they have their first coat of tar down AND the glassier was back in town:

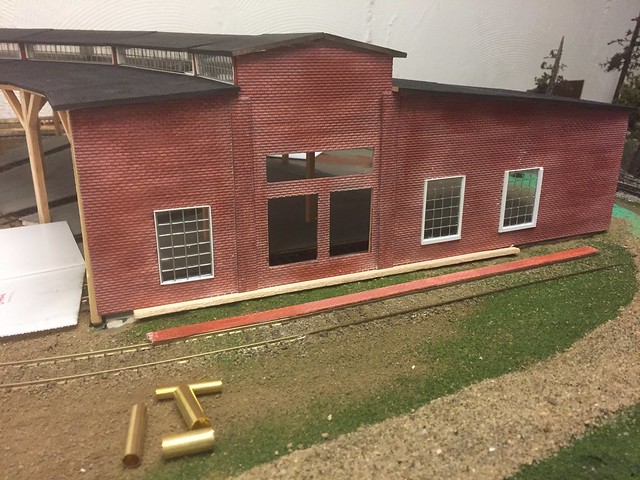
The front windows are all done and in place. The back row to go.
The windows are looking really good. Just need to get the back windows in and figure out the side windows on the walls.

The chimneys are just there for looks at the moment. They will be actually installed once I get the roof finally figured and sorted out.
And with it all mocked into place:
My first attempt at painting the bricks can be seen on the lower front edge of the building. I think I've got a pretty good formula figured out for brick color. I'm still toying with the mortar aspect, but I've got enough scrap pieces to practice with.
The walls are all cut out of the styrene brick sheets and mocked into place:
The two tall stacks will form "thicker pillars" that will hide some seams. Still need to cut out windows and doors.
Along the back wall, I thought that I would play a little bit with the angle and have the bricks interlock at the corners. This is a work in progress. Not sure if I will keep it or not. It could look cool... or it could look like crap... I haven't decided yet.
Painted the roof sections so they have their first coat of tar down AND the glassier was back in town:
The front windows are all done and in place. The back row to go.
The windows are looking really good. Just need to get the back windows in and figure out the side windows on the walls.
The chimneys are just there for looks at the moment. They will be actually installed once I get the roof finally figured and sorted out.
And with it all mocked into place:
My first attempt at painting the bricks can be seen on the lower front edge of the building. I think I've got a pretty good formula figured out for brick color. I'm still toying with the mortar aspect, but I've got enough scrap pieces to practice with.
goscrewyourselves
I'm the one
Looking great mate - very well done and can't see any reason why the brick work wont be likewise!
KB02
Well-Known Member
The guy was a bit of a jerk and certainly took his sweet time, but the windows (I think) look great.

Got some LED's in the mail this week so I can put some light inside the building. They are WAY smaller in real life that I thought they would be. Which, in a way, is fine because it means I won't be overpowering the inside with illumination.
Got some LED's in the mail this week so I can put some light inside the building. They are WAY smaller in real life that I thought they would be. Which, in a way, is fine because it means I won't be overpowering the inside with illumination.
KB02
Well-Known Member
Got some wall work done:
You know, there is something to be said for scratch building everything yourself. You can take pride in knowing that it is entirely your work and no one else's. On the flip side, if it all goes wrong, you have to own that, too. It can also take FOREVER to get things done sometimes - like cutting out a wall, or figuring out how to cut out a wall. Next time I may just buy a kit.
You know, there is something to be said for scratch building everything yourself. You can take pride in knowing that it is entirely your work and no one else's. On the flip side, if it all goes wrong, you have to own that, too. It can also take FOREVER to get things done sometimes - like cutting out a wall, or figuring out how to cut out a wall. Next time I may just buy a kit.
goscrewyourselves
I'm the one
Looks very good KB02, and your right - doing it all yourself makes it all that much better.
KB02
Well-Known Member
The walls are in place! Well, mostly. I still need to work on the stall doors, so those sections haven't been glued on yet, but all the others are on.


The back wall still has some wet glue, hence the bracing and the tilted roof, but it's in place.
And I just liked this shot:
All the roofing sections are removable if I need to get inside. And, in theory, the whole structure should still be removable so I can pick it up right off the base. The theory part comes into play depending on if any glue from attaching the walls seeped down the uprights. I have two sections that might be questionable.
KB02
Well-Known Member
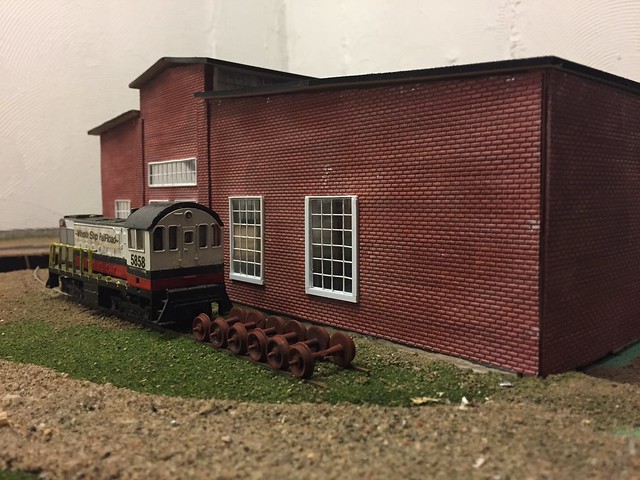
Thanks! I was really hoping to get more of a white mortar look on the bricks, but I think they came out looking fine. Then I drove past a hotel being built locally that has brick walls and they were using a brick colored mortar, so that made me feel even better.
The plan is to have good ole' 5858 sitting there beside the round house as a derelict with it's engine showing, but it might sully the look of the walls too much. We'll have to see.")
The plan is to have good ole' 5858 sitting there beside the round house as a derelict with it's engine showing, but it might sully the look of the walls too much. We'll have to see.
goscrewyourselves
I'm the one
KB02,
No question about it, this is a very impressive build!
No question about it, this is a very impressive build!
KB02
Well-Known Member
2mm LEDs are a pain in the but to work with. I'll start there.
After seeing Tony (Wombat457) put lights in his engine house, I just knew it was the right way to go, though. It has certainly been a learning experience. Glad I got 100 LED's to work with.
My first attempt at wiring up the lights was just with wire and wire alone. Not only did I find this messy, inconsistant and ugly, I found the contacts on the LED's were very fragile and able to break off very easily.

I also found that the bracing boards broke off easily and had to re-glue several of them.
Then I got smart and realized that I still had a bunch of PC Board lying around from the turnouts I built. So, I made little light fixtures that were much cleaner and sturdier.

Each "fixture" is about an inch long and holds two LED's (as you can see). I tied two fixtures together for a total of 4 LED's going through each resistor (1k ohm). I have a total of 16 lights running through 4 resistors. It came out much cleaner and with much less damage than my all-wire attempt.

With all the top lights on, it kind of gives it a blue-ish glow...

But when the lights go off...

I think it looks pretty good.
... now I've got to build some doors... or do I?
After seeing Tony (Wombat457) put lights in his engine house, I just knew it was the right way to go, though. It has certainly been a learning experience. Glad I got 100 LED's to work with.
My first attempt at wiring up the lights was just with wire and wire alone. Not only did I find this messy, inconsistant and ugly, I found the contacts on the LED's were very fragile and able to break off very easily.
I also found that the bracing boards broke off easily and had to re-glue several of them.
Then I got smart and realized that I still had a bunch of PC Board lying around from the turnouts I built. So, I made little light fixtures that were much cleaner and sturdier.
Each "fixture" is about an inch long and holds two LED's (as you can see). I tied two fixtures together for a total of 4 LED's going through each resistor (1k ohm). I have a total of 16 lights running through 4 resistors. It came out much cleaner and with much less damage than my all-wire attempt.
With all the top lights on, it kind of gives it a blue-ish glow...
But when the lights go off...
I think it looks pretty good.
... now I've got to build some doors... or do I?
KB02
Well-Known Member
I was going to power the lights off of track power through a toggle switch, but instead I realized that I still had a decoder powering the turn table with all it's lighting wires open. SO, of the two banks of lights in the building, the first bank is powered off of the Headlight wire and second powered off of the rear light wire. This was all the lights can be turned on and off right from the throttle.
I'd like to think that this is clever, but I'm sure that someone will tell me that I'm running to much power through the decoder. Seems to be working for now, though.
I'd like to think that this is clever, but I'm sure that someone will tell me that I'm running to much power through the decoder. Seems to be working for now, though.
goscrewyourselves
I'm the one
KB02,
I really like how you did your lights, using those little boards certainly made things clean and neat AND much easier to connect to the structure.
I have no idea how you are powering them, or more to the point, understand how you are doing them; however, they sure do look nice VERY nice, even the blue look.
The one thing I used was SMD resistors, instead of the "conventional type". They are much smaller and I thought easier to handle when it came to connecting them to the wiring.
At the end of the day though, your lighting looks great and has inspired me to get mine completed to the point of being able to see how my shop lights up with all lights connected and in the dark.
KB02
Well-Known Member
Wired to a decoder, just like the headlights of a locomotive.KB02,
I have no idea how you are powering them, or more to the point, understand how you are doing them; however, they sure do look nice VERY nice, even the blue look.
goscrewyourselves
I'm the one
Interesting way to do it and am glad it is you doing it Personally, and being the electronics guru I am I think the idea is very clever!
Personally, and being the electronics guru I am I think the idea is very clever!
Last edited:
Greg@mnrr
Section Hand
The round house looks great with the lighting installed. Good idea.
In a two stall engine house I have on the C&MN, I used metal clothes hangers and stripped off the finish and installed two hangers the length of the building. The hanger rods on high in the structure and would not be noticed. On the hangers, I installed lamps with shades and fed power to each of the hangers, now brackets. I soldered the lamp leads directly to the brackets.
The only problem was that I darken the windows of the building and the lighting isn't visible through the windows and limited to viewing only when the door are open.
Great planning.


goscrewyourselves
I'm the one
Fantastic result KB02 ... very impressive indeed!
