Bridges along the Northern Pacific's Butte Shortline.


N

NP2626

Guest
I've taken some photos showing all the bridges on my layout. My layout is called the Butte Shortline; however, none of my bridges actually existed on the real butte Shortline. The bridges are mostly Atlas Bridge Kits. I have modified almost all of these bridges and have scratch built or Kit Bashed others. I will describe what I did with each photo.

HPIM7864 (Small).JPG

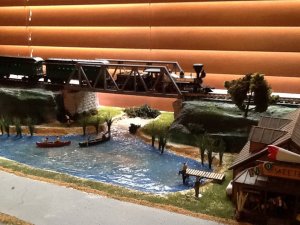
In the photo above, at the top with a train crossing it, is a ballasted Atlas Warren Truss bridge with three trusses as this is a double tracked location (Siding). The trusses are simply glued to a a plywood base, with ballasted cork road bed on top.

There are three scratch built bridges and one culvert crossing under two tracks in the Butte Yard. Scenery still needs some finishing here.

HPIM7866 (Small).JPG

This second photo shows a double tracked Atlas Deck Plate Girder Bridge with a scissors crossover on top. The actual bridge itself is a piece of 5 ply 1/4th thick plywood and the girders are simply glued to the plywood edges. I realize that no railroad would put a cross over on a bridge. However, model railroad are always cramped for space and this was where I had to put it. Both abutments for this bridge where carved from plaster.

HPIM7865 (Small).JPG

Both of these bridges are Atlas Deck Truss Bridges. The one in back is actually a stock, non-modified Deck Truss. The one forward is two Atlas Deck Truss Bridges spliced together. You will notice that almost all my bridges have been panted with Floquil Spray Roof Brown. Abutments on the left are Atlas Brick Bridge Piers that have been cut in half with their footings cut-off and modified to fit their locations. I am most attracted to Deck Bridges. I like the fact that the train seems to balance precariously on the top of the bridge.

HPIM7867 (Small).JPG

The wood trestle in the back is a Straight Campbells Tall Timber Trestle Kit # 144-216 modified with a curve. I know that Campbells offered a curved trestle, that kit must have been either more expensive; or, out of stock at the time I ordered it so I just figured I could curve the straight one; so, I ordered it instead.
 
Last edited by a moderator:
I like it! Who cares if the real railroads wouldn't put a cross over on a bridge. It's your railroad and as long as you like it who cares. I'll have to take notes on this.

Justin
 
Nice work on the bridges. So far as the crossover on the bridge goes, due to the usual lack of real estate on out layouts, we have to do what we have to do. I have a double crossover coming right off of a bridge for the same reason. Well done/
 
I have been considering a couple of bridges on my layout, just to break up the monotony of a basic oval. I like what you have done here. Gives me a few ideas for my own bridges.

Jesse
 
HPIM7868 (Small).JPG

The Deck Plate Girder bridge behind the Truss bridge is made from the Plate Girders cut off of the Atlas Through Plate Girder Bridge and glued to the bottom of the flex track in this location and the guard rails are Code 70 rails glued to the ties. The abutments for both this bridge and the Truss Bridge in front of it, again are the cut up parts from Atlas Bridge Piers.

The Warren Truss Bridge in the foreground is a stock Atlas Warren Truss Bridge. An interesting problem with this bridge is that I found the angle bracket used to support the vertical uprights on the bridge (Total eight with four per side) all caught on the steps on my passenger cars. I took my soldering gun to them and melted parts of them away and out of the way of my passenger car boarding steps.

HPIM7869 (Small).JPG

Again, this photo shows another Deck Plate Girder Bridge cut from an Atlas' Through Plate Girder Bridge. The abutments are made from Celotex Ceiling Tile glued together and carved to look like large cut rock blocks and painted to look like random stone. This bridge has it's girders painted silver and I put an Northern Pacific Monad decal in the middle section to make this bridge look different than the other Deck Plate Girder Bridge. The retaining wall to the right is from AIM Products and are plaster castings.

HPIM7870 (Small).JPG

This is my last bridge and this one is my Hoo Doo Gulch Trestle. Excepting the Atlas Through Plate Girder Bridge on the left end, this bridge is scratch built. The track is Micro Engineering's Bridge Track with Code 83 rails and Code 70 Guard Rails. Since all of the rest of my track is Code 100, I had to buy two code 100 to Code 83 transition tracks for either end of the bridge. The abutments are AIM Products plaster castings again. I have described how I built this trestle in my thread on my layout in the Forum here entitled Virtual Layout Tours: http://www.modelrailroadforums.com/...y-Northern-Pacific-Butte-Montana-Layout/page8 . So, if your interested and haven't read it already, there is a pretty complete description of how I built this trestle.
 
Last edited by a moderator:
So, I have described the 13 bridges there are on my layout. Please take some photos and show us your bridges!
 
Is anyone visiting this forum, anymore? People generally like to show-off their work! I thought maybe people would think this a fun thread to be come involved with. Maybe the SKY is falling?
 
Is anyone visiting this forum, anymore? People generally like to show-off their work! I thought maybe people would think this a fun thread to be come involved with. Maybe the SKY is falling?
I like the thread. I think it is the great sucking sound of the coffee shop. Thanks for the invitation to share. I don't really have a layout, but from our Christmas display I set up the modulars. And there are two bridges there. I'll update this post with their pictures later this evening.

The "small stream crossing" module done by my youngest son. Not really much to look at, a standard trestle other than it is double track. Basically two Atlas trestles cut and spliced together.
trestle.jpg

The "canyon" module done by my eldest son in 1999 for the NMRA national convention in St. Louis. The bridge is a Walther's Warren Truss. It doesn't really have a base. The track is laid on 3/4" plywood with "L" braces on either side to hold the bridge up. It was necessary due to the rough treatment that modulars get with all the setup and tear downs. The "rock" buttress is a real support but is also 3/4" plywood with rock paper over it. The short deck span to the left is also just deck bridge pieces glued to the side of the plywood.
deepcanyonbridge.jpgdeepcanyon2.jpg
 
Last edited by a moderator:
Thanks for posting a photo Iron Horseman! I don't get it, either! The Coffee Shop get so much action that it is difficult to keep abreast of, while the rest of the Forum languishes.
 
Last edited by a moderator:
For some reason, I just this morning opened this thread. Mark - Really a great job on all the bridges (I love bridges on a layout).
Iron Horseman - That module is great looking. Kudos to your son!

I have a couple bridge photos hiding somewhere? I'll have to look for them and post, maybe tonight or tomorrow.
 
I guess I didn't read carefully enough that you wanted to see our bridges as well. I will show the trestle I built for my N Scale layout. Its a double track, and my very first scratch build project. It is now being torn down to make the switch to HO.

attachment.php


attachment.php
 
Nice assortment of bridges Mark!
I'm just working on a new layout right now so no photos to show.
I also do what you described by narrowing an Atlas plate girder bridge and turning it upside down.
I also turn N scale plate girder bridges upside down for smaller spans on the ends of larger ones.
 
Atlas bridges are very nicely made, inexpensive and there are a variety to chose from. Cutting them up into usable parts for something different in a "Bridge Bash", only makes sense!
 
I love bridges , never enough bridges on a model railroad. That must have took quite a bit of planning to get your bridges to cross other rails like you did.
 
I love bridges , never enough bridges on a model railroad. That must have took quite a bit of planning to get your bridges to cross other rails like you did.


Lynn, I assume you are talking to me. Actually, there wasn't much more planing to have a bridge cross tracks, than to have bridges cross any other obstacle. I drew the track plan for the layout on my drawing board and noted where the tracks crossed other tracks and that was that! What type of bridge to cross the tracks with, was decided when I built and detailed the area around the crossing. I knew I had to make the bottom of the bridge a specific height above the rail-heads of the track it crossed and that was all that it really took as far as calculations. Dimension H of the NMRA HO Standards Type II Gauge gives this dimension as 2 and 11/32nds inches. This would be the minimum necessary between the rail-head(s) being crossed and the underside of any part of the bridge crossing them. This would describe the dimensions used for the deck girder bridge which is the second photo in post # 5. The third photo in that post is actually higher than the standard, as I needed to match up with track to the right in this photo.

When I designed this area originally, the track work was much different in this area. I didn't like the steep grade I had designed into the original design, so I changed this, put in a grade crossing and made a loop for the grade up. My ruling grade on my layout is calculated to be an uncompensated 2%.
 
Last edited by a moderator:
I only managed to get one bridge on my layout. I am modeling the area where I live and there is only one river to cross in the route that the railroad would have followed. There is a road bridge crossing the same river, guess that could be counted.

20180128_163203.jpg
 
Lynn, I assume you are talking to me. Actually, there wasn't much more planing to have a bridge cross tracks, than to have bridges cross any other obstacle. I drew the track plan for the layout on my drawing board and noted where the tracks crossed other tracks and that was that! What type of bridge to cross the tracks with, was decided when I built and detailed the area around the crossing. I knew I had to make the bottom of the bridge a specific height above the rail-heads of the track it crossed and that was all that it really took as far as calculations. Dimension H of the NMRA HO Standards Type II Gauge gives this dimension as 2 and 11/32nds inches. This would be the minimum necessary between the rail-head(s) being crossed and the underside of any part of the bridge crossing them. This would describe the dimensions used for the deck girder bridge which is the second photo in post # 5. The third photo in that post is actually higher than the standard, as I needed to match up with track to the right in this photo.

When I designed this area originally, the track work was much different in this area. I didn't like the steep grade I had designed into the original design, so I changed this, put in a grade crossing and made a loop for the grade up. My ruling grade on my layout is calculated to be an uncompensated 2%.
Yep Mark I was referring to you :) , do you have a track plan kicking around ? I would be interested in seeing it. When I see your bridges and the rails in the background it reminds me of a John Allen type railroad. My railroad is an around the wall loop to loop and I tried designing in what you accomplished and still have space for structures and managed one bridge crossing a rail, but do have many others and plans for more.
 
I have the one bridge by Moe's bait shop
 

Attachments

  • image.jpg
    image.jpg
    264.6 KB · Views: 139
Last edited by a moderator:
Well, I don't know why two of the photo's aren't showing now. Will try to re-upload them tonight.

Seems to have worked. Pictures are back in the post above.
 
Last edited by a moderator:
Iron Horseman - That module is great looking. Kudos to your son!
Ha, you saying this just reminded me. He spilled an entire bottle of XR-7 polystyrene cement while building it. It started melting the plastic top of the portable table he was working on, before we could get it sopped up.


Back
Top