B&M Railroad (Ben & Me)


Hi Iron Horseman,

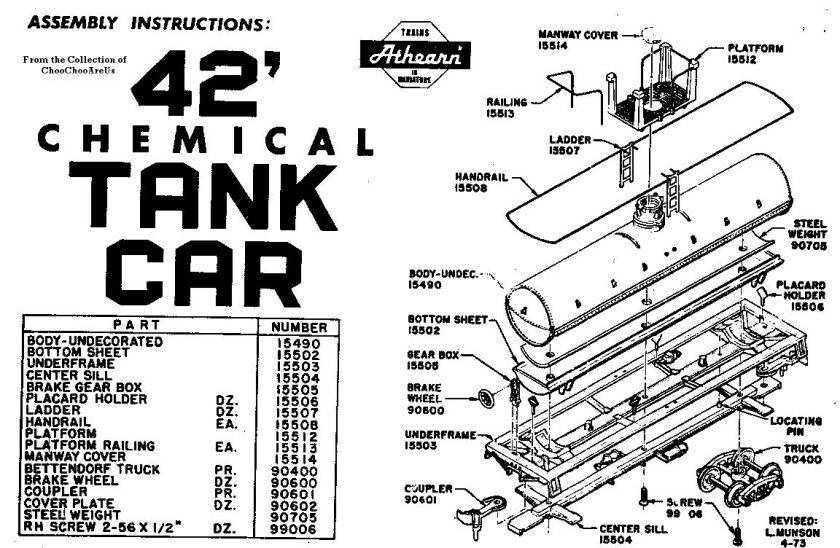
Thanks for all the good info. I'll start checking the wheels and the flanges and the trucks and see what I find. I did go with code 83 track, and I believe it is a AHM car that is derailing. The car missing a coupler is a Hooker tanker, HOKX 56656. I couldn't find any manufacturer name or where it was made, but a nice gentleman at Kadee looked at some pictures of it and thinks it may be Athearn. I'm planning on replacing all the plastic wheels with metal ones and getting Kadee couplers to replace all the plastic horns.

Oh, what's a good way to check the wheel gauge? Calipers? Eyeballing it?
 
The car missing a coupler is a Hooker tanker, HOKX 56656. I couldn't find any manufacturer name or where it was made, but a nice gentleman at Kadee looked at some pictures of it and thinks it may be Athearn.
Yes, that is an Athearn chemical tank. One of the few Athearn couplers not held on by the little metal clip. You have to remove "center sill" to change the couplers. This is done by taking off the two trucks and removing the center screw. Here is the diagram for it
42chemicaltankcar1973.jpg


Oh, what's a good way to check the wheel gauge? Calipers? Eyeballing it?
The best money you will ever spend is on two tools. An NMRA standards gauge, and a Kadee coupler height gauge. Should be available at any hobby store that carries trains and can be found all over the internet. Set the wheels onto the notches on the side of the NMRA gauge and one instantly knows if they are right. Saves bunches of time over setting a caliper.
WAL98-1.jpg
205-5.jpg


Thanks to HOSeeker, Front Line Hobbies, and Kadee for the images.
 
Last edited by a moderator:
Yes, that is an Athearn chemical tank. One of the few Athearn couplers not held on by the little metal clip. You have to remove "center sill" to change the couplers. This is done by taking off the two trucks and removing the center screw. Here is the diagram for it
42chemicaltankcar1973.jpg


The best money you will ever spend is on two tools. An NMRA standards gauge, and a Kadee coupler height gauge. Should be available at any hobby store that carries trains and can be found all over the internet. Set the wheels onto the notches on the side of the NMRA gauge and one instantly knows if they are right. Saves bunches of time over setting a caliper.
WAL98-1.jpg
205-5.jpg


Thanks to HOSeeker, Front Line Hobbies, and Kadee for the images.


Awesome! Thanks Iron Horseman, they are now on the list of things to get. And thank you for the directions. I'll play with it this weekend. :)
 
Ok, so, I talked with Athearn and was told that my model did not have factory sound installed so it there was a sound decoder, it was installed after it was sold. I called MRC and got some information about the decoder but he could not tell me if the MRC 1620 was for DC or DCC. He said they changed several years back from being able to do either to doing DC or DCC. I asked if it did have a decoder in it would I blow it up if I put it on DC. He said no. So, for the first time only, I popped open a locomotive and took a look inside and compared it to the schematic in the booklet. No MRC and no Tsunami sound card. The train runs fine.

After being successful, I went ahead and pooped open my Athearn GP 40. It took a few minutes but I finally figured out that the shell was held on by plastic clips and not screws. Putting it back together was the challenge. I could not get the shell to go back on, it kept going on sideways and I could not get it to go in straight. Apparently I loosened the motor and it was going in crooked. Once I got that figured out, it all went back to gather. Ran it to make sure I didn't break it!! LOL!

Now, after doing that, its time to figure out how to lubricate these things. LaBella 107 seems to be the recommendations for the shafts and some white grease is recommended for the gears. Little concerned about the white grease, several folks say it gets hard and sticky after awhile and may cause problems.
 
They certainly can't have been using it on the gears of the Intermountain SD40-2 I got recently, grease was exuding out of every axle after just a few runs back and forth along my 6' of test/programming track. Talk about overload. And mess.
 
They certainly can't have been using it on the gears of the Intermountain SD40-2 I got recently, grease was exuding out of every axle after just a few runs back and forth along my 6' of test/programming track. Talk about overload. And mess.

I hope it wasn't too much of a mess. Did it come off ok?
 
Darn. I was just looking at one of my cars and the door came flying off and landed in the trash can. It looks like the bottom rail that the door slides on came off and I can't find it. :confused:
 
Yea! Found the missing sliding door rail. I'll glue it back on once I get some modeling glue. Suppose I could use CA.

Finally got around to pulling up the track and the cork and put down some leveler to make the gate transition/line up better. Used DAP patch and leveler. It was more the consistency of grout. I put up some strips of wood on both sides so the gate will match the height of the benchwork and used a straight edge to level out the patch.

leveler.jpg

Also added an new rolling stock to my collection. Not exactly B&M but it gives you a clue to what I use. :rolleyes:

Old Spice.jpg
 
I hope it wasn't too much of a mess. Did it come off ok?

Getting the covers off the bottom of the gearboxes wasn't straight forward at all, once off was just a matter of picking it out with a tooth pick. Cleaning up the greasy marks from where it got on my fingers was annoying.
 
Getting the covers off the bottom of the gearboxes wasn't straight forward at all, once off was just a matter of picking it out with a tooth pick. Cleaning up the greasy marks from where it got on my fingers was annoying.

I'm glad you were able to get to it. Yeah, greasy marks are always fun!
 
Well, its been a while. Life has a way of keeping you busy but I finally got some time and some parts and am starting to work on the B&M again. I've collected several cars over time and got some parts to up grade them. I now have on hand some Intermountain metal wheel sets, a micro mark truck tuner, a Peco #6 Diamond Crossing to replace the Atlas crossing, a Kadee coupler height gauge, some fiber washers, and a bunch of Kadee #14 and #148 couplers. Oh, and some Testors cement. Most of my cars have talgo trucks so I'm going to cut off the connectors and put a body mounted box/couplers on them. Oh, I also lucked out getting some 1/4 oz lead weight with tape on them to add to the cars. I went to several tire places and asked if I could have some of their used lead and most of them looked at me as if I was asking for something that was totally taboo. The last place I went to, the gentleman I talked to said they didn't have any and when I told him I was going to used them on my trains, he gave me a 9 lbs box of new weights. Boy, was I surprised.

I spent some time on fixing the tracks. There were a few areas that were causing derailment issues. The biggest issue I had was with my Flying Scotsman that my grandkids gave me for Christmas. It would derail in several places almost every time. Removing some solder from the inside of the rail helped, fixing a joint helped in an other area, and in one area, I had to pull up the track, make it straighter, and fix a joint. The Scotsman flies now without a problem. Well, accept for at the Atlas diamond crossing. Always derails there as do some of my other cars. When I can, I'll pull the Atals and put in the Peco. I hope that will fix the derailment issue.

I do have another issue I need to work on. For some reason my GP 40-2 needs a push to get moving once the power is turned on. Sometimes it doesn't need a push. I've check to see if it is straddling a rail joint but it's not. I also notice that the light in the cab flickers while the engine is running reguardless of the speed. Its worse at lower speeds. I'm wondering if I need to add a few power points along the track. I have 2 loops running, each about 24' in length. I'm also wondering if there is something going on with the wheels.

IMG_2906.jpg

IMG_2907.jpg

IMG_2908.jpg

IMG_2909.jpg
 
Couldn't get the picture of the lead to upload for some reason.

This is my first attempt at repairing a car. Part of the side of the box was broken/missing so I cut a piece of plastic tab from a loaf of bread and tried to glue it in place but it didn't work. I went to check on it about 4 hours later the the tab part just fell off. I filed everything down again, added more cement and added a new piece. I'll work on it tomorrow and see how it does. I wouldn't have messed with it but the new Kadee #14 whiskers pop out of the opening and will not spring back to center. I figure I could put in a new wall, clean it up and do from there. Well see.

IMG_2921.jpg

Here are some pictures of the cars I've collected. Not the greatest. I'll take some better ones later.

IMG_2913.jpg

IMG_2914.jpg

IMG_2915.jpg

IMG_2916.jpg

IMG_2917.jpg

IMG_2918.jpg
 
Here are my GP 38-2 Bicentennial and my GP 40-2 BM.

BM Loco 200 2.jpg

BM Loco 315.jpg

I picked up a BM caboose last year but I don't have a picture of it yet. Maybe tomorrow.


This was a Christmas present from my 4 year old grandson (mommy and granny had something to do with it). Its wooden and is 16" x 36". I have it hanging over the layout.

IMG_2905.jpg
 
Well, life has a way of distracting you. I'm finally getting back to where I left off. I got new wheel sets, kayde connectors and some weights and started upgrading some of the cars. I also cleaned up the scenery a little and put a coating of plaster over it. Not pretty but it will work. I'm hoping to paint some of the "rock walls" and but a base coat of brown on the hill that will have trees on it.

Sorry about the glare off the blue bucket. Have a bunch of fish fry in there.
 

Attachments

  • IMG_3748.JPG
    IMG_3748.JPG
    267.3 KB · Views: 194
  • IMG_3749.JPG
    IMG_3749.JPG
    239.7 KB · Views: 198
  • IMG_3750.JPG
    IMG_3750.JPG
    238.9 KB · Views: 193
  • IMG_3751.JPG
    IMG_3751.JPG
    238.6 KB · Views: 197
Just got done reading thru your build. Looking good!
Hi Mike,

Thank you for your complement. I feel bad it's taken this long just to get to this point but I'm starting to get back into it. Just did some painting this past weekend and it doesn't look too bad for a first time. I'll post those pics soon. Need to paint the expandable foam and start making some autumn trees. Need to make the new gate as well. Hopefully this weekend. :)
 
Ok, some more progress. Last week I painted the rock cliffs and mountain (hill more like it) grayish and I painted the middle hill light brown and sprinkled some ground up pine bark on the wet pain. This is the first time I've ever made or painted scenery and I must say I'm surprised at how well it turned out. No were near as impressive and other members here but it will do. I'm a little disappointed on how the brown hill turned out, I thought the wet paint would have held onto the bark a lot better. It looks like the fine bark powder stuck but most of the bigger pieces didn't. I did go back with some glue and add some bigger bark and it looks better. There were a couple of area where the bark didn't stick at all but I kind of like appearance of it. It offers a little contrast. Actually, by the time I add the trees to the hill, you probably won't see much of the ground anyway.
 

Attachments

  • IMG_3788.JPG
    IMG_3788.JPG
    257.7 KB · Views: 193
  • IMG_3789.JPG
    IMG_3789.JPG
    249.6 KB · Views: 188
  • IMG_3790.JPG
    IMG_3790.JPG
    241.3 KB · Views: 184
  • IMG_3791.JPG
    IMG_3791.JPG
    440.6 KB · Views: 186
  • IMG_3792.JPG
    IMG_3792.JPG
    299 KB · Views: 197
  • IMG_3793.JPG
    IMG_3793.JPG
    468.6 KB · Views: 180
Earlier today I made some trees for the first time. The first batch came from the Woodlands Scenic forest canape, autumn mix kit. I really don't like how they turned out. They look clumpy and a bit bare on top. I dipped the trees into scenic cement and then sprinkled the flocking over it. It doesn't look like the flocking stuck to it too well. I'm sure that's more of a function of me being new to it.

IMG_3800.JPG

IMG_3801.JPG

IMG_3804.JPG


I ran out of twigs before I did flocking so I started using some super trees that I got from scenic express almost a year ago and instead of using cement I used hair spray and I must say I'm a lot happier with the results.
IMG_3805.JPG


IMG_3802.JPG
IMG_3803.JPG


I'll let them both dry overnight and put them on the brown hill tomorrow. I covered the hill in plaster so I think I'll just carefully drill a hole and use either Elmers glue or a hot glue gun to attach the trees to the scene.


Back
Top